DE Get Support

Handbook Export

Getting Started

What is Timebutler

Overview of Timebutler

Timebutler is the online solution for vacation planning and absence management with time tracking and overtime features. We also offer a Digital Personnel File and a tool for shift planning.

Every employee gets their own user account and enters their absences and working times themselves. Timebutler notifies managers, calculates the individual vacation entitlement, maintains the working time balance, and takes care of the rest.

Over 300,000 people use Timebutler to easily record and manage vacation and absences within their team, for time tracking, and for overtime management. For more than 22 years.

You can learn about the features of Timebutler here.

With the live demo, you can try Timebutler right away and log in to one of the sample user accounts as an admin, manager, or employee.

You get to know Timebutler best when you sign up for Timebutler. You’ll automatically receive a free trial period and can try Timebutler risk-free.

Sign up and set up

Getting Started with Timebutler

You can try Timebutler for free. When you create a user account, you automatically receive 6 weeks of free access and can test Timebutler with any number of users, without restrictions and without risk.

You can roll out Timebutler in your company in no time. To do so, create an initial user account, and you will receive the login credentials by email. Log in to your user account with these credentials, and the setup wizard immediately guides you through the first steps. After that, tailor Timebutler to your needs and create user accounts for your colleagues.

Timebutler sends welcome emails to your colleagues and ensures they log in to Timebutler.

If you don’t have a user account yet, just start here.

Free trial period

When you create your first user account in Timebutler, you automatically get 6 weeks of free access and can test Timebutler with any number of users, without limitations and without risk.

Most companies use the trial period to test Timebutler with, for example, 10-15 employees. Once they decide on Timebutler, they invite the remaining employees.

Get started here

Transition after the trial period

During the trial period, you can use Timebutler with all features and without restrictions. Timebutler will notify you in good time before the trial period ends.

If you don’t want to continue using Timebutler, you don’t need to do anything: the trial period ends automatically, and there is nothing to cancel.

If you choose Timebutler, you can conveniently order a subscription extension online. Your colleagues won’t notice that you extended the subscription in the background.

For this reason, you should enter real data during the trial period rather than sample data, so that you don’t have to delete the sample data and enter the correct data at the end of the trial period. When you extend the subscription, all user accounts, entries, settings, and other data is retained, and you can continue working seamlessly with your existing user accounts.

If you continue working with Timebutler after the trial period, you can of course also delete all your test entries (absence entries) conveniently in the List view of the absences.

Set the Start of time tracking date to the date on which you start using Timebutler. This greys out all earlier working time entries so that they are not included in the working time balance.

Switch to Timebutler, transfer of data

If you already use software for vacation planning, absence management, or time tracking, you can switch to Timebutler easily and conveniently. Several options are available for importing a wide range of data:

User accounts

You can create user accounts using the bulk import instead of entering them one by one. Here you can find information about the bulk import of user accounts.

Vacation requests and absence entries

You can also create vacation requests using the bulk import. Here you can find information about the bulk import of absences.

Working time balances

Employees have an overtime balance when they start time tracking with Timebutler. You can enter this working time balance as of the start of time tracking in Timebutler, so that employees begin their first day of time tracking with the correct starting balance.

Mid-year start with Timebutler

If you start using Timebutler mid-year, for example in May or August, you need to decide how to handle working time and the vacation and absence entries from previous months. Here is the best way to proceed:

Transfer vacation requests

Timebutler manages vacation balances by calendar year. For this reason, it is best to enter all vacation requests for the entire calendar year in which you start using Timebutler. You don’t have to enter them manually; you can import the absences using the bulk import in Timebutler.

Here you can find information about the bulk import of absences.

Transfer absence entries

As a rule, you don’t need to add absence entries that occurred before you started using Timebutler. It usually doesn’t matter when employees worked from home or went on a business trip in the past, for example. For these other absences, it is usually enough to import only entries that are in the future. You can, of course, also import entries from the past. As with vacation requests, you import them using the bulk import for absences.

Here you can find information about the bulk import of absences.

Transfer the overtime balance for time tracking

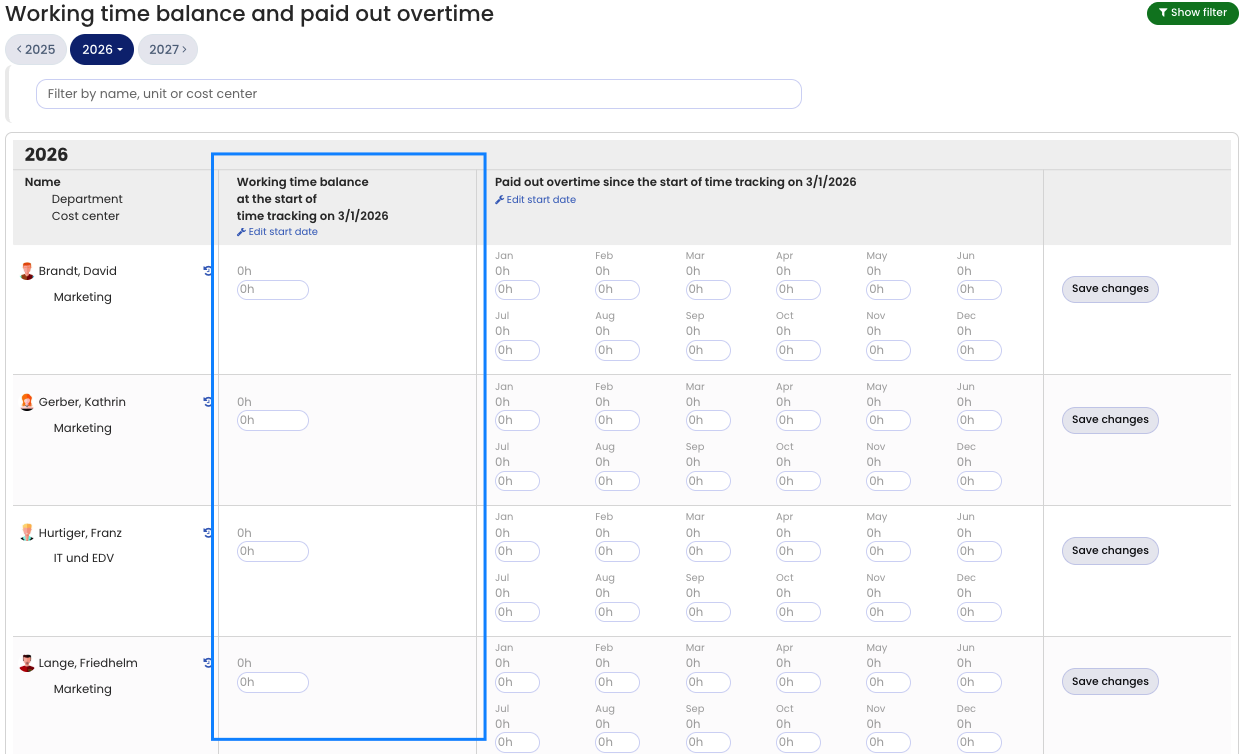
If you enable the time tracking feature in Timebutler, you need to enter the overtime balance that each employee has accumulated up to the day time tracking starts. You don’t have to do this in advance. Since this balance is only final on the start day itself, it is enough to enter it once you have started using Timebutler. To do so, log in as an admin, click Settings > Working time balance in the bottom left, and enter the values in the Working time balance at the start of time tracking column.

First steps for admins

Credentials and sign-in

You start with Timebutler by creating your first user account. You receive a user account with full admin rights. Timebutler sends you the login credentials by email straight away.

Use the credentials to log in to your Timebutler user account. The setup wizard then starts automatically and guides you through the first steps.

After that, set up Timebutler at your own pace and adapt it to your company’s needs. Then create the user accounts for your colleagues and let Timebutler handle the rest.

Just start here: Get started with Timebutler

Tip: Looking for a concise quick start? Download the quick-start guide.

Setup wizard

After you create the first user account and log in to Timebutler for the first time, the setup wizard starts. It guides you through the first and most important settings.

On the first page of the setup wizard, you decide whether to enable the time tracking feature or the overtime feature, or to disable both features. The Vacation Planner and Absence Management are always enabled.

As with all other settings in Timebutler, you can’t select a wrong setting, and you can change your decision later. For example, you can start without time tracking and still enable it later at any time.

Tip: Would you like an overview of the steps for setting up Timebutler? Download the setup guide for admins.

Configure settings

After you finish the setup wizard, you are on the dashboard in Timebutler, the home page that gives you an overview of the most important information.

You can now configure the additional settings. To do so, click Settings > More.. in the bottom left and work through the various configuration options on the page. You can leave most settings unchanged; only some options need to be adjusted.

You don’t need to complete all settings before you create the user accounts for your colleagues. You can also create the user accounts first and optimize the remaining settings afterwards.

Create user accounts

When you create the user accounts, Timebutler sends a welcome email with the personal login credentials to the employees. Inform the employees about Timebutler before the welcome email is sent, so that they don’t ignore or delete it.

Now create the user accounts for your colleagues. To do so, click Employees in the top left, then click Create user account below the small Employees. You have two options:

Create a single user account

Click Create a user account, enter the details, and create a user account this way.

User data bulk import

Click the Go to Excel import button to create many user accounts automatically via import. First, download the Excel template from Timebutler. It contains all the columns needed for user accounts, such as email address, first name, last name, department, working days per week, and so on. Enter the employees’ data in the Excel sheet. Then upload the completed Excel file to Timebutler to create dozens or hundreds of user accounts with a single click.

Tip: If you have already stored the employee data in another system, you (or your IT department) can export the data from the third-party system and paste it into the Excel file. This way you don’t have to re-enter the data; you can conveniently copy and paste it.

Read here how to import user accounts with different working time models.

Send the welcome email

The following applies in both cases: you can enable or disable the Send welcome email with login credentials option.

If you enable the option, Timebutler automatically sends a welcome email with the login credentials to the employees and ensures they log in to Timebutler.

If you disable the option, no welcome emails are sent. These users won’t receive any emails afterwards either, so you can set everything up in peace first. You can send the welcome emails at a later time. Only after the users log in to Timebutler for the first time will Timebutler send them further emails.

Using Timebutler

You have successfully set up Timebutler!

Your employees have received their login credentials and can sign in to Timebutler. As an admin, you have an overview of all employees and can continue to configure settings and create user accounts in the future.

Dashboard

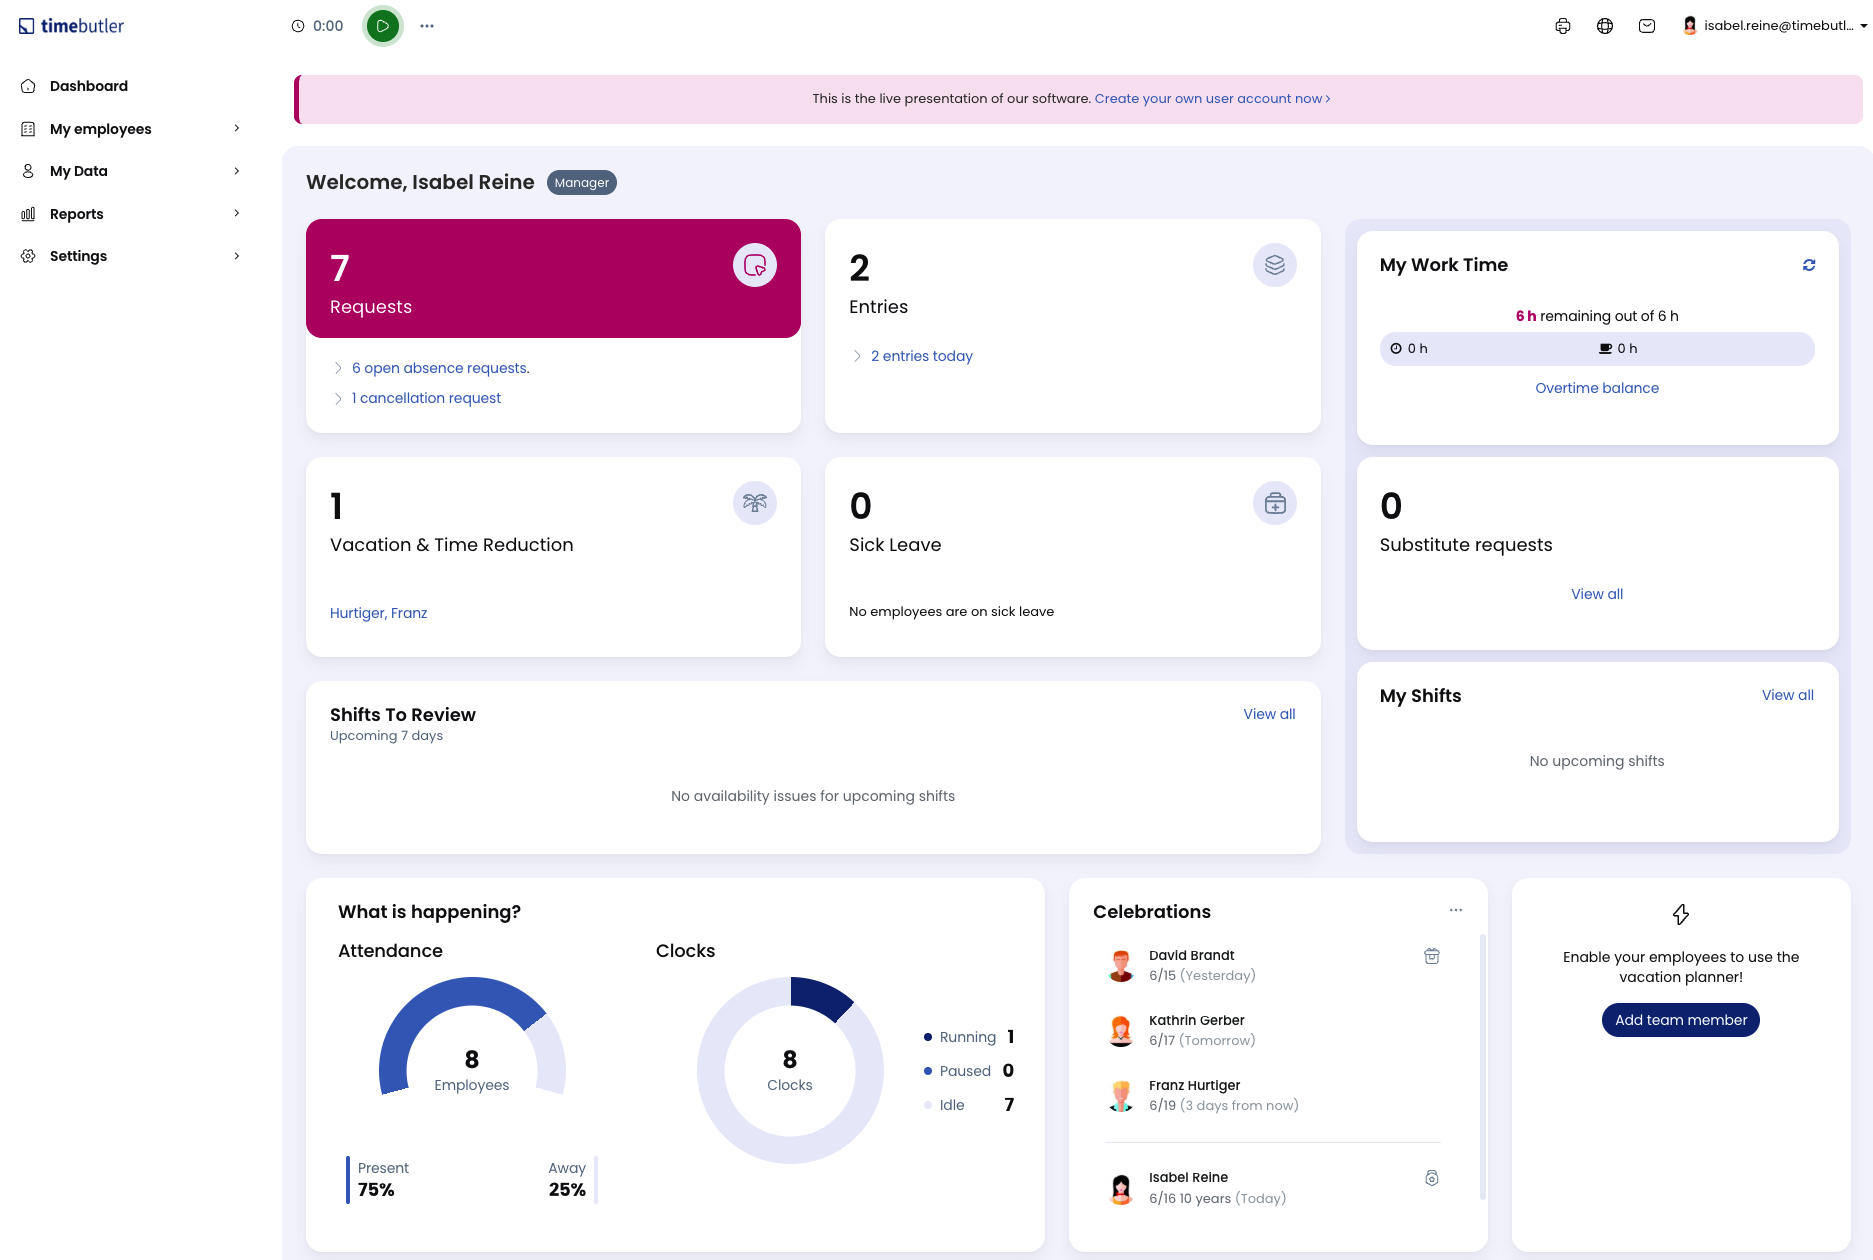
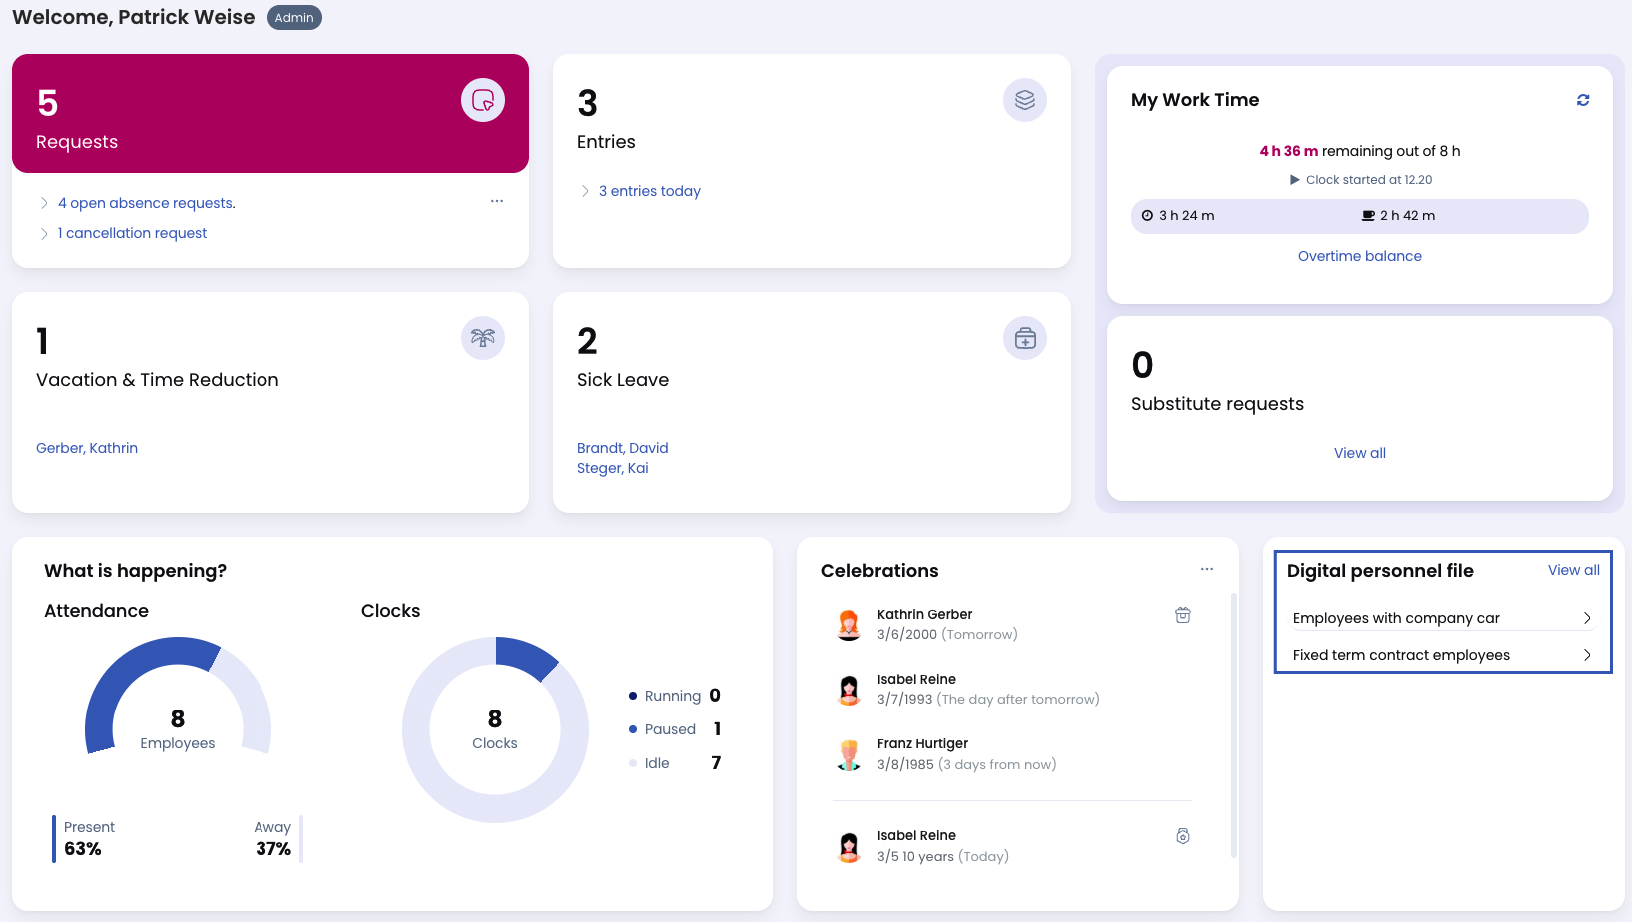
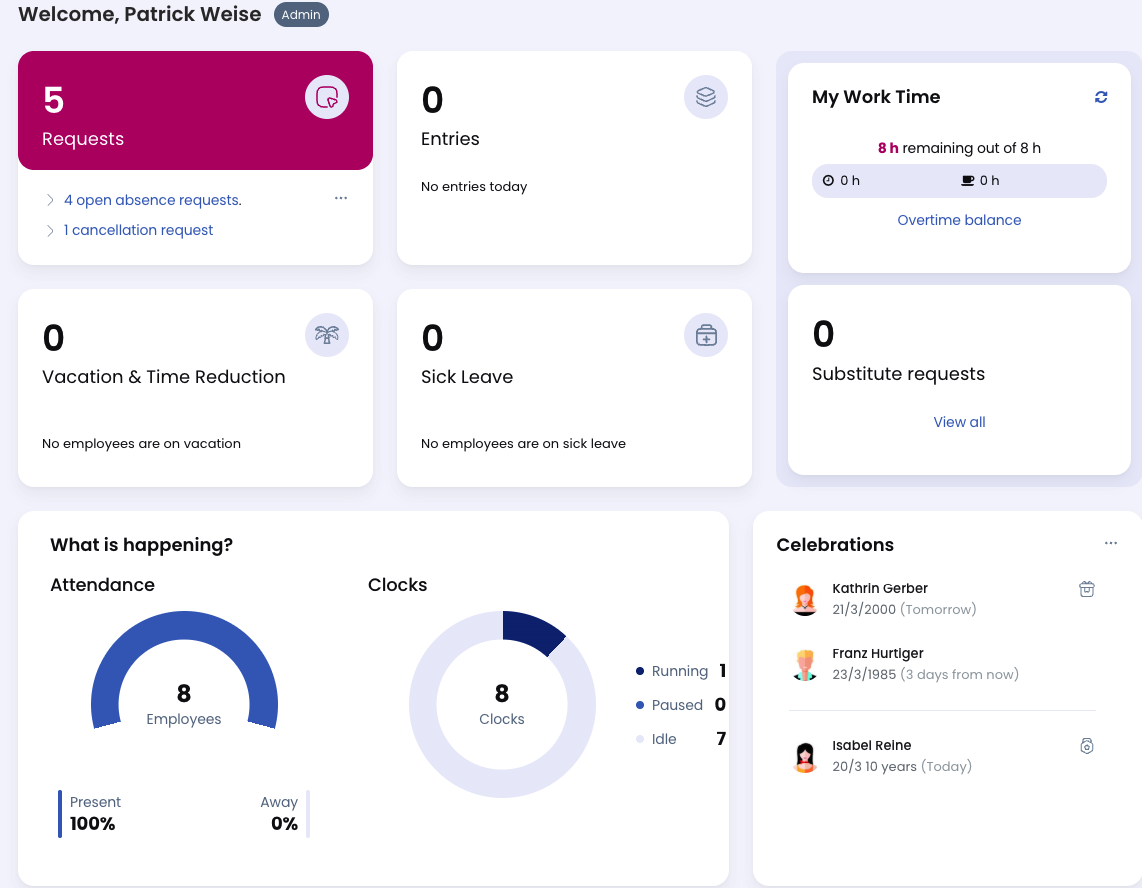
Right after signing in to your Timebutler user account, you land on the dashboard - your cockpit with a clear display of all relevant information on one page.

On the dashboard, you get information about pending requests, employees who are present and absent, upcoming birthdays and company anniversaries, your working time status (only if the time tracking feature is enabled), and much more.

You can click most sections to get more information.

You can return to the dashboard from any page in Timebutler by clicking the area with the logo at the top left.

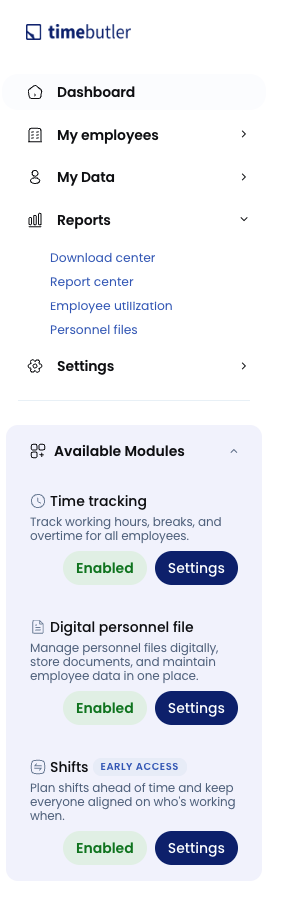
The left navigation bar always gives you access to all Timebutler functions, divided into four areas:

My Employees

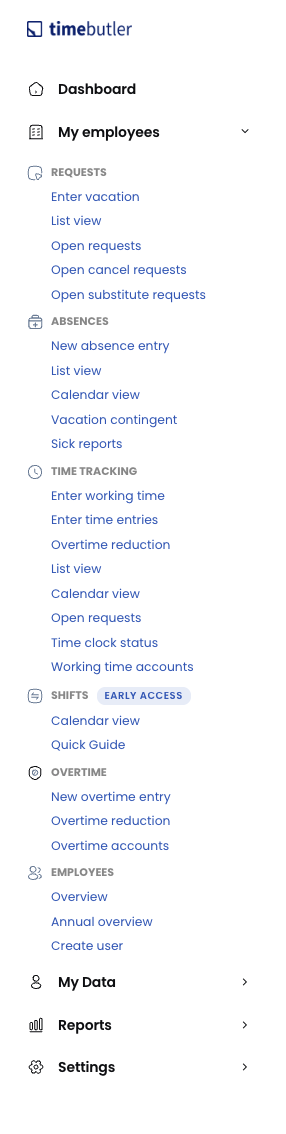
In the My Employees area, you find all functions and information about all employees in the company. You can open the calendar view for employees, approve or reject pending requests, enter new absences, view working times, and much more.

My Data

In this area, you can view your own data: your vacation balance, your absences, your working times, etc.

Reports

In this area, you can access reports and analyses.

Settings

In this area, you find various settings to tailor Timebutler to your needs and make changes to employee settings.

First steps for managers

Credentials and sign-in

Timebutler automatically sends the login credentials for your personal Timebutler user account to you by email. Your manager or HR department will inform you before your user account is set up.

The email contains your username and password. Use them to log in to your Timebutler user account and start using Timebutler right away. Please also check your spam folder for an email from Timebutler.

In advance, your manager or HR department ensures that you have the correct viewing and editing permissions for your team and that you are ready to go right away, so that you can approve or reject vacation requests and other absences from your employees, make the necessary settings, and much more.

Right after your first login to Timebutler, a short live tour starts that shows you the most important areas of Timebutler. The tour only takes a minute - it’s worth it!

Tip: Would you like a concise quick start? Download the quick-start guide.

Dashboard for Supervisors

Right after you sign in to your Timebutler user account, you land on the dashboard - your cockpit with a clear display of all relevant information on one page.

In the dashboard, you get information about open requests, present and absent employees, upcoming birthdays and company anniversaries, your working time status (only if the time tracking feature is enabled), and much more.

You can click most sections to get more information.

You can return to the dashboard from any page in Timebutler by clicking the area with the logo at the top left of any page.

Using Timebutler

From your dashboard, you always have access to the most important functions in Timebutler.

The left navigation bar always gives you access to all Timebutler functions, divided into four areas:

Employees

In the Employees area, you find all functions and information about your employees. You can open the calendar view for your team, approve or reject pending requests, enter new absences, view working times, and much more (note: only the functions that the admin has enabled for you are available).

My data

In this area, you find everything about your own data: your vacation balance, your absences, your working times, and so on.

Reports

In this area, you can access reports and evaluations - provided your admin has enabled this area for you.

Settings

In this area, you find various settings for tailoring Timebutler to your needs and for changing employees’ settings.

First steps for employees

Credentials and sign-in

Timebutler automatically sends the login credentials for your personal Timebutler user account to you by email. Your manager or HR department will inform you before your user account is set up for you.

The email contains your username and password. You can use them to log in to your Timebutler user account and start right away. Please also check your spam folder for an email from Timebutler.

In advance, your manager or HR department ensures that you have the correct visibility permissions for your colleagues, so that you are ready to start entering vacation, opening the team calendar, and much more.

Right after your first login to Timebutler, a short live tour starts that shows you the most important areas of Timebutler. The tour only takes a minute - it’s worth it!

Tip: Would you like a concise quick start? Download the quick-start guide.

Dashboard for Employees

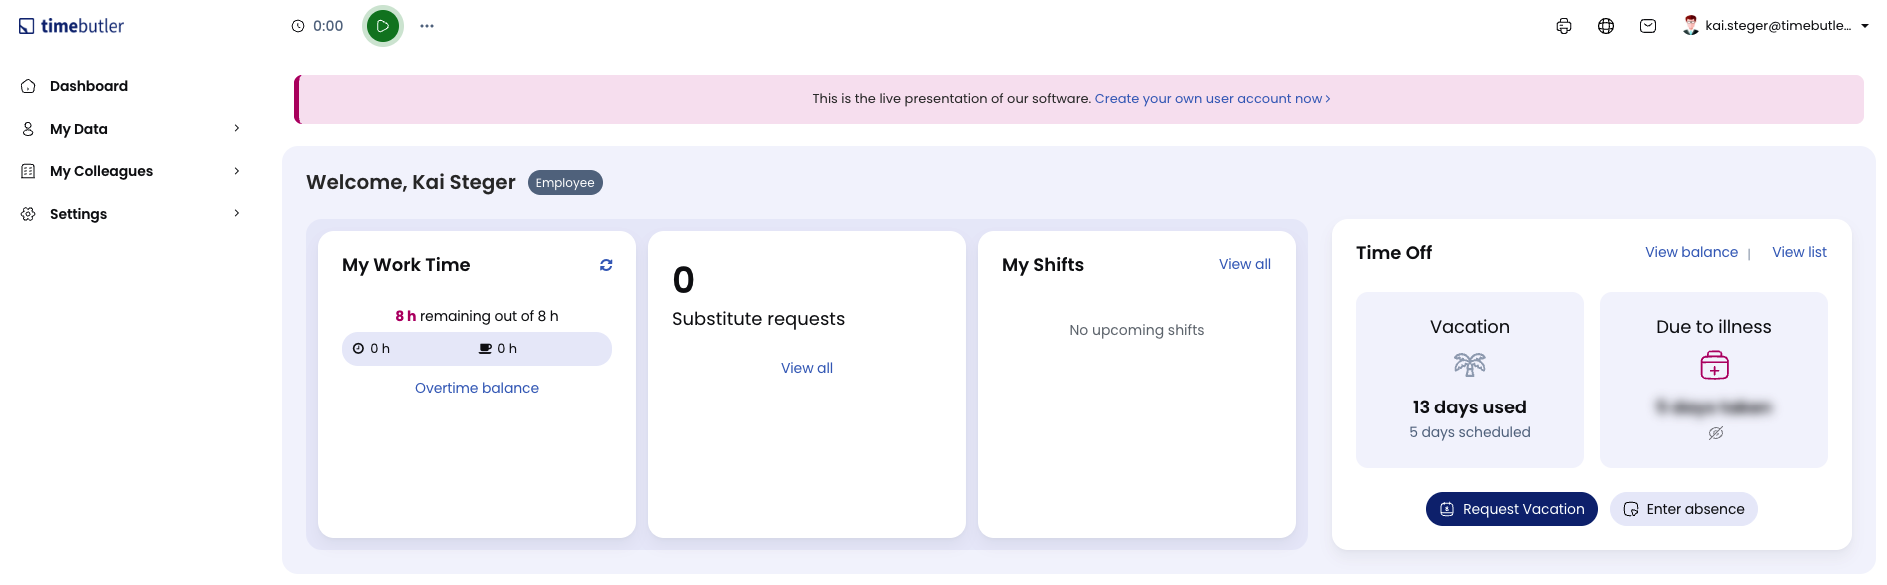
Right after you log in to your Timebutler user account, you land on the dashboard - your cockpit with a clear overview of all relevant information on a single page.

On the dashboard, you get information about pending substitute requests (only if approval for substitutes is enabled), your working time status (only if the time tracking feature is enabled), and more.

You can click most sections to get more information.

You can return to the dashboard from any page in Timebutler by clicking the area with the logo in the top left.

Using Timebutler

From your dashboard, you always have access to the most important functions in Timebutler.

The left navigation bar gives you access to all Timebutler functions. You can use the navigation bar to go to any area and any function in Timebutler at any time.

Vacation Planner

Enter vacation

Enter vacation

There are several ways to submit a new vacation request:

Submit vacation via the calendar

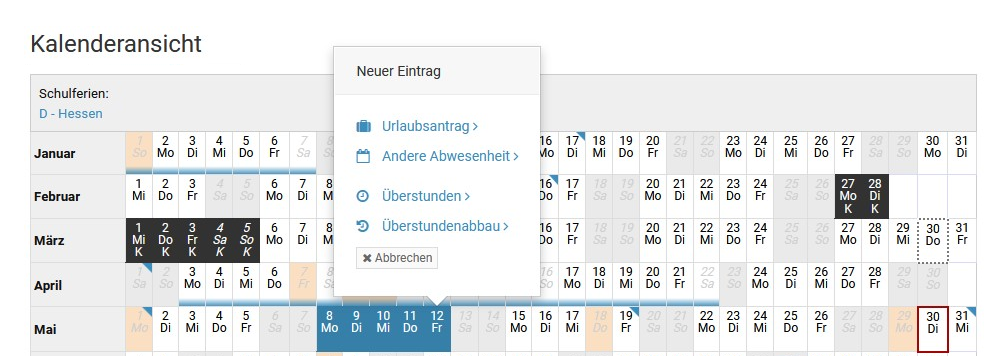
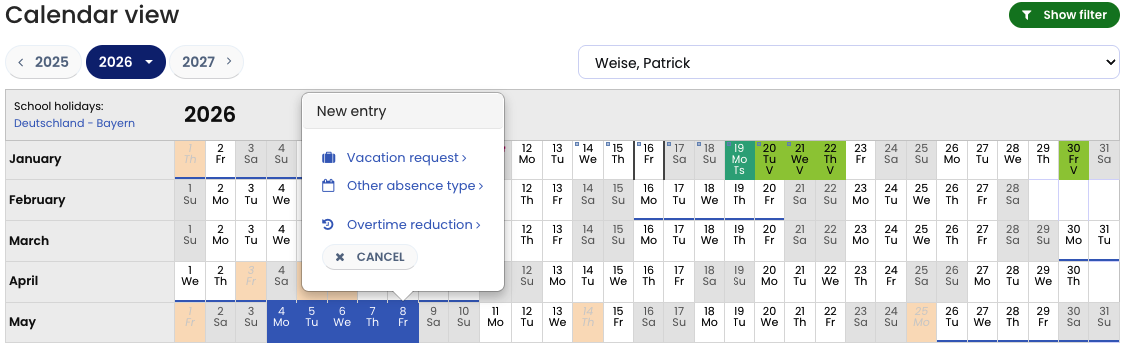
Employee users sign in to Timebutler and click “Absences > Calendar view” on the left. Then click the first day when the vacation request should start, and then click the day when it should end. A small selection window opens. Click “Vacation request” in it. This opens the entry form where you can edit and save the vacation request.

Supervisors and admins sign in to Timebutler and click “Employees > Absences > Calendar view” at the top left. Then, in the row of the desired employee, click the first day when the vacation request should start, and then click the day when it should end. A small selection window opens. Click “Vacation request” in it. This opens the entry form where you can edit and save the vacation request.

Enter vacation via the entry form

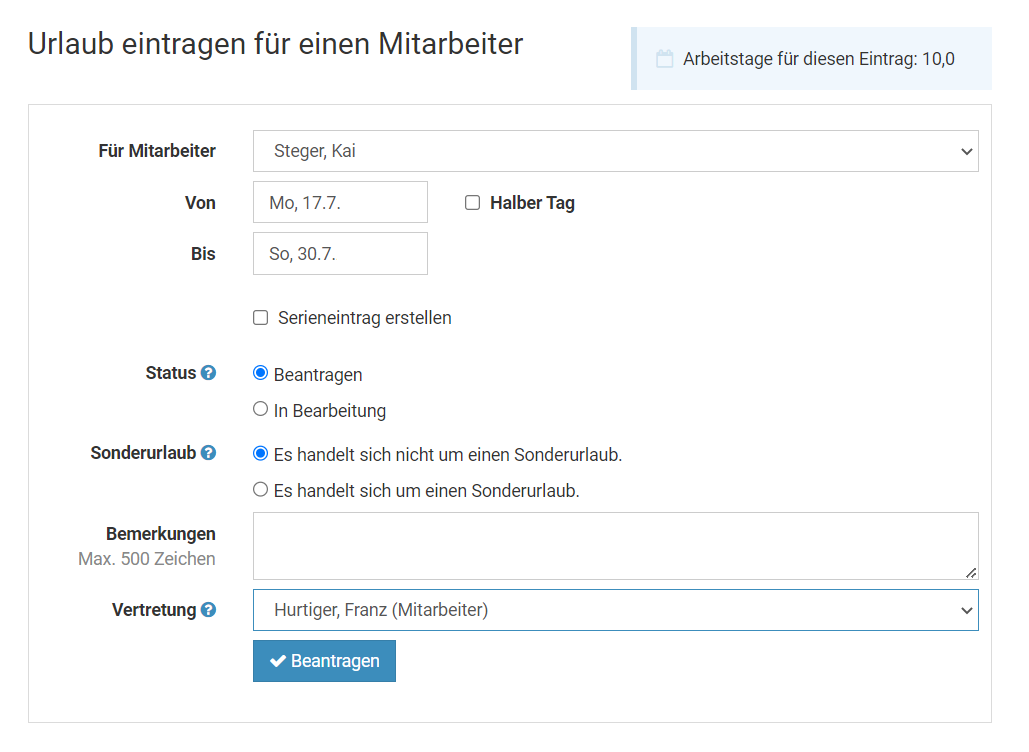
Employee users sign in to Timebutler and click “Vacation > Enter vacation” on the left. This opens the entry form for the vacation request.

Supervisors and admins sign in to Timebutler and click “Employees > Requests > Enter vacation” at the top left. This opens the entry form for the vacation request.

More options

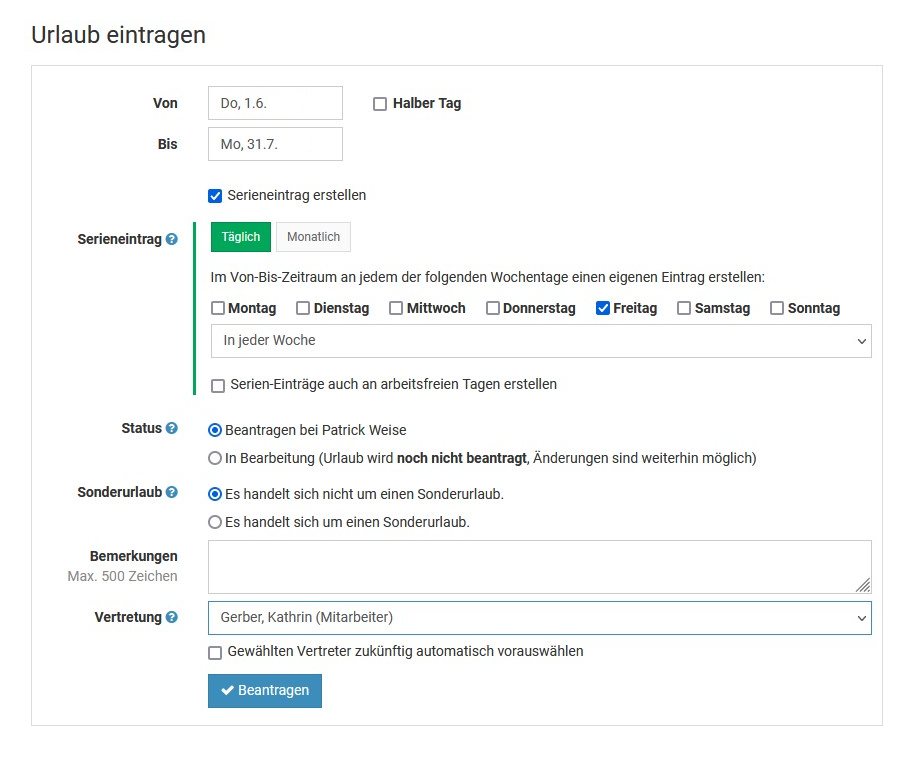
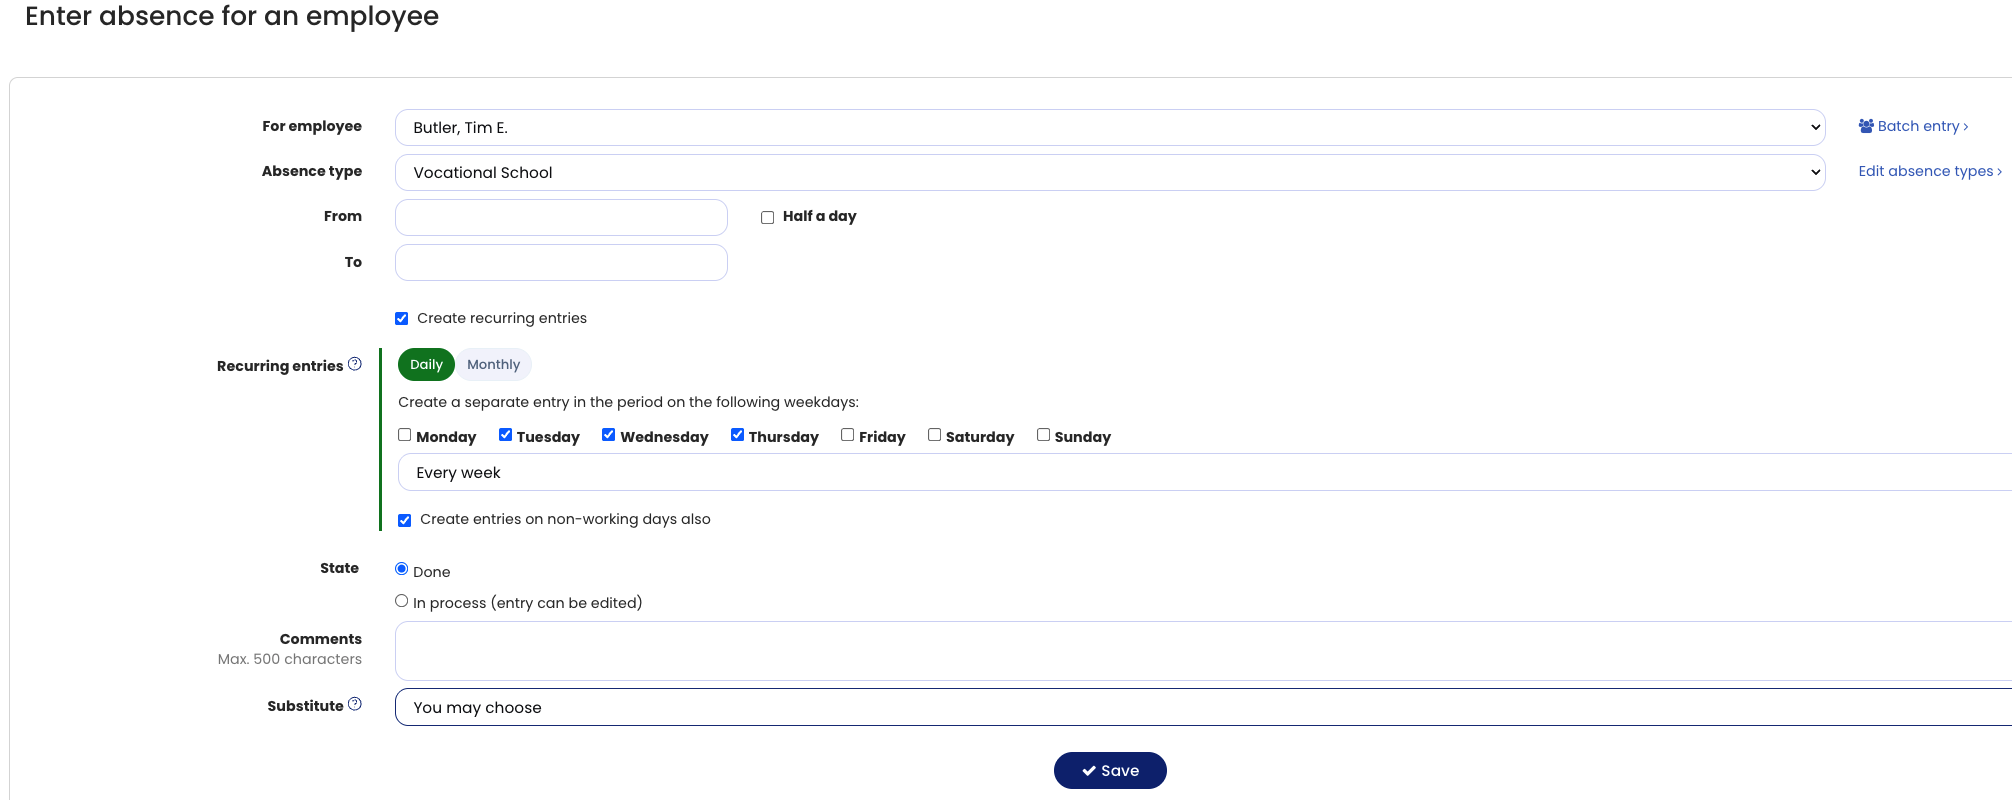
You can also enter vacation requests as a recurring entry, for example if you want to take vacation every Friday over the next two months.

Admins can also submit a vacation request for all or many employees as a bulk request.

You can also import vacation requests and absences via bulk import. This is particularly useful at the beginning when switching to Timebutler.

Screenshot: Submit vacation via the calendar

Screenshot: Submit vacation via the entry form

Approve vacation

When an employee submits a vacation request, Timebutler starts the approval workflow. The manager receives an email notification about the vacation request. If the employee has multiple managers assigned, the multi-level approval workflow runs.

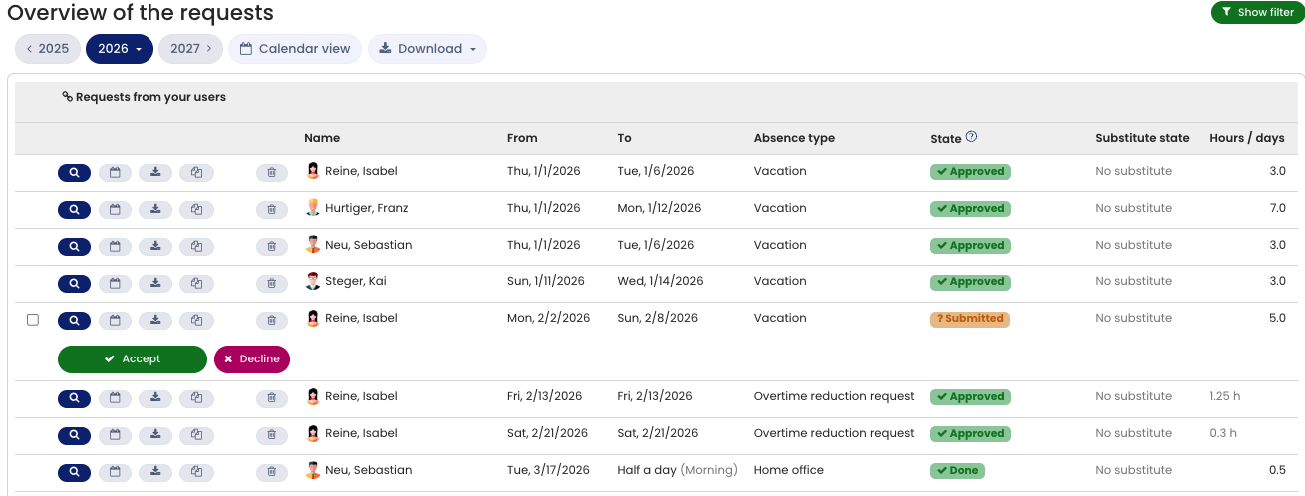
The email to the manager contains two buttons to approve or reject the vacation request with a single click. The manager can also view and edit open vacation requests by signing in to Timebutler and clicking Requests > Open requests at the top left.

In addition, immediately after signing in to Timebutler, the dashboard clearly displays the open requests in the box at the top left.

Allow vacation without approval
You can also configure that vacation does not require approval.

Approval by the delegate
Using the delegate feature, the delegate can approve or reject their employees’ requests on behalf of the manager during the manager’s absence.

Screenshot: Approving vacation in the list view

Change vacation

Timebutler does not allow you to change approved vacation requests after the fact, to prevent manipulation and ensure audit compliance.

To change an approved vacation request, you must delete the vacation request and submit a new one.

Employee users cannot delete the vacation request themselves. Instead, Timebutler sends a cancellation request email to the manager. The manager can approve the cancellation request; Timebutler then deletes the vacation request and informs the employee by email. The employee can now submit the new vacation request.

Managers and admins can delete vacation requests and then submit a new vacation request.

Admins have a convenience feature:
For example, if an employee has entered a 2-week vacation and falls ill in the last week, the admin only enters the 1-week illness entry. Timebutler detects that the illness entry overlaps with the vacation request and offers to shorten the existing vacation request automatically.

So admins only enter the new entry, and Timebutler automatically shortens, splits into two parts, or deletes existing entries, depending on how the new entry overlaps the existing one.

Vacation recurring entry

You can enter a recurring entry for vacation and other absences. For example, if you want to take vacation every Friday over the next two months, you don’t need to enter 8 individual vacation requests; you can enter a recurring entry.

Create a recurring entry

To enter a recurring entry for vacation, sign in to Timebutler and open the input form for a vacation request (read here how to get to the input form for Entering a vacation request). In the input form, enable the option “Create recurring entry”. Additional options for creating the recurring entry will then be displayed.

Delete recurring entries

Employee users and supervisors receive the option to undo the recurring entries—i.e., delete them—immediately after entering them. If you don’t choose this option, you can no longer delete the recurring entries as a whole; you can only delete each entry in the series individually.

Admins can delete entire series they created with one click via Undo actions. This option is available for a limited time after the recurring entries have been created. After that, even admins can only delete each entry in the series individually.

Company shutdown and batch entries

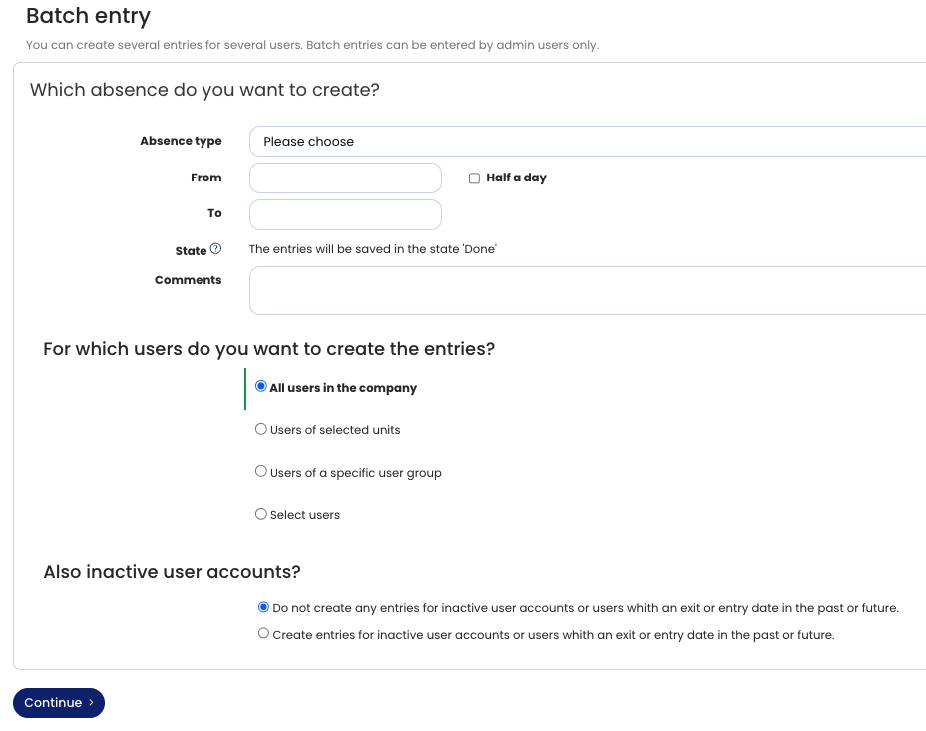
You can create entries for a large number of employees with just a few clicks and, for example, create a company shutdown for several or all employees.

You can make the batch entry for all employees, for employees in a specific department, for employees at a specific location, or for individually selected employees. In the batch entry, you can also set the requests to Approved immediately, without requiring managers to approve them.

To do this, sign in to your account as an admin, click Employees at the top left, then under Absences click New absence entry. On the page, click the Batch entry link next to the employee selection.

In batch entries, you can set the vacation to be approved immediately so that it does not require approval by managers. This lets you, for example, enter a mandatory company shutdown for all employees between Christmas and New Year.

Note
If you want to enter a company shutdown that should be deducted from the vacation balance, enter vacation for the employees via a batch entry. In Timebutler, you can create a new absence type “Company shutdown”. However, if you enter the absence entries as “Company shutdown”, the days will not be deducted from the vacation balance. Only vacation requests are deducted from the vacation balance.

If, on the other hand, you do not want the company shutdown to be deducted from the vacation balance, then create a new absence type “Company shutdown” and then make a batch entry of the type “Company shutdown”. This company shutdown absence entry will not be deducted from the vacation balance.

Company shutdown batch entry

Vacation accounts

View leave accounts

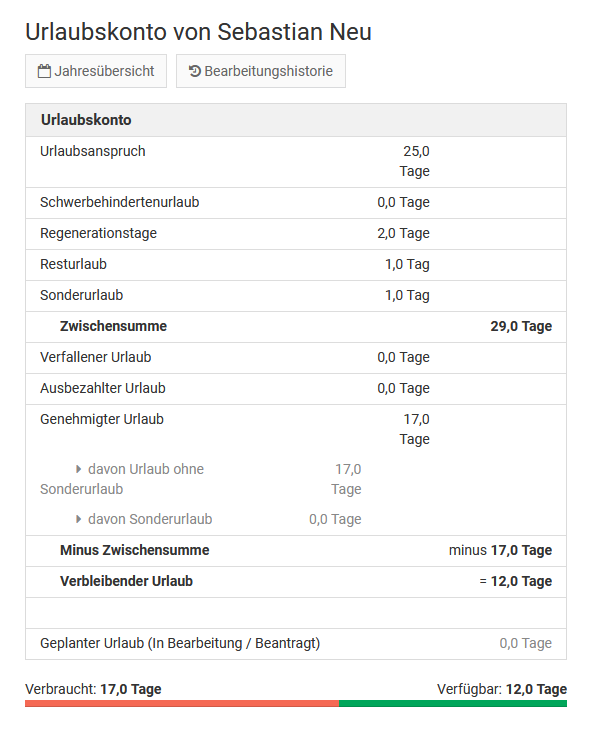
Timebutler maintains a leave account for every employee and takes approved leave requests, public holidays, weekly working days, leave entitlement, and all other settings into account when calculating the balance. The leave account always covers a calendar year.

Employee users can view their own leave account at any time. To do so, the employee user signs in to Timebutler and clicks on the left: “Leave > Your leave account”.

Supervisors and admins can also view their own leave account, and additionally the leave accounts of employees they have permission to view. To do so, the supervisor or admin signs in to Timebutler and clicks on the left: “Employees > Absences > Leave accounts”.

Structure of the leave account

The leave account displays the different leave entitlement data:

  • Leave entitlement, special leave, carryover from the previous year (Timebutler adds these to the leave balance)
  • as well as expired leave, leave paid out (Timebutler subtracts these from the leave balance).

This results in the employee’s total leave balance for the year. Timebutler then subtracts the number of approved leave days, which yields the remaining leave entitlement.

Additional entitlement types

In the leave account, you can enable the display of enable additional leave for severely disabled employees and also enable another leave entitlement type, for which you can define your own label.

Notify employees about remaining carryover leave

For carryover leave to expire, the employer must notify employees about the remaining carryover leave

Calculate accruals

Learn how to determine the open leave balance for accruals.

Expire carryover leave

Learn how to proceed with the expiration of carryover leave.

Carry over remaining leave to the following year

Timebutler intentionally does not transfer remaining leave from one calendar year to the next automatically. You can do this with a few clicks. Learn how to carry over remaining leave to the following year.

Screenshot: Example leave account of an employee

Edit leave entitlement

Timebutler maintains a leave account for each employee and each calendar year.

You can change the leave entitlement values at any time as follows:

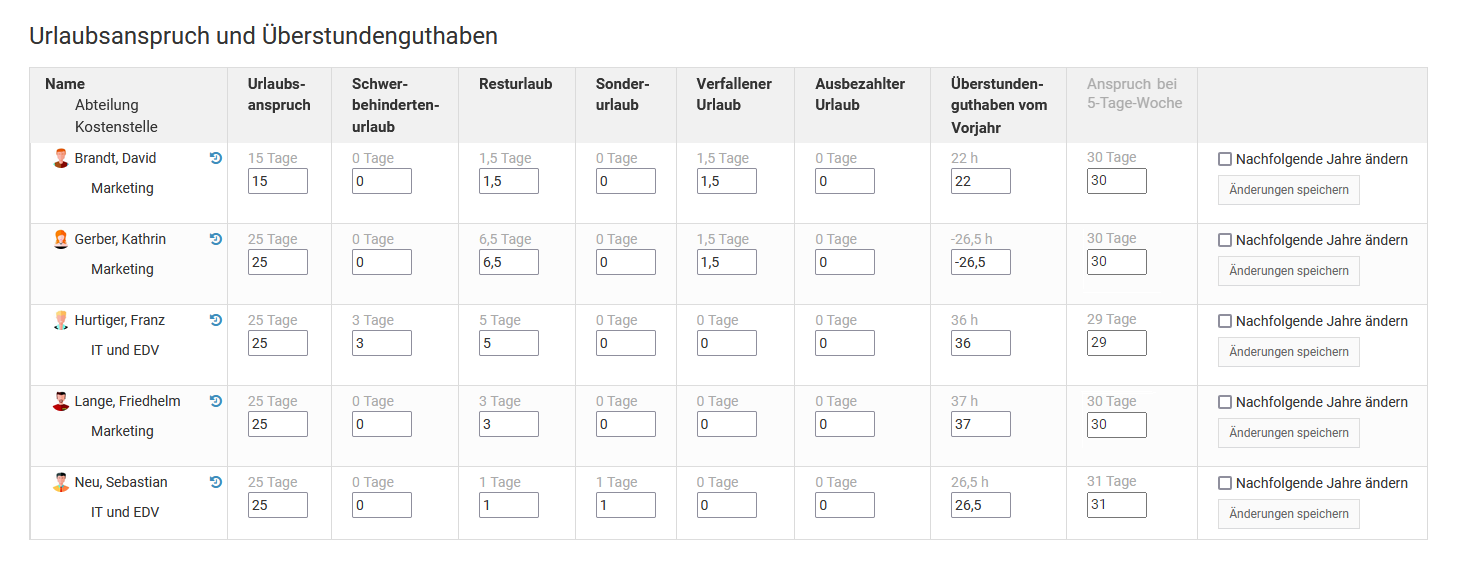
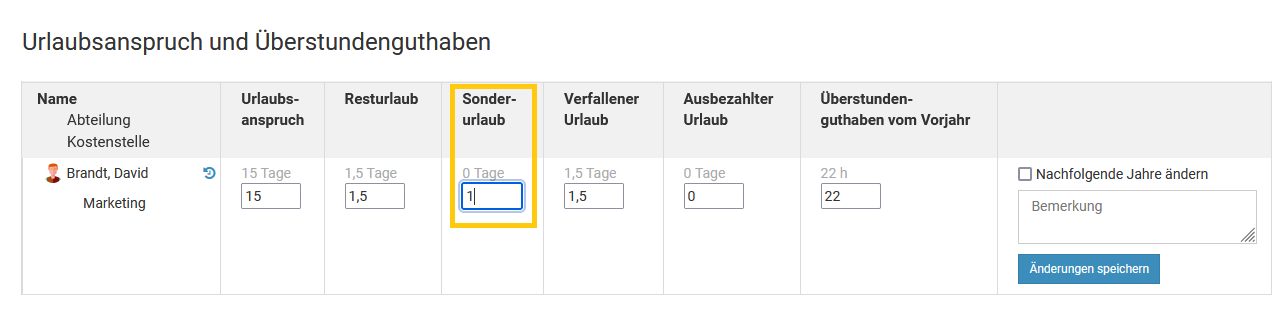
Sign in to Timebutler as an admin and click “Settings” at the bottom left, then click “Leave entitlement” underneath. Here you can change the values in the different columns and save.

If you want to change the values for a year other than the current year, click one of the buttons with the calendar year at the top of the page to switch to the desired year.

Carryover to subsequent years
We intentionally do not automatically carry over remaining leave from one calendar year to the next. You can trigger this with just a few clicks. Learn here how to carry over remaining leave to the next year.

Additional entitlement types
The leave account contains various leave entitlement types, for example leave entitlement, remaining leave, and special leave. In addition, you can enable up to two more leave entitlement types: Severely disabled persons’ leave and any additional leave entitlement type, whose name you can set as you like.

Screenshot: Edit screen for leave entitlement

Part-time and vacation entitlement

With Timebutler, you can also manage the absences and vacation of employees who work part-time.

There is little to consider, because: a part-time employee generally has the same vacation entitlement as a full-time employee, and to calculate a pro-rated vacation entitlement only the number of weekly working days matters. Do not take the daily working hours per weekday into account, even if they are irregular.

Learn more about Vacation entitlement for part-time employees, including an online calculator for calculating vacation entitlement.

Download vacation accounts

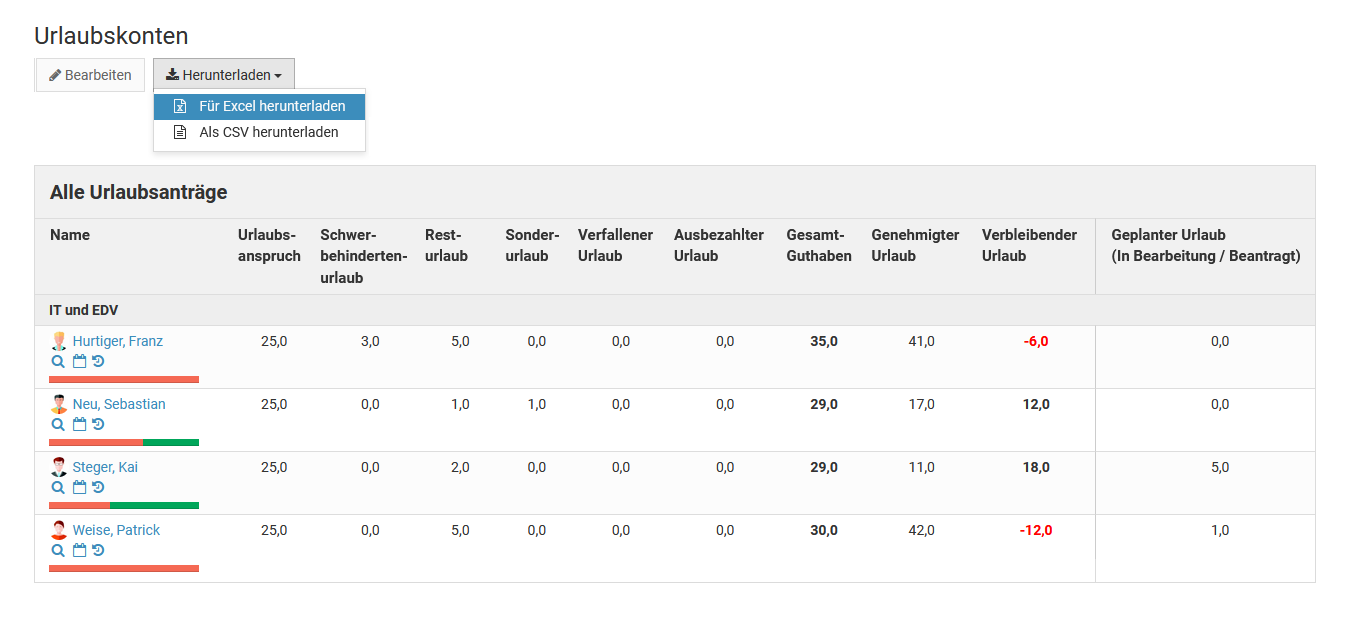
An admin or supervisor can access the vacation accounts for multiple employees and download the data as an Excel file or CSV file. There are two ways to do this:

1) View and download vacation accounts

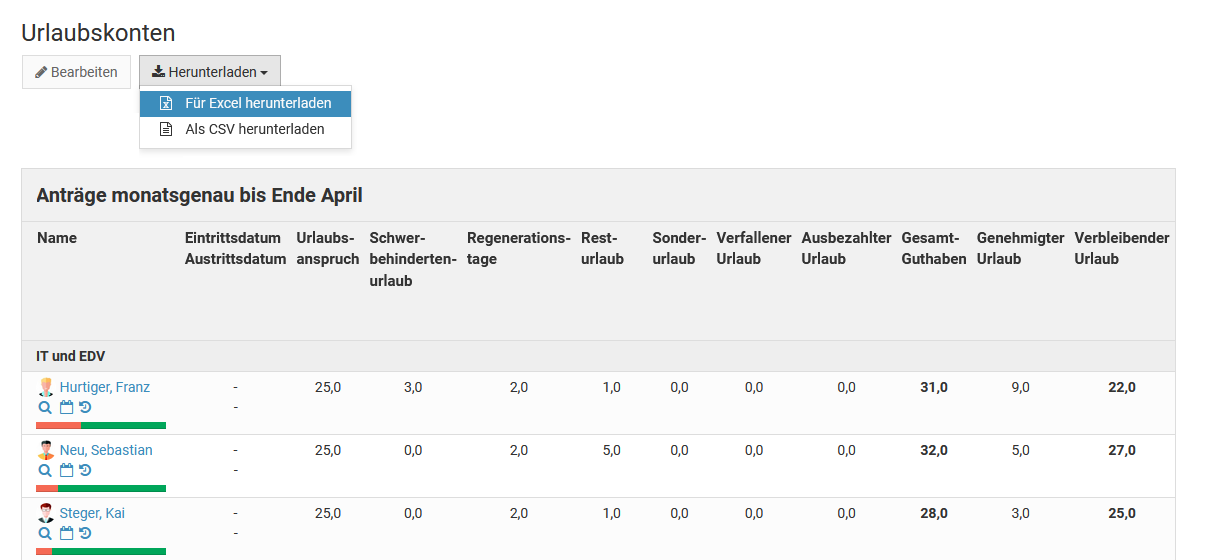
Sign in to Timebutler as an admin or supervisor and click at the top left on “Employees > Absences > Vacation accounts”. Now click the “Download” button to download the vacation accounts as an Excel file or CSV file.

If you want the report to include vacation requests only up to today or up to a specific month, click the green “Show filter” button at the top right of the vacation accounts view and change the “All vacation requests” setting to one of the other options. Then click the “Apply” button. The page reloads, and the vacation accounts now show only the vacation requests you configured in the filter.

This view is especially useful when you want to determine the number of vacation days for accruals.

2) Download vacation accounts via the Download Center

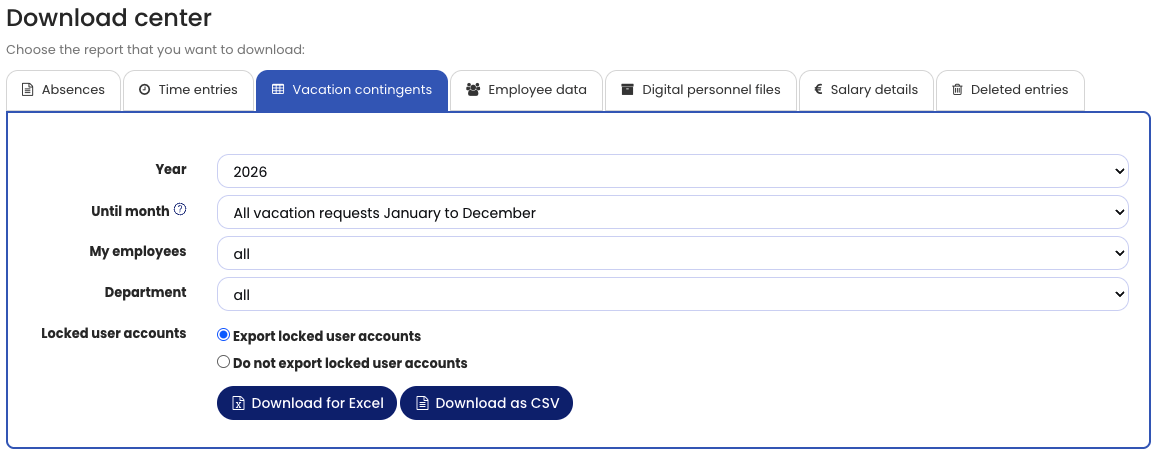
Read here how to download vacation accounts via the Download Center.

Special leave

Special leave is deducted from the employee’s leave balance. In return, HR (Admin) increases the employee’s special leave entitlement by the same number of days so that the leave balance remains unchanged.

The procedure for special leave is as follows:

1. Employee informs about special leave
A special leave case has occurred or will occur in the near future, for example your own wedding or the birth of your own child. The employee now informs their supervisor or HR.

2. Employee receives special leave credit
HR records the granted special leave in the employee’s leave entitlement as follows: sign in as Admin and click “Settings” at the bottom left, then “Leave entitlement” below it. For the desired employee, increase the value in the “Special leave” column by the number of days. For example, if you want to add 2 special leave days and the column shows 1, change the number to 3 and save the change.

3. Employee requests special leave
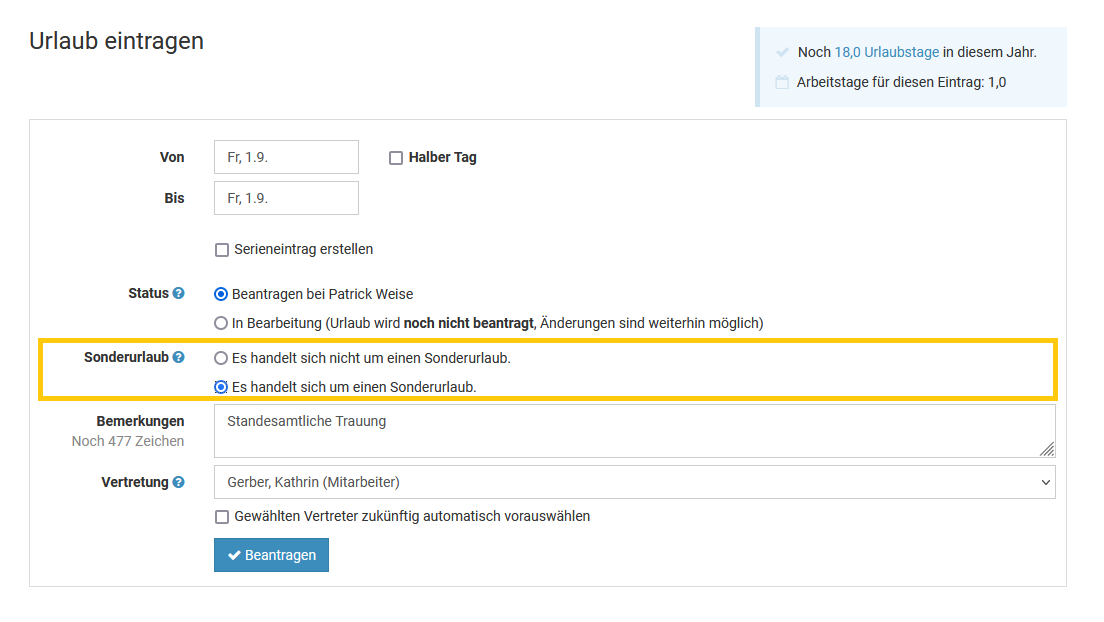
The employee’s total leave entitlement has now increased by this number of days. Next, the employee submits a new leave request and selects the option “This is a special leave.” Timebutler requires an entry in the remarks field for special leave.

4. Supervisor approves special leave
The supervisor now approves the leave request, so the days are deducted from the leave balance again. After the leave request is approved, the employee has the special leave approved and again has the same leave entitlement as before applying.

If step 2 described above was forgotten, where an admin increases the special leave entitlement, that’s not a problem. You can also enter the entitlement after the special leave has been requested and approved.

Enter special leave credit

Screenshot: Request special leave

Severely Disabled Leave

If employees in your company are entitled to Severely Disabled Leave, you can activate this leave entitlement type with just a few clicks.

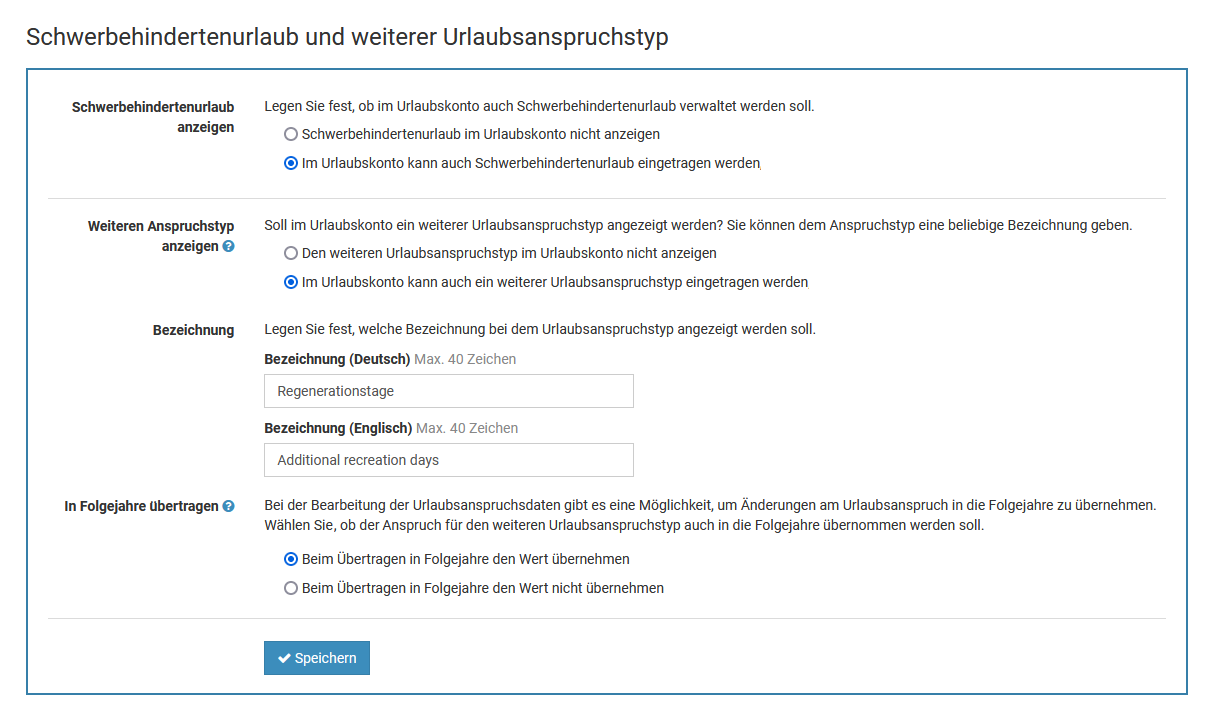
Log in to Timebutler as an admin and click “Settings” at the bottom left, then “More..” below it, then on the right click “Severely Disabled Leave and Additional Leave Entitlement Type”. Here you can activate management of Severely Disabled Leave with a single click.

After that, the leave accounts view will display Severely Disabled Leave and you can enter the “Leave entitlement for Severely Disabled Leave”.

Additional leave entitlement type
You can also activate an additional leave entitlement type in the leave account.

Additional leave entitlement type

In the leave account various leave entitlement types are available, for example leave entitlement, remaining leave, and special leave. You can enable an additional leave entitlement type and set your own label for it. This lets you manage an additional leave entitlement in the leave account, for example to manage recovery days separately.

Log in to Timebutler as an admin and click “Settings” at the bottom left, then “More..” underneath it. On the page, click “Severely disabled leave and additional leave entitlement type”. Here you can enable the additional leave entitlement type and also enter a label for it.

Severely disabled leave
You can also enable severely disabled leave in the leave account.

Accruals for unused vacation

To create the accrual for unused vacation, you need to determine how many vacation days employees still have available as of a specific month. Proceed as follows:

1) Open vacation accounts

Sign in to Timebutler as an admin or supervisor and click “Employees > Absences > Vacation accounts” at the top left.

2) Limit to month

On the page, click the green “Show filter” button at the top right. You will find the “Up to month” option here, which lets you limit up to which month the vacation requests should be included.

You have two options:

Option “Requests month-accurate up to end of -month-“: For example, if you set the option “Requests month-accurate up to end of April”, only the vacation days from January through the end of April are included. Vacation days that fall in May or later are ignored. With this filter setting you can calculate the vacation account month-accurately.

Option “Requests with start date up to end of -month-“: For example, if you set the option “Requests with start date up to end of April”, the system includes in full all vacation requests that start between January and April — even if they extend into May. A vacation request that starts in April and extends into May is still included with the total number of vacation days, including the days that fall in May.

After you select the appropriate option for the desired month, click the “Apply” button to apply the filter.

3) Download report

The page reloads and now shows the vacation accounts, considering only those vacation requests you set in the filter, for example only the vacation requests that start no later than June. In the “Remaining vacation” column you can now see how many vacation days the employees still have left afterwards, i.e., in the example from July.

4) Download

You can now download these data with one click on the “Download” button as an Excel file or CSV file and, for example, forward them to the tax advisor or the payroll office.

Note:
For example, if you choose the filter setting “Requests with start date up to end of June”, a vacation request that starts on 6/25 and ends on 7/5 is counted in full, including the days that fall in July. This is intentional: For vacation requests that begin within the review period, you usually do not need to create an accrual for the entire number of days of the vacation request.

If you still want a month-accurate calculation, select the option “Requests month-accurate up to end of June”

Month-accurate analysis also in the Utilization Report

You can also get a month-accurate analysis of vacation days in the Cumulative Utilization Report as follows:

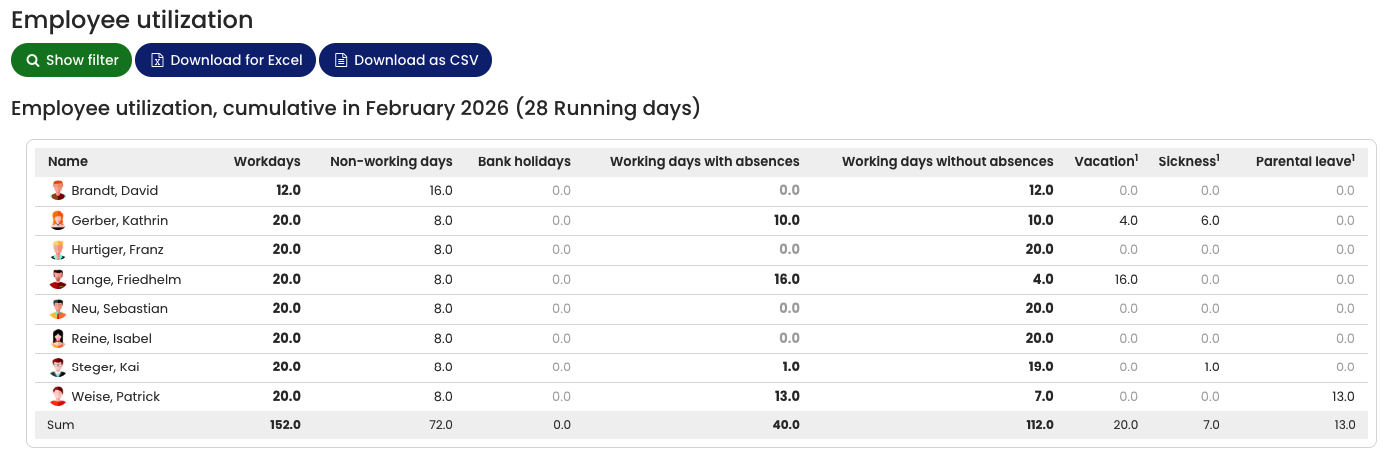
On the left, click “Reports > Utilization report” and set the desired period, for example January to June. For “Report type” select the “Cumulative” option and select the option “Show columns for all absence types, even if no entry exists.”. Then click the “Show” button. In the “Vacation” column you now see the exact number of approved vacation days for the selected period. You can also download this report as an Excel file with a single click.

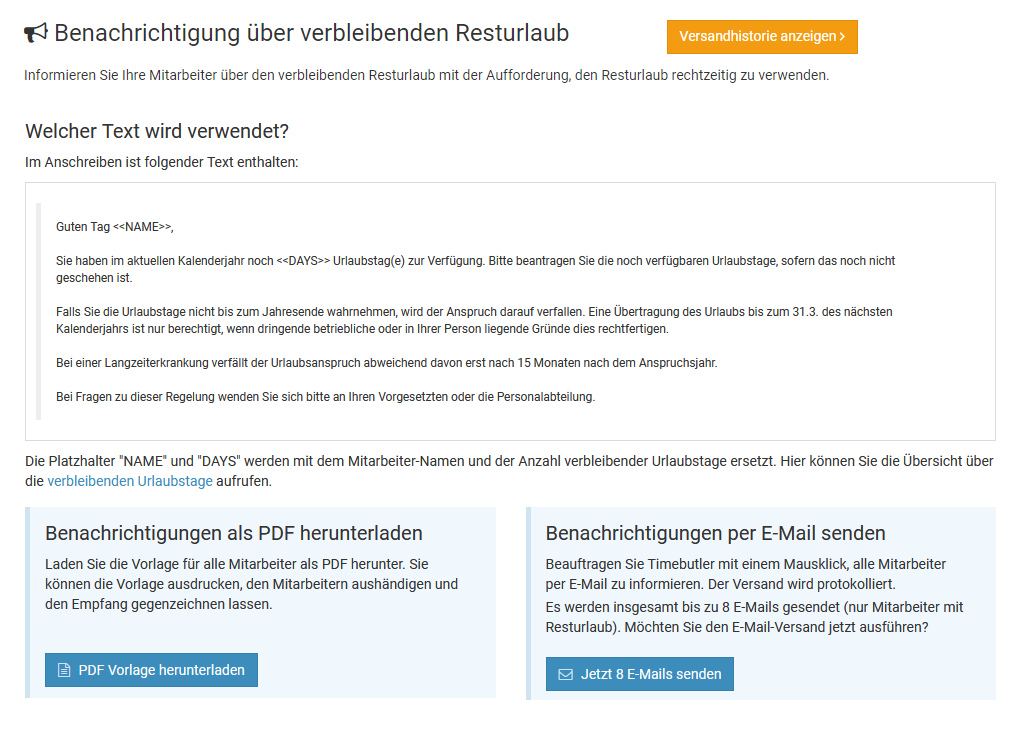
Notification about remaining leave balance

The Court of Justice of the European Union ruled that the employer must enable employees to take paid annual leave. The employer must also prompt employees to take their remaining leave in time and must inform them about expiry deadlines.

In Timebutler, there are two ways to notify employees individually about their remaining leave balance with just a few clicks:

Written notification with signature

An admin can download a PDF template that lists each employee’s individual remaining leave balance along with a request to schedule it. You can print the PDF template and present it to employees, who then acknowledge receipt by signing.

To download the template for the written notification, sign in to Timebutler as an admin, click “Settings” at the bottom left, then “More..” below it, then “Notification about remaining leave balance” on the right. On the page, click the “Download PDF template” button.

Notification by email

You can also have Timebutler automatically send a personal email to each employee. The email also includes the information about the individual remaining leave balance along with the request to schedule it.

To send the emails automatically, sign in to Timebutler as an admin, click “Settings” at the bottom left, then “More..” below it, then “Notification about remaining leave balance” on the right. On the page, click the “Send emails” button.

Custom text template
Timebutler provides a ready-made text template for the notification. You can change the text template and adapt it to your needs. In your text template, you can use several placeholders that Timebutler replaces automatically, for example with the employee’s name or the employee’s individual remaining leave entitlement. The available placeholders are described when you edit the text template.

Delivery log

When sending emails, Timebutler logs the recipient’s name, the number of remaining leave days, and the date when you requested the send. For companies with hundreds of employees, Timebutler does not send the emails simultaneously, but distributes them over several hours depending on company size. This reduces the likelihood that spam filters sort out the emails. Timebutler informs you about the sending period.

Obligation to provide evidence
The employer should be able to prove that they informed the employee. Email sending is more convenient, but compared with the written PDF template it makes it harder to provide proof.

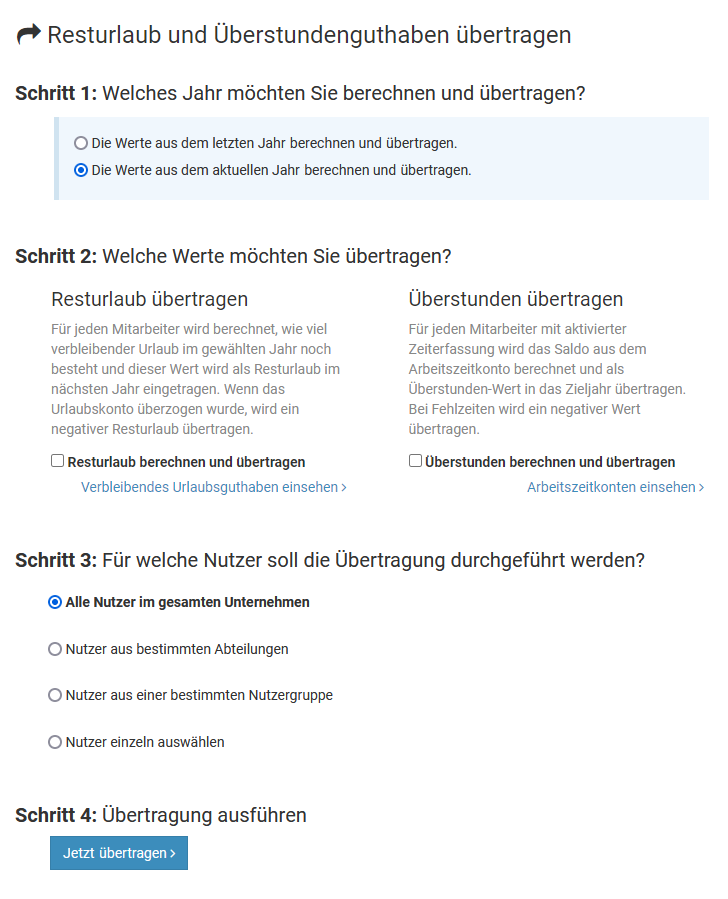
Carry over remaining leave to the next year

Timebutler intentionally does not carry over remaining leave to the next year fully automatically, among other reasons because companies sometimes want to edit the remaining leave value manually.

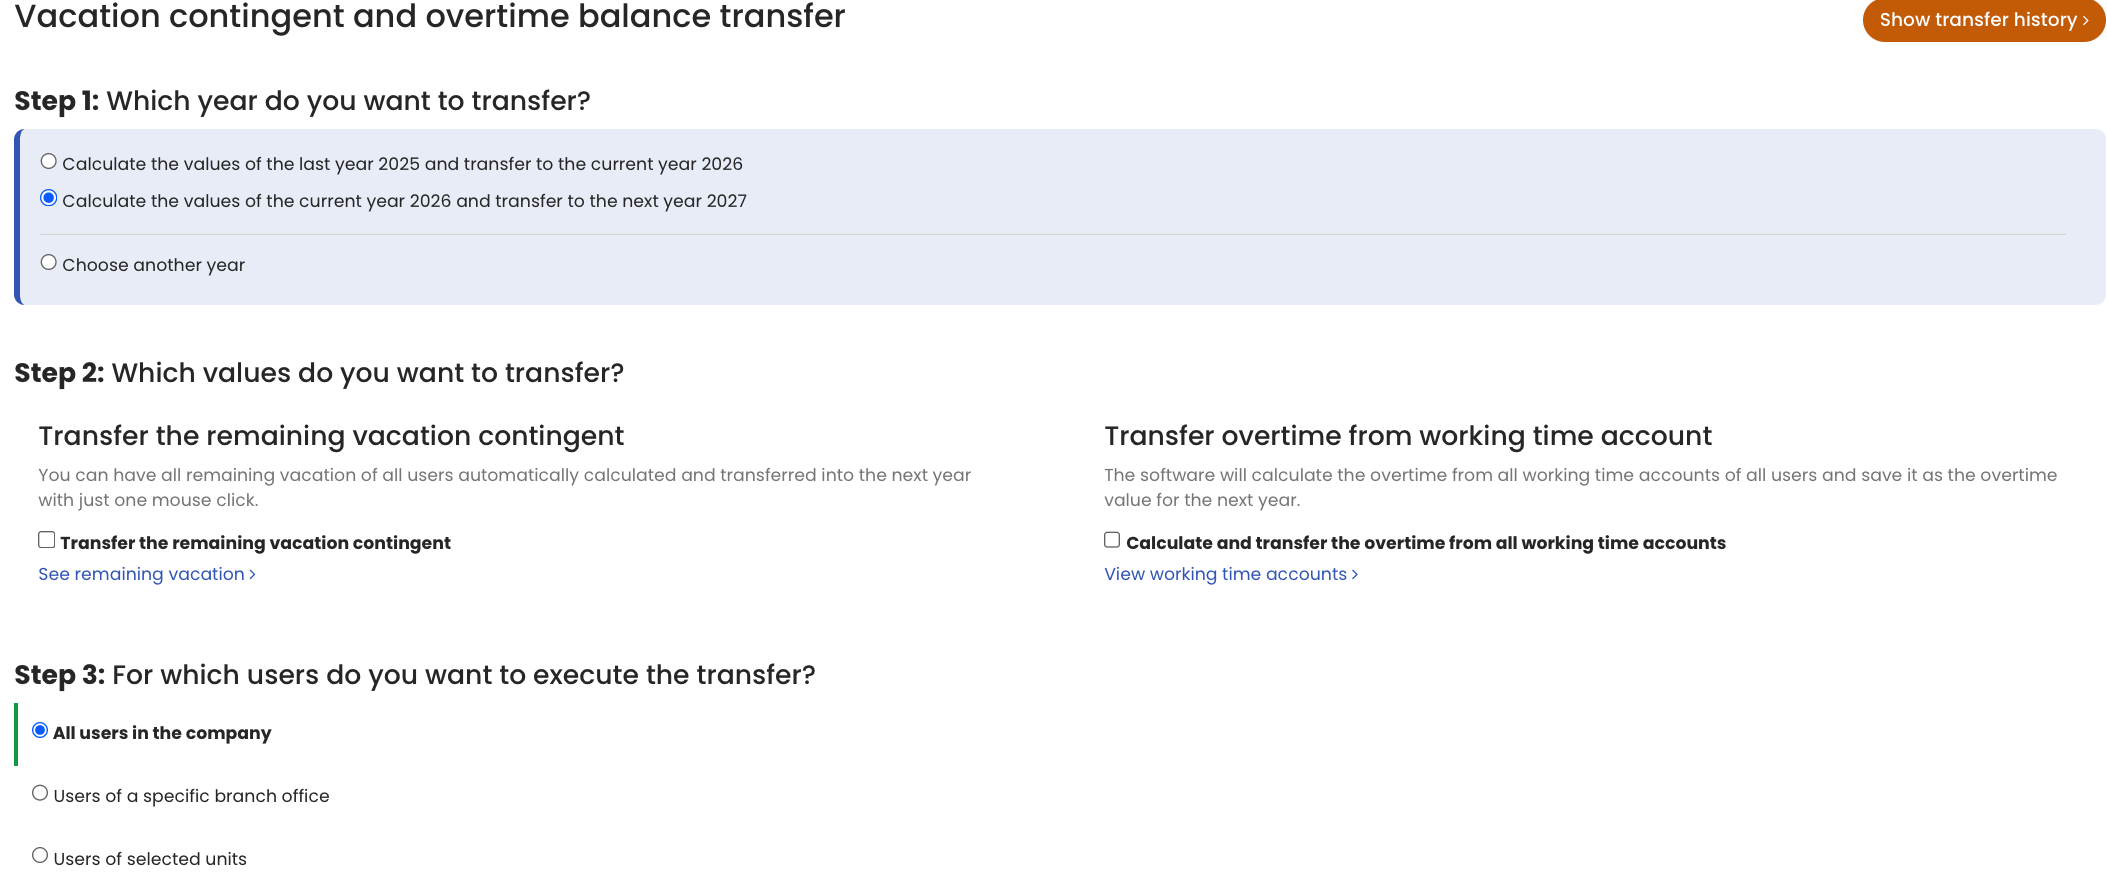
An admin can carry over remaining leave for all employees with just a few clicks and does not need to laboriously calculate and enter it manually. Sign in as an admin, then click “Settings” at the bottom left, then “More..”. Now click “Carry over remaining leave” on the right.

You can run the carryover as often as you like. You can run the carryover in November or December, and in any case again at the start of the year when vacation planning for the previous year is complete. Timebutler will automatically remind you about the carryover at the beginning of the year.

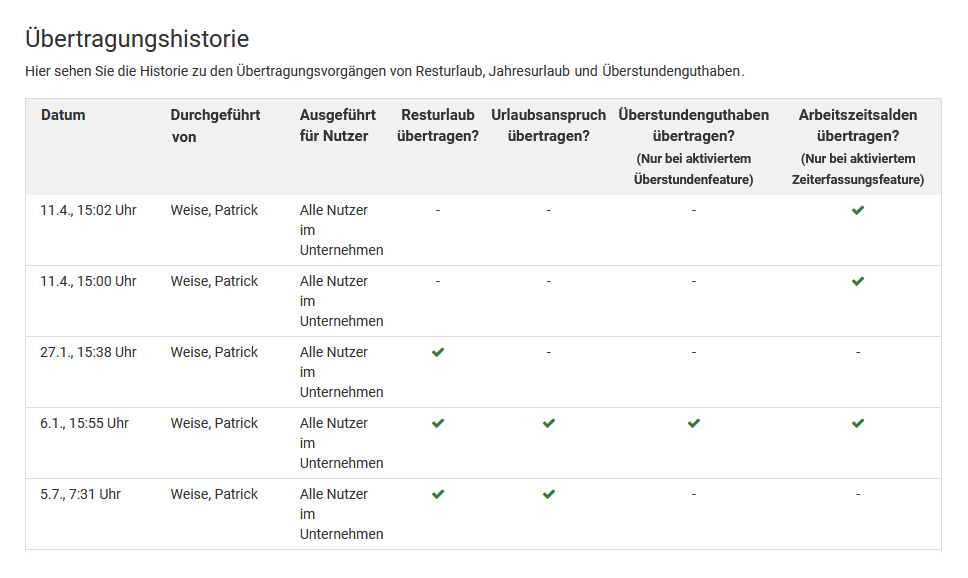
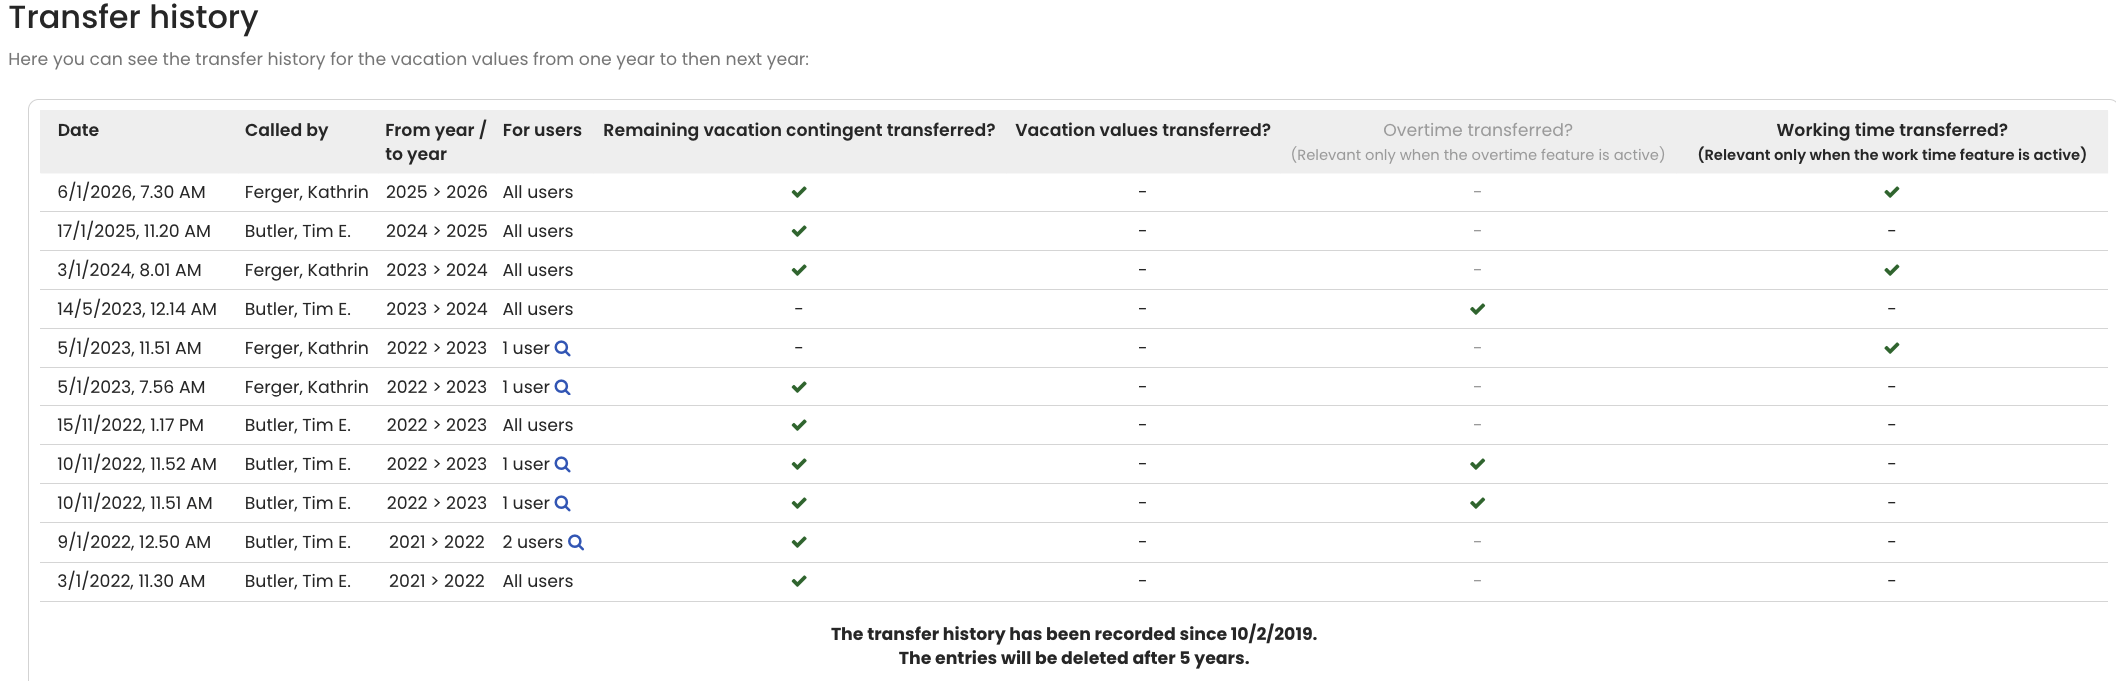
Carryover history
An admin can check at any time when the carryovers of remaining leave were executed. Sign in as an admin, then click “Settings” at the bottom left, then “More.”. Now click “Carry over remaining leave” on the right. Now click the “Show carryover history” button at the top right of the page.

Screenshot of the selection for carrying over remaining leave

Screenshot of the carryover history

Expiration of remaining vacation

There is intentionally no automatic expiration of remaining vacation, among other reasons because companies handle this differently: in some companies, remaining vacation expires at the end of March, others grant longer periods or do not allow any carryover of remaining vacation beyond December. Other companies allow individual employees or departments longer periods, etc.
You can, however, determine expired vacation semi-automatically as described below.

Example of remaining vacation expiring on March 31

After March 31, sign in with an admin user. You don’t have to do this on April 1; you can also do it later in April or even May. Now click “Employees” in the top left, then under “Absences” click “Vacation accounts.” Click the green button for the filter at the top right, then change the “All vacation requests” option to “Requests by month up to end of March” and click the “Apply” button to apply the filter.
The page reloads, and the vacation accounts display while considering only vacation requests with a start date up to the end of March. In the “Remaining vacation” column, you now see for each employee how many remaining vacation days they carried over from last year. In the “Approved vacation” column, you see how many vacation days the sum of vacation requests with a start date from January through March amounts to (in other words: the number of vacation days the employee took during that period). Now you only need to compare the two numbers from the “Remaining vacation” and “Approved vacation” columns: for employees where the number of approved vacation days is less than the remaining vacation, the employee took fewer vacation days by March than they had remaining. The difference is therefore the number of expired days.
Two examples:

  • An employee has 5 days of remaining vacation and 12 days of approved vacation: no remaining vacation expires for this employee, because they used more than the 5 days of remaining vacation by the end of March.
  • An employee has 5 days of remaining vacation and 3 days of approved vacation: 2 vacation days expire for this employee, because by the end of March they only took 3 of the 5 days of remaining vacation.

Repeat this for each employee to identify the (few) employees whose vacation days have expired. This is usually very few or none, since employees naturally make sure no vacation expires. Once you’ve identified the affected employees and their number of expired days, click “Settings” at the bottom left, then “Vacation entitlement” underneath. For the affected employees, enter the number you determined earlier in the “Expired vacation” column and save the change.
Timebutler then automatically recalculates the employees’ vacation accounts and immediately deducts the expired vacation from the vacation balance.

Pay out vacation

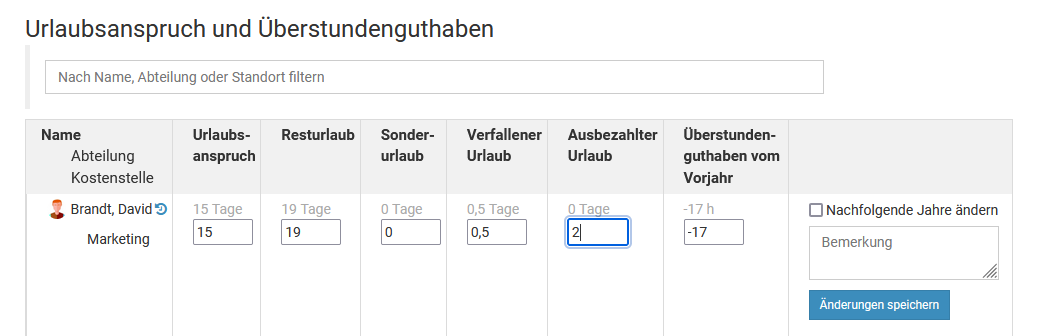
When an employee receives a vacation payout, the employee’s vacation entitlement for that year decreases. You can record the paid-out vacation in Timebutler with a few clicks, as follows:

Record paid-out vacation

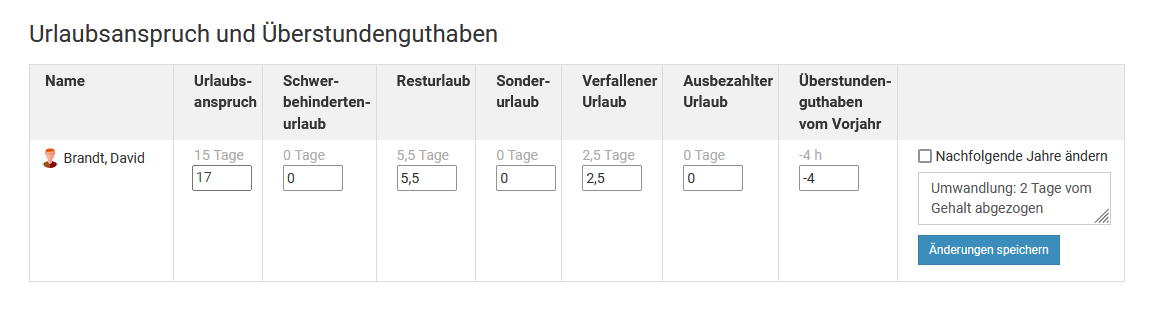
Log in to Timebutler as an admin and click “Settings > Vacation entitlement” at the bottom left. In employee Schmitt’s row, increase the number in the “Paid-out vacation” column by 2 days. If it shows 0, enter 2. Then, on the right in the row, click the “Save changes” button. This immediately deducts 2 vacation days from the employee’s vacation account.

Convert salary to vacation
Read here how to handle the reverse case: Convert salary to vacation.

Convert vacation into working time balance
If you don’t pay out the vacation but convert it into working time balance, then read here how to convert vacation into working time balance in Timebutler.

Screenshot: Record paid-out vacation

Convert vacation into working time credit

You can convert vacation balance into working time credit: the system deducts vacation from the vacation account and, in return, increases the overtime credit in the working time account. This allows an employee to offset negative hours in the working time account with vacation. An admin can perform the conversion.

Here is an example for employee Schmitt, who has -8 h in the working time account and wants to convert 2 days of vacation (16 h) into working time credit:

1. Enter paid-out vacation

Sign in to Timebutler as an admin and click “Settings > Vacation entitlement” in the bottom left. In the row for employee Schmitt, increase the number in the “Paid-out vacation” column by 2 days. If there is a 0 there, enter a 2. Then click the “Save changes” button on the right in the row. The system immediately deducts 2 days of vacation balance from the employee’s vacation account.

You should inform the employee that the display of the 2 paid-out vacation days does not mean the vacation was paid out, but that it serves as an offset for the working time account (which ultimately also affects salary).

2. Increase working time

You now need to increase the working time by 16 h. You have two options. Choose one of the two options:

1) Increase working time balance
Click “Settings > Working time balance” in the bottom left. In the row for Mr. Schmitt, increase the value in the “Working time balance from the previous year” column (or “Working time balance at the start of time tracking on tt.mm.jjjj”) by 16. If it shows 21,5, change it to 37,5. Then click “Save changes” on the right in the row. This increases the working time account credit by 16 h immediately.

2) Enter working time
Enter a new working time entry for employee Schmitt that includes the number of hours by which you want to increase the working time. In the example, a working time entry of 16 h. The system immediately credits this working time to the working time account and increases the working time account credit by 16 h.

When entering the working time entry, you should add an appropriate comment in the notes, for example “16 h offset by converting vacation.” It also makes sense to place the working time entry on a Sunday: then it does not collide with a real working time entry for the employee and it becomes clear that this is not actual working time performed.

Read here how to convert salary into working time credit.

Convert working time credit into vacation

If an employee has accumulated a lot of overtime, you can convert this working time credit into vacation. You reduce the overtime credit in the working time account and increase the vacation entitlement in the vacation account. An admin can perform the conversion.

Here is an example for the employee Schmitt, who has 60 hours of overtime in their working time account and wants to convert 40 h of it into 5 days of vacation:

Reduce working time credit

To reduce the working time credit, enter the overtime as paid overtime (inform the employee that this is not paid overtime, but that the overtime was converted into vacation). For employee Schmitt, enter 40 hours of overtime as paid overtime.

Log in to Timebutler with an admin user and click “Settings” at the bottom left, then “Working time balance” below it. In the row of the affected employee, increase the value in the current month under “Paid overtime” by the number of paid overtime hours. Then click the blue “Save changes” button (on the right in the row).

Increase vacation credit

Log in to Timebutler with an admin user and click “Settings” at the bottom left, then “Working time balance” below it. In the row of the affected employee, increase the value in the “Special leave” column by the desired number of days. So if “0” is entered for employee Schmitt, change that to “5”. If “2” is entered there, change it to “7”.

That’s it. The employee immediately has 40 h deducted from the working time account and 5 days added to the vacation account.

Are you looking for the reverse case? Read here how to convert vacation into overtime.

Convert salary into vacation

If an employee has a negative vacation balance and wants to top up the vacation account by waiving salary—or if the employee waives salary to receive more vacation days—follow these steps:

1. Pay reduced salary

Independent of Timebutler, pay the employee less salary in the affected month to offset the increase in vacation entitlement. Calculate the prorated salary waiver and pay the employee accordingly less salary.

2. Increase vacation entitlement

Sign in to Timebutler as an admin and click “Settings” at the bottom left, then “Vacation entitlement” below it. In the “Vacation entitlement” column, increase the value by the number of days that were deducted from salary. Then click the “Save changes” button on the right. The employee receives the days credited to their working time account immediately.

Example:
You deducted the equivalent of 2 vacation days from employee Huber’s salary payment. In the vacation entitlement input form, Mr. Huber has 25 days of vacation entitlement. The admin changes 25 to 27 and saves the change.

Read here how to handle the opposite case: Pay out vacation.

Convert salary into working time credit

You can convert salary into working time credit: you pay out less salary in one month and, in return, increase the overtime credit in the working time account. This lets an employee offset negative hours on the working time account by waiving salary. An admin can perform the conversion.

Here is an example for employee Schmitt, who is -16 h on the working time account and wants to offset these 16 h by waiving salary:

1. Pay reduced salary

Independent of Timebutler, pay the employee less salary in the affected month to compensate for the increase in working time credit. Calculate the proportional salary waiver and pay the employee accordingly less salary.

2. Increase working time

You now need to increase the working time by 16 h. You have two options. Choose one of the two options:

1) Increase working time balance
Click at the bottom left on “Settings > Working time balance”. In Mr. Schmitt’s row, increase the value in the “Working time balance from the previous year” column (or “Working time balance at the start of time tracking on dd.mm.yyyy”) by 16. If it shows 21.5, change it to 37.5. Then click “Save changes” on the right in the row. This immediately increases the working time account credit by 16 h.

2) Enter working time
Enter a new working time entry for employee Schmitt that includes the number of hours by which the working time should be increased. In this example, a working time entry of 16 h. This time is immediately credited to the working time account and increases the working time account credit by 16 h.

When entering the working time entry, add an appropriate comment in the notes, for example “16 h offset through salary conversion”. It also makes sense to place the working time entry on a Sunday: that way there is no clash with a real working time entry by the employee and it becomes clear that this is not actual time worked.

Read here how to convert vacation into working time credit.

Pro-rated, mid-year vacation entitlement

Pro-rated vacation entitlement when creating a new user account

When you create a new user account and the employee joins the company mid-year, the employee has a reduced vacation entitlement for the first calendar year. The employee receives the full annual vacation entitlement starting with the following calendar year.

There are two ways to set the pro-rated vacation entitlement for the first calendar year:

1) Enter the pro-rated vacation entitlement manually
In the “Vacation entitlement per year” field, enter the annual vacation entitlement the employee has when employed for a full calendar year. In the “Vacation entitlement in 2025” field, enter the pro-rated, lower vacation entitlement the employee has in the year they are hired mid-year.

In this case, you determine the pro-rated vacation entitlement yourself and enter the value in the “Vacation entitlement in 2025” field. Timebutler does not calculate the value in this case.

2) Let the pro-rated vacation entitlement be calculated
In the “Vacation entitlement per year” field, enter the annual vacation entitlement the employee has when employed for a full calendar year. Leave the “Vacation entitlement in 2025” field empty. In the “Start date” field, enter the employee’s start date. Save the changes.

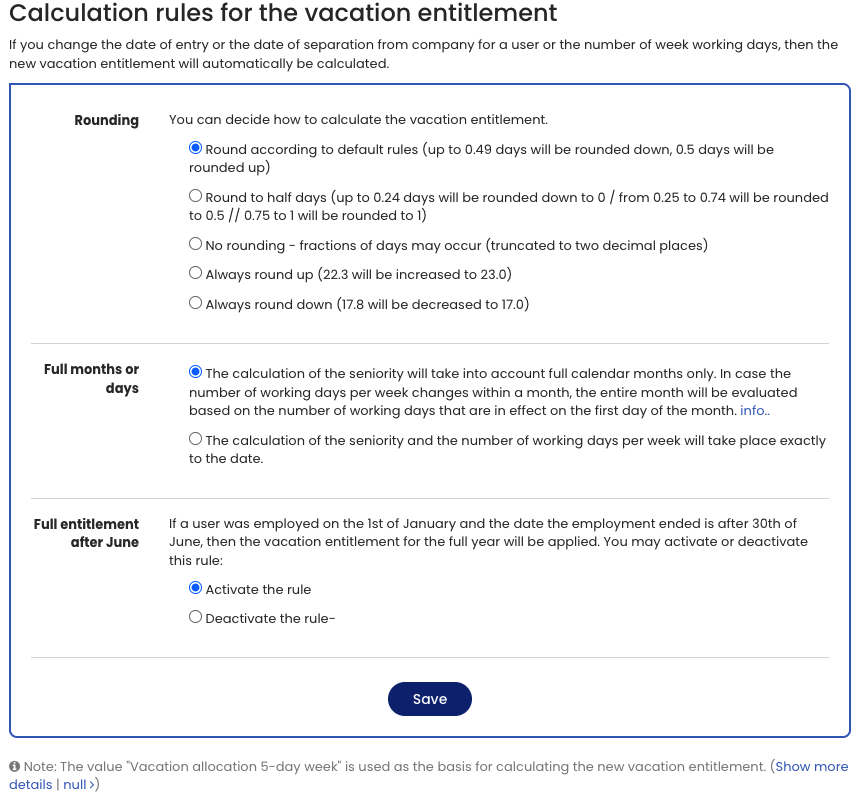
Timebutler now calculates the pro-rated vacation entitlement (according to the Settings for calculating the vacation entitlement) for the current year, and on the next page you receive a suggestion to adjust the pro-rated vacation entitlement, which you can accept or decline with a click.

Pro-rated vacation entitlement when an employee leaves

If an employee resigns or otherwise leaves the company, they have a reduced vacation entitlement in the last year of employment (unless they leave on December 31).

You can have Timebutler calculate the reduced vacation entitlement automatically. Log in to Timebutler as an admin and click in the top left on “Employees > Employees > Overview”, then for the desired user account click the green icon with the pencil (=Edit). In the “Leave date” field, enter the employee’s leave date and save the changes by clicking the blue “Save” button at the bottom of the page.

Timebutler now calculates the pro-rated vacation entitlement (according to the Settings for calculating the vacation entitlement) taking the leave date into account, and on the next page you receive a suggestion to adjust the pro-rated vacation entitlement, which you can accept or decline with a click.

Automatic vacation entitlement calculation

When an employee joins the company mid-year or leaves the company mid-year, they are entitled to fewer vacation days for that calendar year. Likewise, the vacation entitlement changes when the number of weekly working days is adjusted — for example, when an employee reduces their working days from Monday through Friday to Monday, Wednesday, and Thursday.

Timebutler will individually calculate the new vacation entitlement for the employee for the affected years and propose the changes. You can accept the new vacation entitlement with a single click.

Note:

Calculating the new vacation entitlement is complex and demanding. For example, an employee’s weekly working days may change on a specific date. Or you may retroactively change the weekly working days for a certain period and set the leaving date. It is also possible that the weekly working days change but the total number of working days stays the same (for example, changing from “Mon+Wed+Thu” to “Tue+Wed+Fri”) — in this case, no adjustment to the vacation entitlement is necessary for the affected period.

Timebutler handles these special cases, identifies all years for which a change is necessary, and calculates the new vacation entitlement. The rules for recalculation that you can individually configure are applied. Let Timebutler handle the tedious calculation of the new vacation entitlement.

To calculate the new vacation entitlement, the value “Entitlement for a 5-day week” is used, which can be set individually for each employee.

Setting rules for the calculation

An admin can define the rules by which the new vacation entitlement is calculated.

No recalculation for bulk changes to user accounts

When you change the working days for a large number of employees via bulk change, the new vacation entitlement is intentionally not recalculated automatically. Such a change can affect hundreds of different values — for example, changing the working time model for 50 employees starting next month: the vacation entitlement for all future years would need to be adjusted. It would not be practical to present the necessary changes to the vacation entitlement for review and approval.

Entitlement for a 5-day week

The entitlement for a 5-day week is the vacation entitlement for a full calendar year that the employee would have if they worked a 5-day week (full-time). This value is not an actual vacation entitlement in the vacation account but serves solely as a calculation basis in case the vacation entitlement needs to be recalculated for a given year.

For employees who have 5 weekly working days configured, this value should be identical to the vacation entitlement for that year. For employees who have more or fewer than 5 weekly working days, the value will contain exactly the vacation entitlement the employee would have if they worked 5 days per week.

What is the purpose of the entitlement for a 5-day week?

When an employee’s start or end date is changed or newly entered, or when the number of weekly working days changes, the vacation entitlement must be recalculated.

To calculate the new vacation entitlement, it is necessary to know the entitlement for a full-time position (5-day week). The entitlement for a 5-day week therefore serves as a calculation basis so that Timebutler can compute the new vacation entitlement for the employee.

This value is used only for this recalculation of the vacation entitlement. It is not a vacation entitlement that the employee has as a balance in their vacation account, and therefore this value is not displayed in the vacation account.

For which year does the entitlement for a 5-day week apply?

The entitlement for a 5-day week applies equally to all years. If you change the value, the updated value automatically applies to all years.

Where is the entitlement for a 5-day week displayed?

The entitlement for a 5-day week is displayed only in the editing form for the vacation entitlement values and can be edited there. It is not shown in the vacation accounts or in other views.

How is the value calculated?

When creating a new user account, the vacation entitlement and the weekly working days are entered. From this information, Timebutler automatically calculates the entitlement for a 5-day week:

  • If the employee has 5 weekly working days, the specified vacation entitlement is also used as the value for the entitlement for a 5-day week.
  • If the employee has more or fewer than 5 weekly working days, the vacation entitlement is converted accordingly. For example, if the employee has 3 weekly working days and 18 days of vacation entitlement, this corresponds to a vacation entitlement of 30 days for a 5-day week (18 / 3 x 5 = 30 days).

The result is rounded to the nearest half day so that no fractions smaller than half a day occur.

Can the value be edited?

The value can be edited at any time in the editing form for the vacation entitlement. Changing this value has no immediate effect on the vacation entitlement or the vacation account.

Only when an employee’s vacation entitlement needs to be recalculated (due to a change in the start/end date or the weekly working days) does Timebutler use this value to calculate the new vacation entitlement.

Does the value need to be entered or edited?

Timebutler calculates the value automatically when creating a new user account. You do not need to enter the value yourself.

In rare cases, however, the value must be edited — namely when the annual vacation entitlement changes. For example, if you grant an employee one additional vacation day per year after 10 years of service, you would increase the “Entitlement for a 5-day week” value by one day.

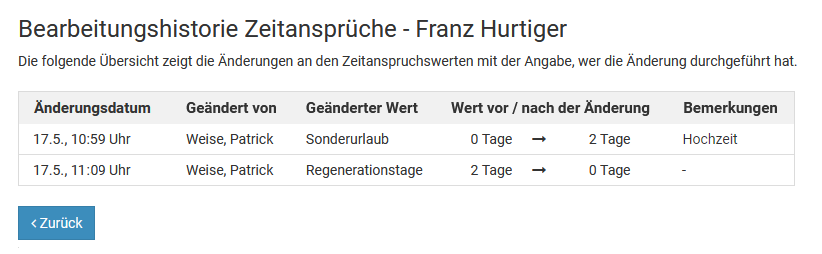
Change history of leave entitlement

Timebutler logs changes to the entitlement data of the leave account (leave entitlement, remaining leave, special leave, expired leave, etc.). This lets you see which user changed the entitlement data.

Time balances are also logged
If the time tracking feature is enabled, Timebutler also logs changes to the working time balance at the start of time tracking as well as changes when transferring overtime credit to the next year.

If the overtime feature is enabled, Timebutler also logs changes to the previous year’s overtime account as well as changes when transferring overtime credit to the next year.

Open change history: Admins and supervisors

To open the change history of entitlement data and time balances as an admin or supervisor, sign in to your Timebutler user account and click “Employees” in the top left, then under “Absences” click “Leave accounts”. For the desired employee, click the icon with the clock and the arrow:

Open change history: Employee users

To open the change history of your own entitlement data and time balances as an employee user, sign in to your Timebutler user account and click “Leave account” under “Your leave” on the left. Then click the “Change history” button.

Comments when making changes

An admin can decide whether the user must enter a comment when editing entitlement data and time balances or whether the comment is optional. An admin can set this in “Global settings”.

Sign in to Timebutler as an admin, click “Settings” in the bottom left, then below that click “More..”. Click “Global settings” in the top right. Now check/change the option “Comments when changing entitlement data”.

Example

Calendar view

Calendar view leave requests

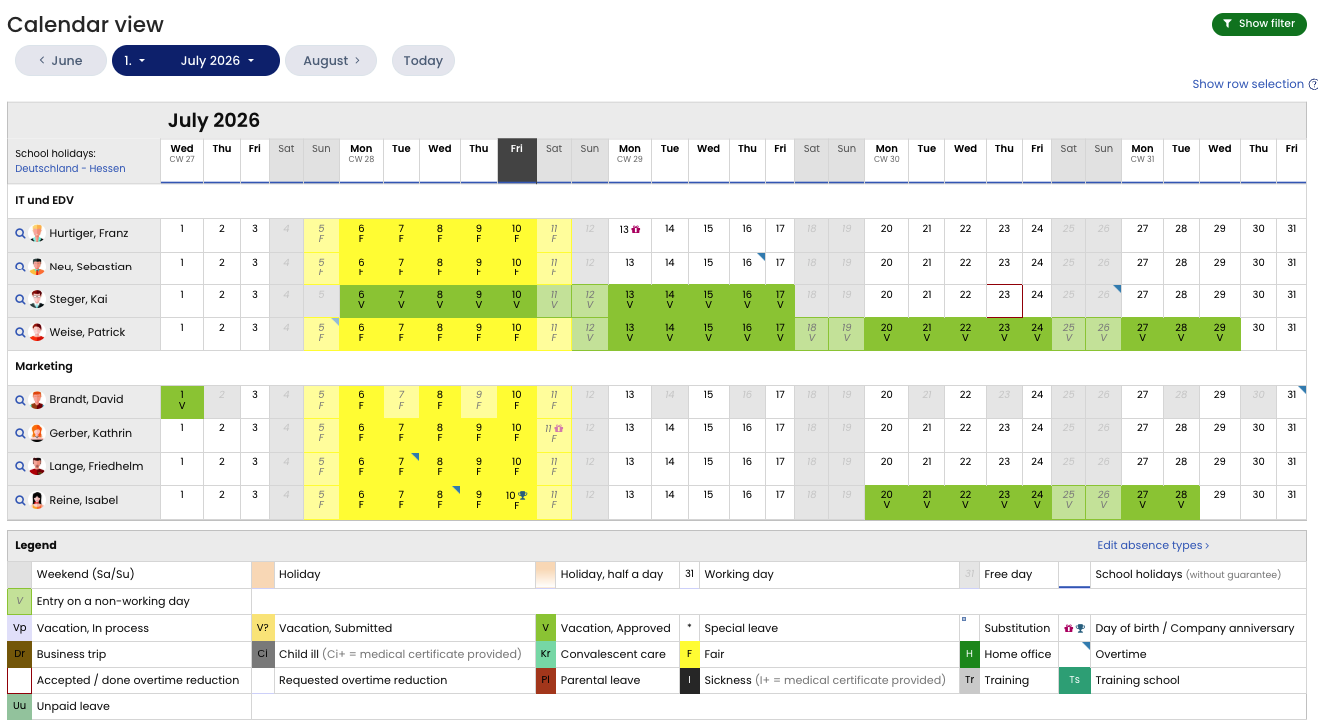
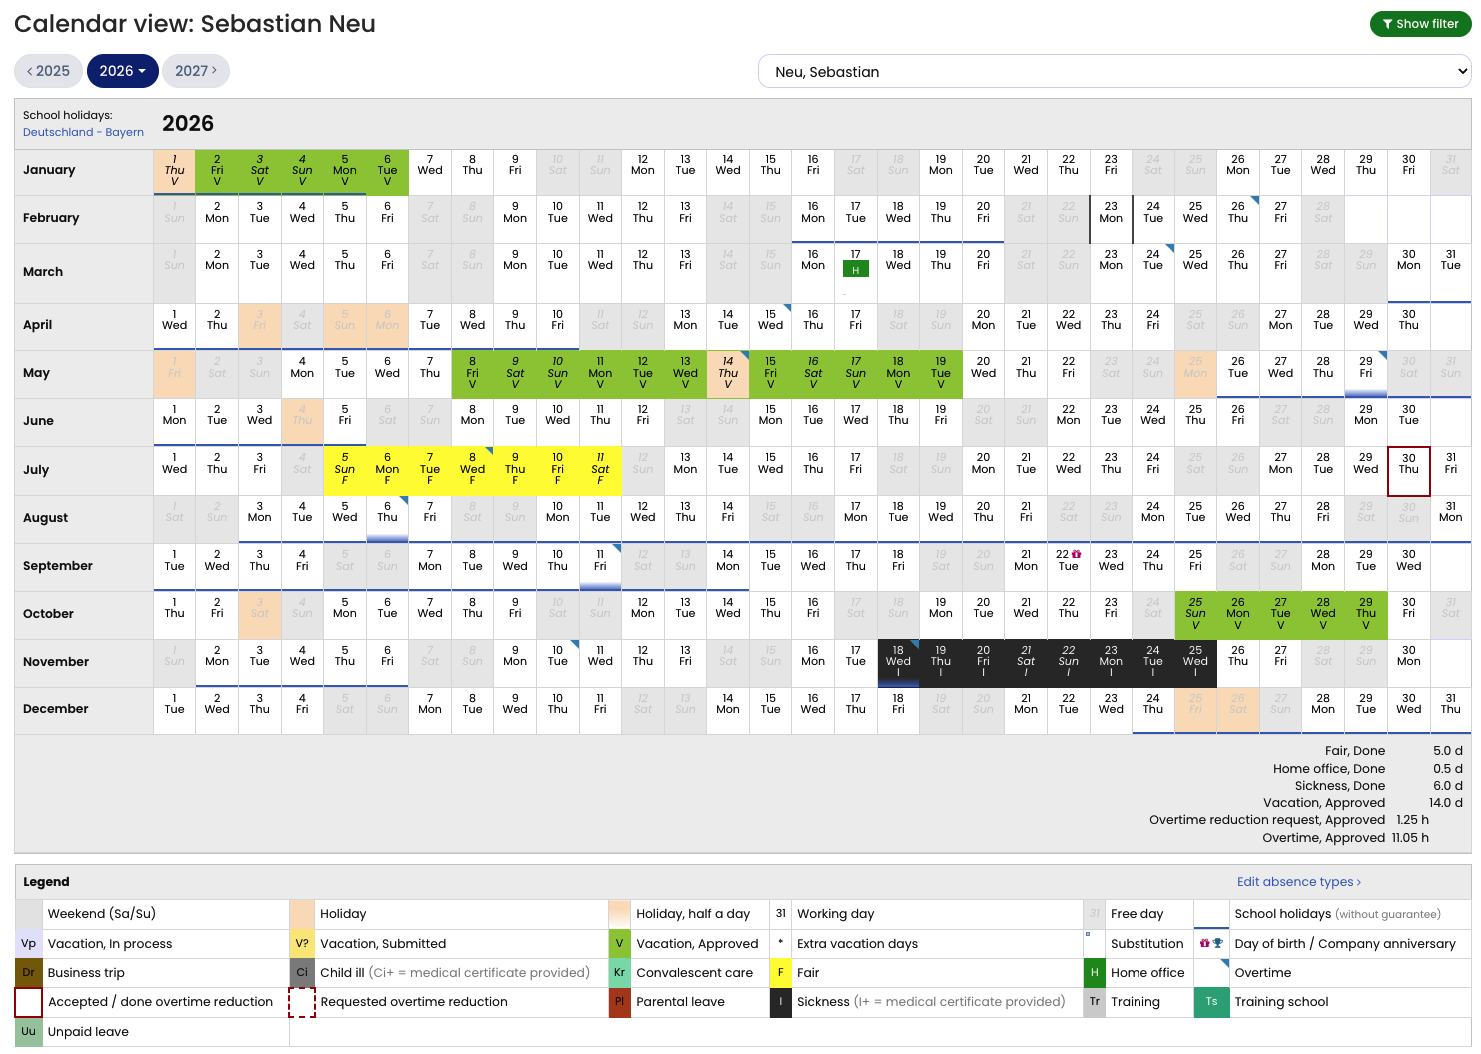
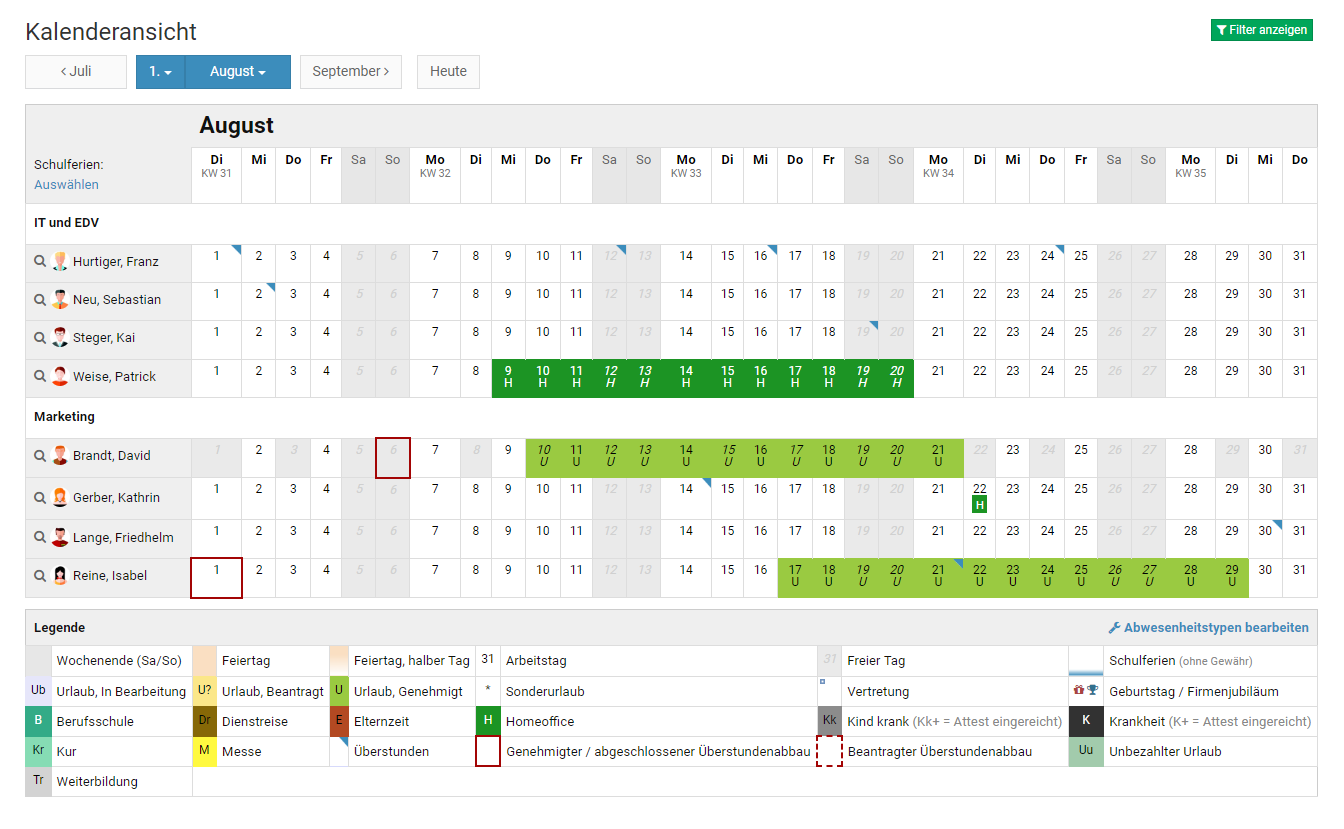
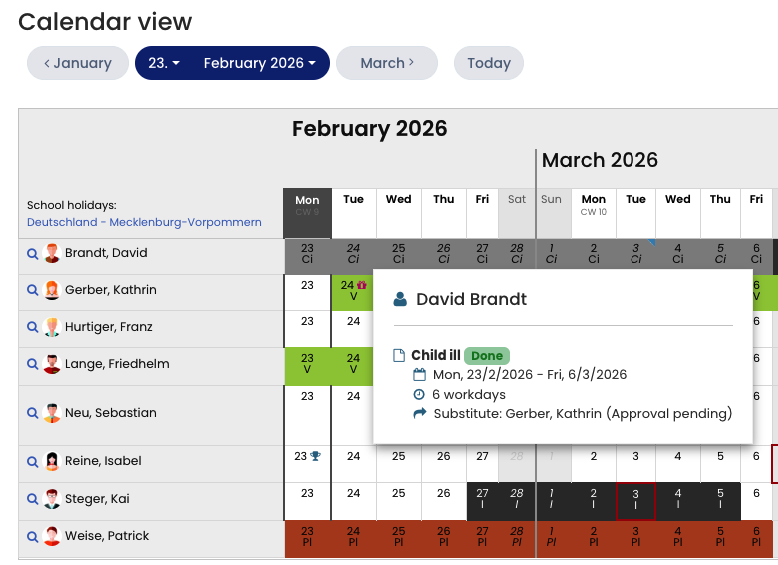
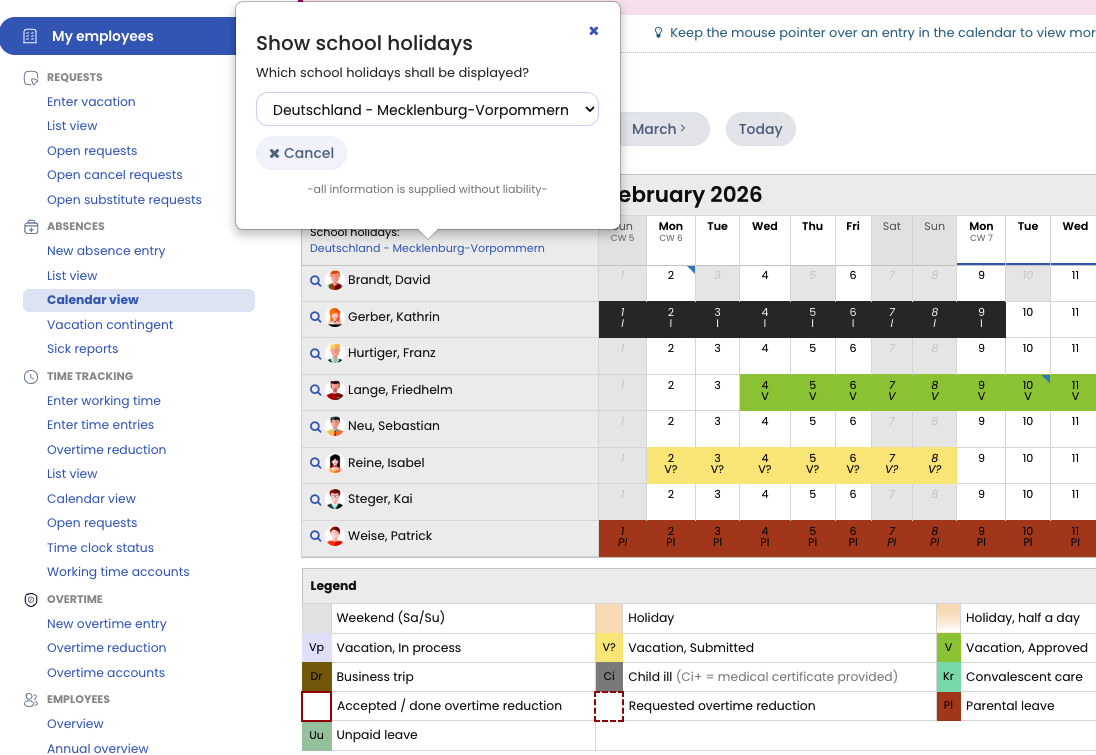
In the absences calendar view, you also see vacation requests. You can easily recognize each vacation request and absence entry by a colored bar.

Open the calendar view: Employee users

Employee users sign in to Timebutler and click Absences > Calendar view on the left. If the employee has visibility permissions for colleagues, they can open the team calendar by clicking Colleagues > Calendar view on the left.

Open the calendar view: Managers and admins

Open team calendar
The manager or admin signs in to Timebutler and clicks Employees > Absences > Calendar view at the top left to view the calendar for their own team or all employees. The calendar shows one month across multiple employees. Timebutler intentionally does not provide an annual view across multiple employees, because one screen cannot present that much information in a meaningful way.

Open your own calendar
The manager or admin signs in to Timebutler and clicks My data > Absences > Calendar view on the left.

Open a single employee’s annual calendar
The manager or admin signs in to Timebutler and clicks Employees > Employees > Annual overview at the top left, then clicks the desired employee’s name.

Settings

Vacation blockers and warnings

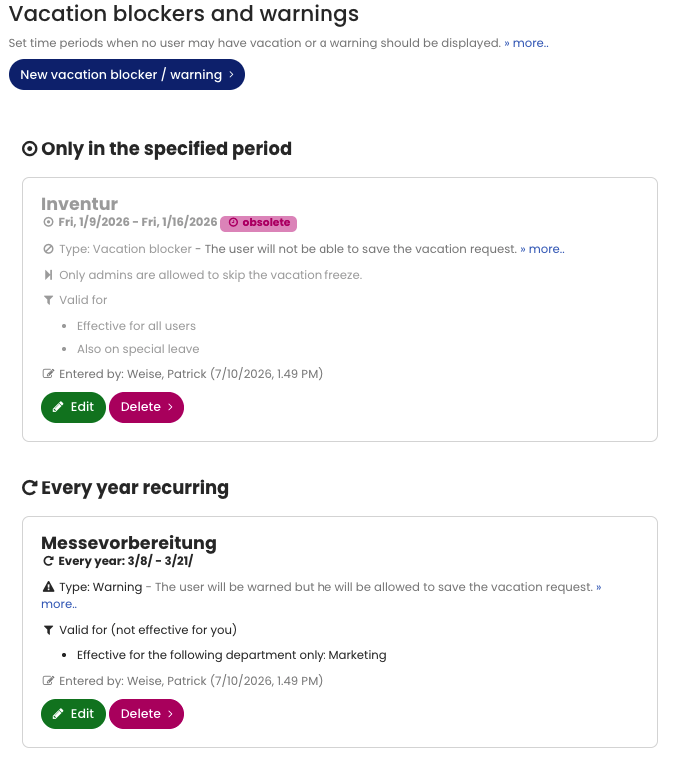
With vacation blockers and warnings, you define dates or periods during which employees can’t take vacation or during which a warning appears. For example, if Sales should attend a business event together next year, you can set up a vacation blocker in advance to ensure that employees in Sales cannot request vacation during that time.

Warning
With a warning, the employee sees a warning message when entering a vacation request and can then decide whether to submit the request anyway.

Vacation blocker
If a new vacation request conflicts with a vacation blocker, an employee user receives an error message and cannot save the request. Admins receive a warning and can override the blocker if they want. You can also decide for each vacation blocker whether managers may override it.

Options
You can limit vacation blockers and warnings to specific employees, departments, or locations. You can create vacation blockers and warnings that recur annually, and you can decide whether to allow special leave to be entered despite vacation blockers.

Edit vacation blockers and warnings
To view or edit vacation blockers and warnings, sign in to Timebutler as an admin and click Settings at the bottom left, then Vacation blockers below it.

Displaying vacation blockers

Vacation blocker and warning periods do not appear in the calendar yet. However, if an employee submits a vacation request that falls within a vacation blocker or warning, they receive the corresponding error/warning message.

In addition, every user can view their vacation blockers. They sign in to their Timebutler account and click Settings at the bottom left, then Vacation blockers below it.

Screenshot: Example vacation blocker

Limits and minimum availability of employees

With limits, you can ensure that a certain minimum number of employees are available and that not too many employees from a department or user group are on vacation at the same time.

Edit limits

To view and edit limits, sign in to Timebutler as an admin, click Settings at the bottom left, then Limits below it.

Limits with the overtime feature

If you enable the overtime feature, then in addition to the minimum attendance limit there are additional options:

  • Overtime limit: Define how much overtime credit an employee may accumulate at most in their overtime account.
  • Deficit hours limit: Define how many deficit hours an employee may accumulate at most in their overtime account.

Limits with the time tracking feature

If the time tracking feature is enabled and the overtime feature is therefore disabled (you can only enable either the time tracking feature or the overtime feature), then the limits on the number of overtime hours and on the number of deficit hours are not available.

In the time tracking feature, you can instead cap overtime, configure rounding of work time entries, or define setup times.

Edit history of vacation requests

You can see the edit history of vacation requests in the entry’s detail view, just like for other absence entries.

Read here how to open the edit history of absence entries.

Vacation not subject to approval

In some companies, employees may enter vacation at their own discretion, without their manager having to approve the requests.

You can configure this setting in Timebutler as follows:

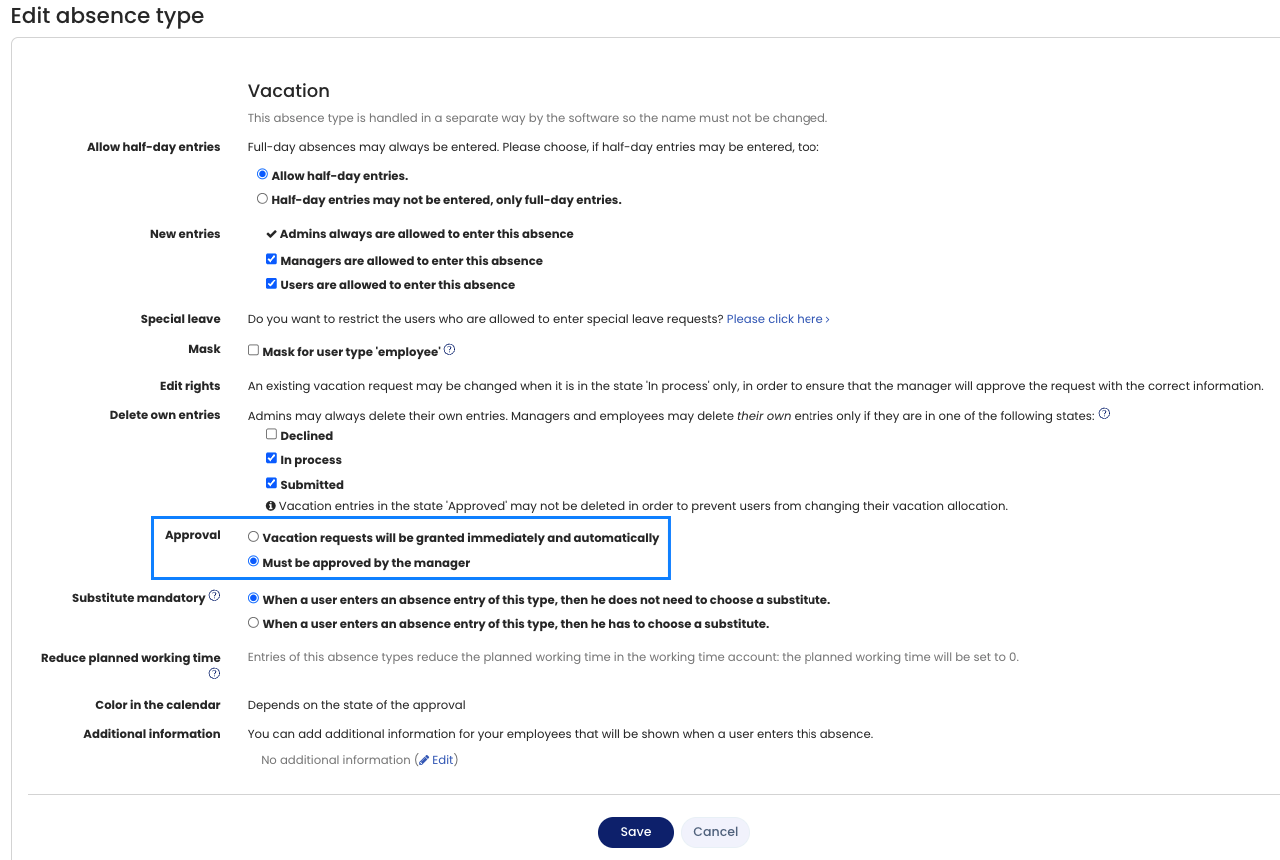
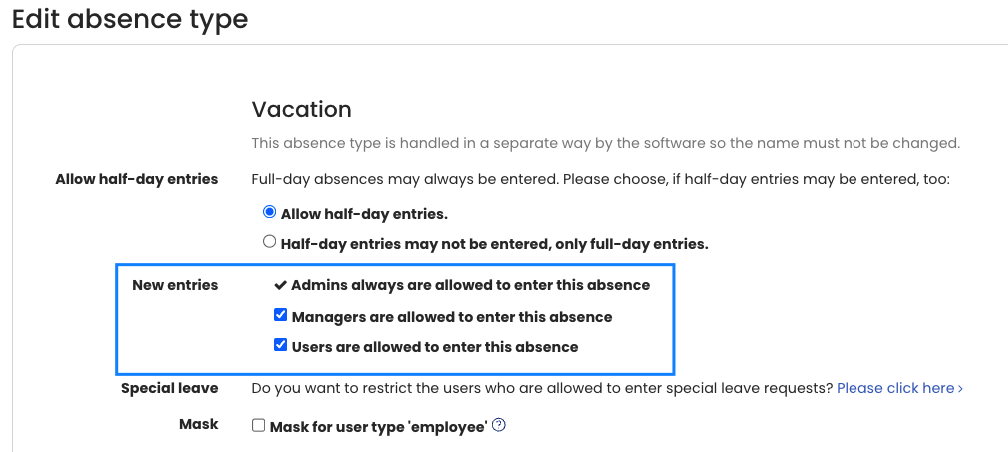
Sign in to Timebutler as an admin and click Settings > More… at the bottom left, then Absence types on the right. In the row for Vacation (in some cases Annual vacation), click the green button with the pencil on the left (= Edit). Check or change the Approval setting, then click the Save button at the bottom.

The change takes effect immediately for new vacation requests. Existing vacation requests that are still in the Requested status remain in this status, and the manager still needs to approve them.

Screenshot: Set vacation as not subject to approval

Troubleshooting

We deduct special leave from the leave balance

We intentionally deduct special leave from the leave balance.

Learn here, how to handle special leave.

No vacation deducted or vacation days calculated incorrectly

If you have recorded vacation for an employee (or another absence entry) and Timebutler has apparently calculated too few vacation/work days, then in most cases this is due to the following causes:

A vacation request did not deduct any vacation

You can set the weekly working days for each employee, for example “Monday to Friday” or “Mon+Tue+Thu+Sat”. Sometimes you accidentally set no weekday as a working day for an employee. As a result, every vacation request calculates 0 vacation days, because according to the settings the employee does not have to work on any weekday.

To check whether this problem exists, sign in to Timebutler as an admin and click Settings > Working days at the bottom left. Check which weekly working days are set for the employee. If no, the wrong, or too few weekly working days are active, click the blue Edit button for the employee, change the weekly working day settings, and click the blue Save button at the bottom. Timebutler automatically recalculates the employee’s vacation requests, absence entries, and vacation balance.

See also the article on weekly working days.

A vacation request deducted too little vacation

If, for a vacation request over, for example, 2 weeks, Timebutler deducted only, for example, 8 vacation days instead of the expected 10, this usually has the following causes:

1) The employee does not have a 5-day week
The employee might not have a 5-day week, but, for example, works only Monday to Thursday. Check the weekly working days to see how many days the employee works per week. To determine the weekly working days, proceed as described in the section above on this page.

2) Weekly working days are set incorrectly
The employee might have a 5-day week, but you accidentally activated only 4 weekly working days instead of 5. To determine and correct the weekly working days, proceed as described in the section above on this page.

3) Holidays
There might be holidays during the chosen vacation period, so the number of vacation days is correspondingly lower. To check which Holiday calendar is set for the employee, proceed as follows:

Sign in to Timebutler as an admin and click Settings > Working days at the bottom left. Check which Holiday calendar is set for the employee. If the wrong Holiday calendar is set, click the blue Edit button for the employee, change the Holiday calendar setting, and click the blue Save button at the bottom.

To find out which holidays apply to a Holiday calendar, sign in to Timebutler as an admin and click Settings > More… at the bottom left, then Holiday calendar on the right. For the desired Holiday calendar, click the blue Details button.

Part-time employees and vacation entitlement

You can use Timebutler to manage absences and vacation for employees who work part time. Please note the following:

Many companies convert vacation entitlement based on working hours and grant proportionally fewer vacation days. For example, if a full-time employee is entitled to 30 days of vacation per year, many companies grant part-time employees who work 50% only 50% of the vacation entitlement, i.e. 15 days. However, this conversion is not necessary and, under the German Federal Vacation Act, it is also incorrect.

Instead, the following principle applies:
A part-time employee generally has the same vacation entitlement as a full-time employee, and only the number of weekly working days is relevant to calculate a pro-rated entitlement. Do not consider the daily working hours per weekday, even if they are irregular.

Here are some examples (assumption: a full-time employee is entitled to 30 vacation days per year with a 5-day week of 8 hours each from Monday to Friday):

Case 1) Part-time employee with a 5-day week and regular working hours

This part-time employee also receives 30 vacation days per year, just like the full-time employee. Although they work only 50% of the time of a full-time employee, one vacation day also gives the part-time employee only half as much time off, so with the same number of vacation days the part-time employee has no advantage over the full-time employee.

Case 2) Part-time employee with a 3-day week and regular working hours

This part-time employee receives 3/5 of the full-time entitlement because they work on 3 out of 5 working days in the week. They therefore receive 3 / 5 x 30 = 18 vacation days. Again, it is not relevant whether they work 4 hours on each of the three days, or 6 hours, or any other number of hours. In any case, they receive 18 vacation days.

Case 3) Part-time employee with an irregular number of hours on different weekdays

If a part-time employee works a different number of hours on different weekdays (for example, Mondays 8 hours, Tuesdays 4 hours, and Fridays 6 hours), this does not affect the calculation of the vacation entitlement. The same as in case 2 applies: the number of weekdays on which the employee works is the basis for the vacation entitlement, regardless of the number of hours per weekday.

If the part-time employee works, for example, 8 hours on Mondays, 4 hours on Tuesdays, and 6 hours on Fridays, they still receive 3 / 5 x 30 = 18 vacation days, which they can request and take at their discretion and in coordination with the employer. For the calculation, only the fact that they work on 3 of the 5 weekly working days matters — regardless of how many hours they work on each day.

Calculate vacation entitlement for part-time employees

Note:
The calculation follows the German Federal Vacation Act, without guarantee. Collective agreements, provisions in the employment contract, and other rules may set different requirements.

Absence Management

Enter absences

Enter an absence

There are several ways to create a new absence entry in Timebutler. The available options depend on the user role and the preferred workflow.

Creating an Absence via the Calendar

Employee users

  1. Log in to Timebutler.
  2. Click “Absences > Calendar View” in the left-hand navigation.
  3. Click on the first day of the absence.
  4. Click on the last day of the absence.
  5. A small selection window appears.
  6. Click “Other absence.”
  7. The absence entry form opens, where you can edit the details and save the entry.

Supervisors and admins

  1. Log in to Timebutler.
  2. Click “Employees > Absences > Calendar View” in the top-left navigation.
  3. In the row of the relevant employee, click on the first day of the absence.
  4. Click on the last day of the absence.
  5. A small selection window appears.
  6. Click “Other absence.”
  7. The absence entry form opens, where you can edit the details and save the entry.

Enter absence via the entry form

Employee users

  1. Log in to Timebutler.
  2. Click “Absences > Create absence.”
  3. The absence entry form opens.

Supervisors and admins

  1. Log in to Timebutler.
  2. Click “Employees > Absences > Create absence.”
  3. The absence entry form opens.

Additional Options

  • Absence entries can also be created as recurring entry, for example when planning home office every Tuesday and Thursday over the next two months.

  • Admins can create absence entries for all employees or multiple employees at once using bulk request.

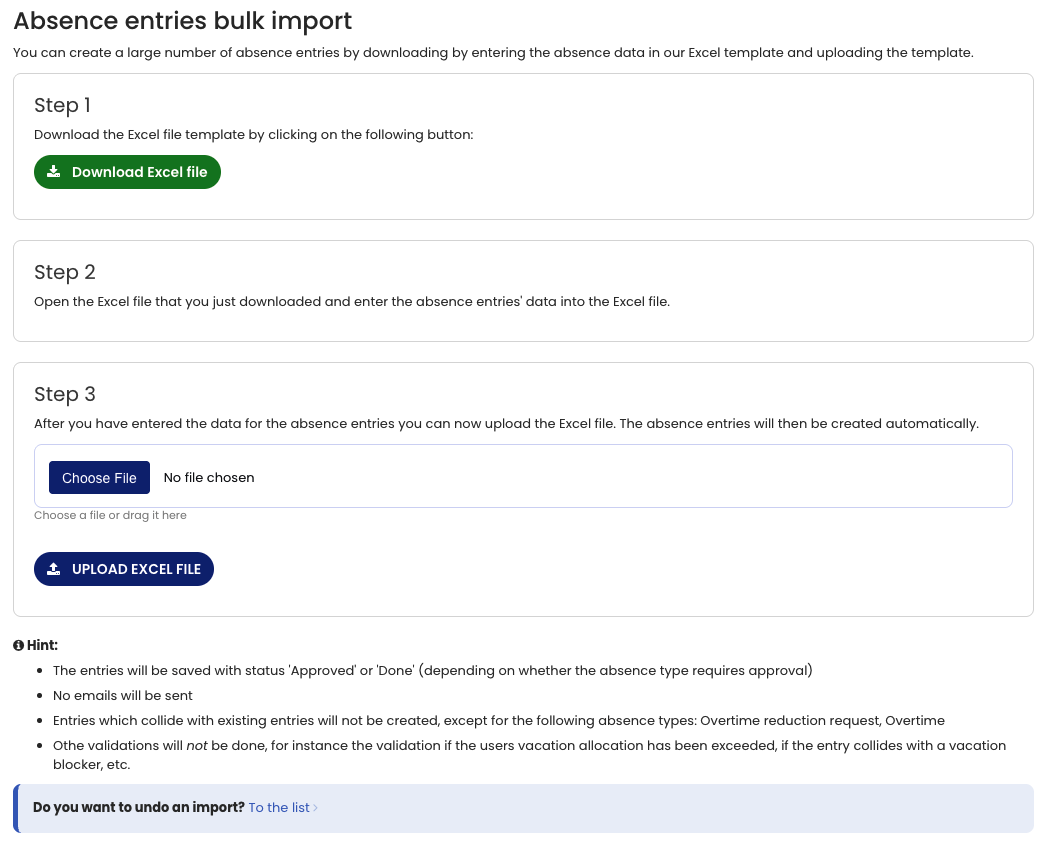
  • Absence entries can also be added via bulk import, which is especially useful when switching to Timebutler for the first time.

Screenshot: Enter absence via the calendar

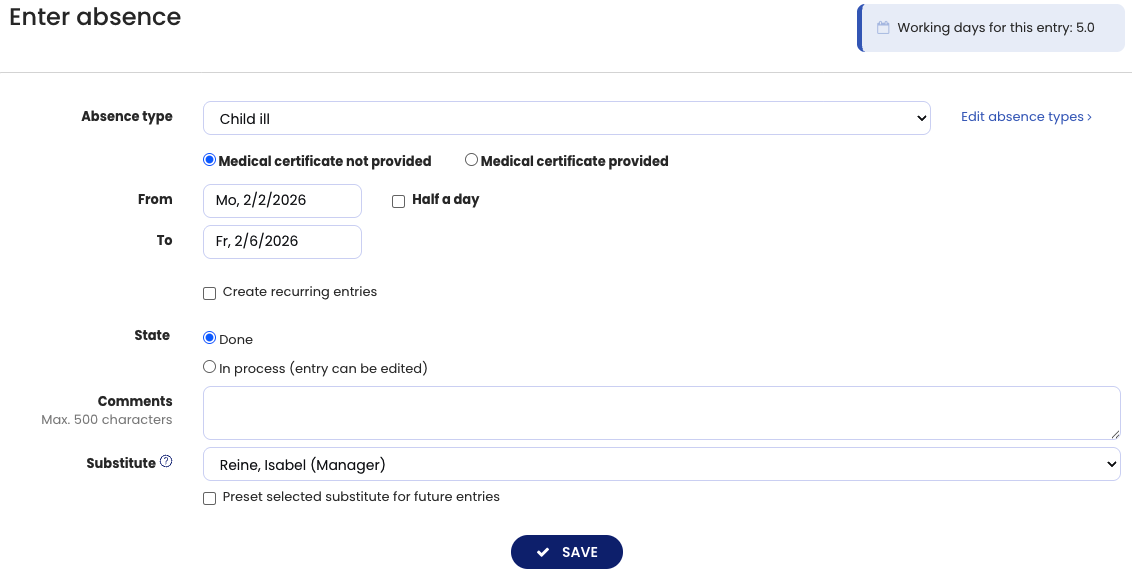
Screenshot: Enter absence via the entry form

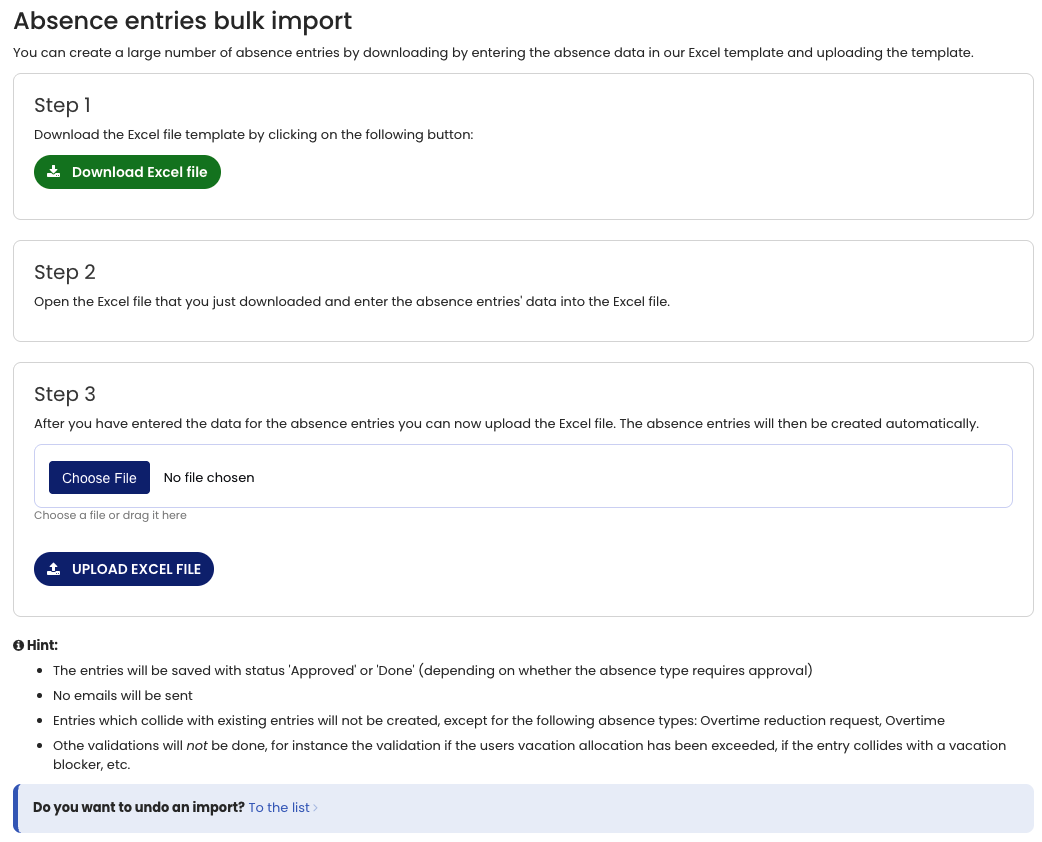
Screenshot: Bulk import of absence entries

Edit absence

The rules for editing absence entries are the same as for editing vacation requests and are designed to ensure auditability and prevent retrospective changes.

Editing Restrictions Based on Status

Absence entries with the status “Approved” or “Processing completed” cannot be edited afterwards. This restriction exists to ensure revision security and to prevent approved requests from being manipulated after the fact.

For example, if approved entries could be edited, an employee could:

  • Replace an approved three-week vacation with a home office entry,
  • Delete the home office entry afterward,
  • And thereby undo the vacation without notice.

To prevent such scenarios, approved or completed entries are locked from editing.

Absence entries with the status “In progress”, however, can be edited at any time.

Changing an Approved Absence Entry

To change an absence entry that has already been approved, the existing entry must first be deleted and then recreated as a new absence entry.

Deleting and Recreating Absence Entries by User Role

Employee users cannot delete the absence entry themselves. Instead:

  • A cancellation request email is sent to the supervisor.
  • The supervisor can approve the cancellation request.
  • Once approved, the absence entry is deleted.
  • The employee is informed and can then enter a new absence entry.

Supervisors and admins Supervisors and admins can delete absence entries directly and then create a new absence entry if needed.

Convenience Feature for Admins

Admins have access to a convenience feature when creating new absence entries that overlap with existing ones.

For example, if an employee has entered a two-week vacation and becomes ill during the second week, the admin only needs to enter a one-week sick leave. Timebutler detects the overlap between the sick leave and the vacation entry and offers to automatically shorten the existing vacation entry.

Depending on how the new entry overlaps with existing entries, Timebutler will:

  • Shorten existing entries,
  • Split them into multiple parts, or
  • Delete them entirely.

Admins therefore only need to enter the new absence, and Timebutler automatically adjusts the existing entries accordingly.

Allow editing and deleting absence entries

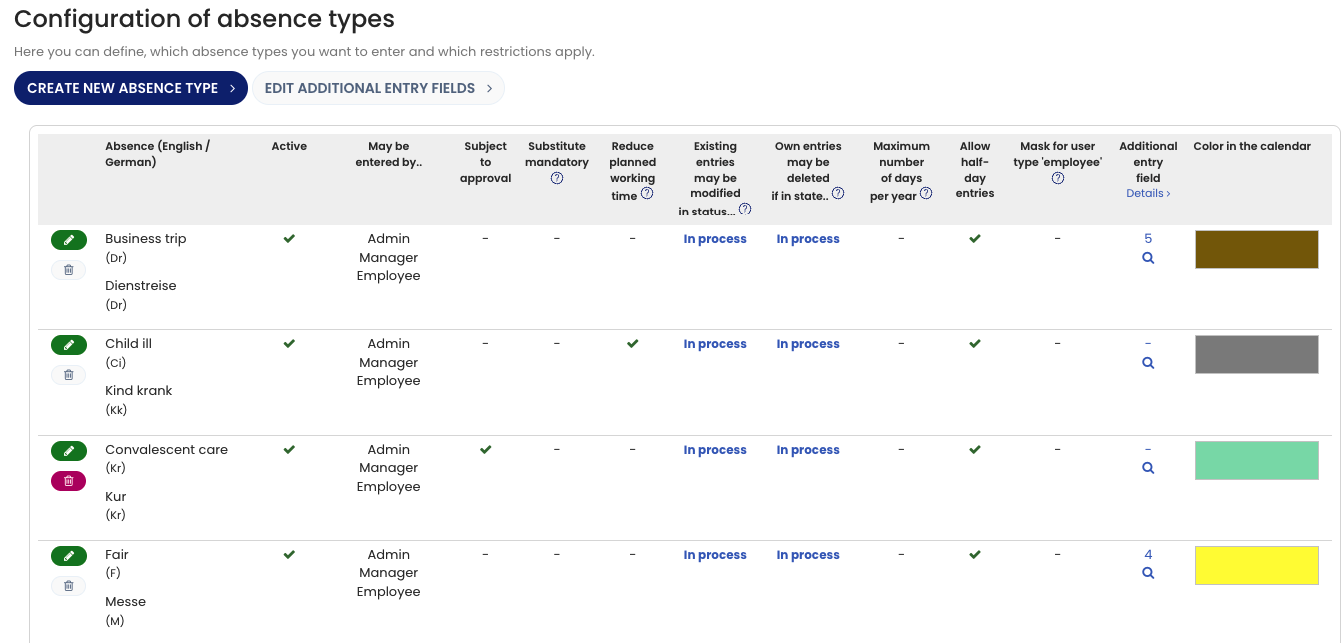
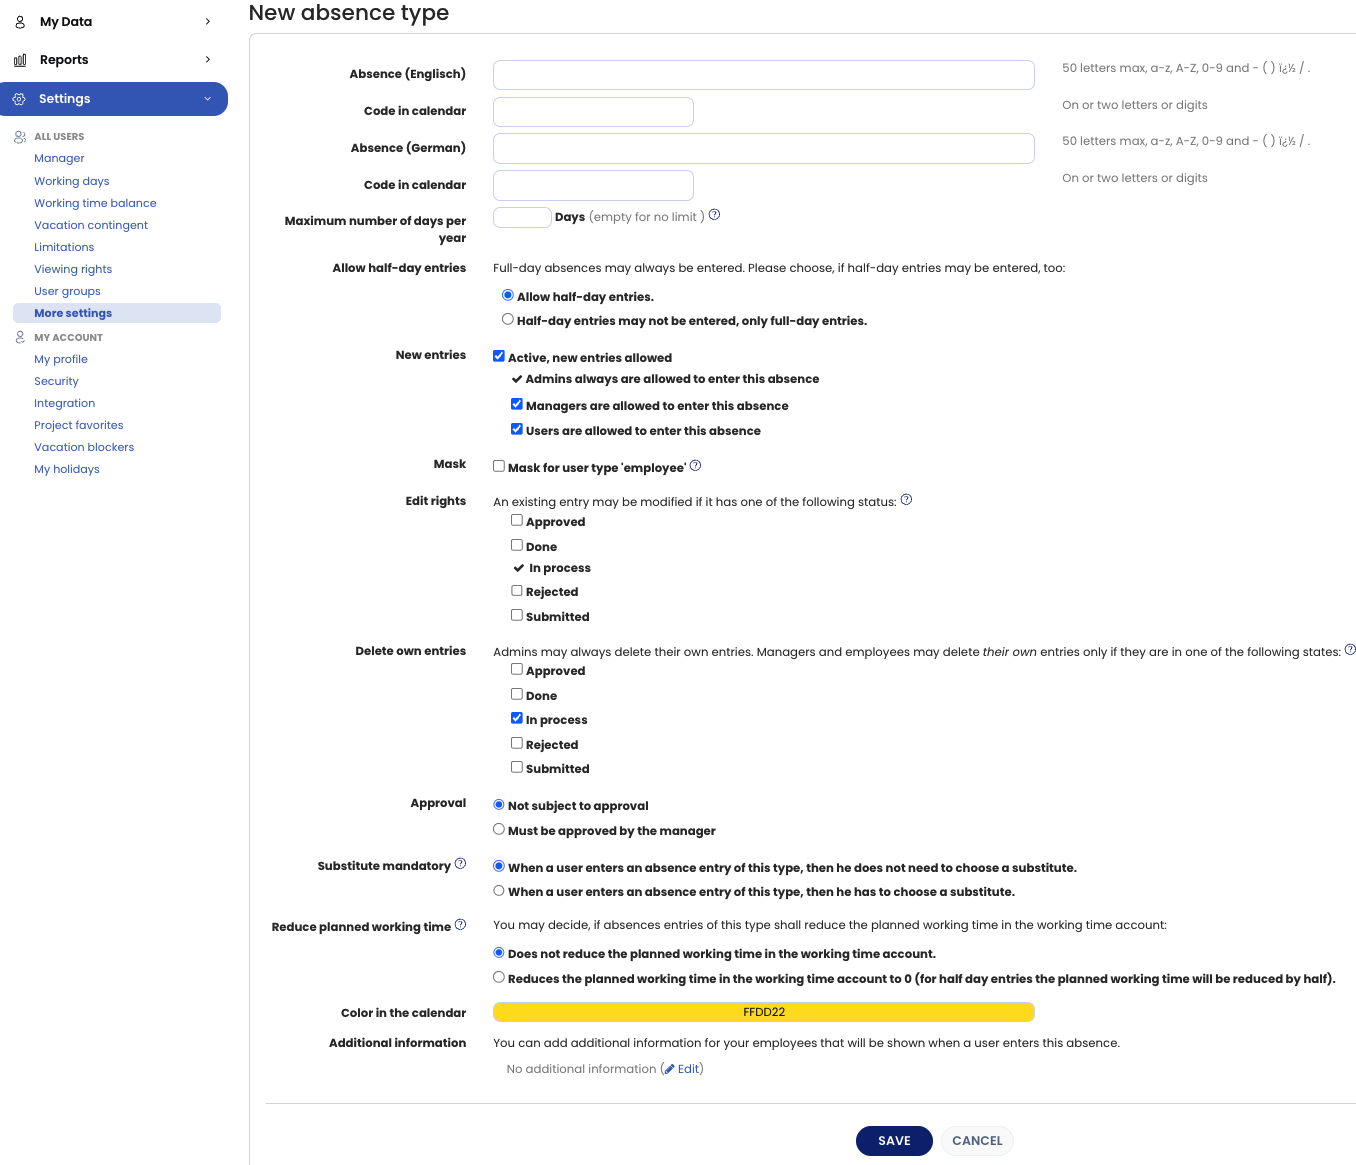
Admins can configure editing and deletion permissions per absence type (for example, training or home office).

This allows admins to define:

  • When users are allowed to edit or delete absence entries
  • That certain absence types (such as home office) can always be edited, changed, or deleted independently by employees, without submitting a cancellation request to a supervisor

Read here how to change the edit and delete permissions for absences.

Delete absence

How an absence entry can be deleted depends on the user role (employee, supervisor, or admin) and on the system settings configured by an admin.

Deleting an Absence Entry: Employee Users

Employee users cannot delete absence entries directly. Instead, deleting an entry triggers a cancellation request that must be approved by a supervisor.

When an employee submits a cancellation request:

  • A cancellation request email is sent to the supervisor.
  • The supervisor can approve the request.
  • Once approved, the absence entry is deleted.
  • The employee is notified by email after the deletion.

Creating a Cancellation Request

Employee users can create a cancellation request in one of the following ways:

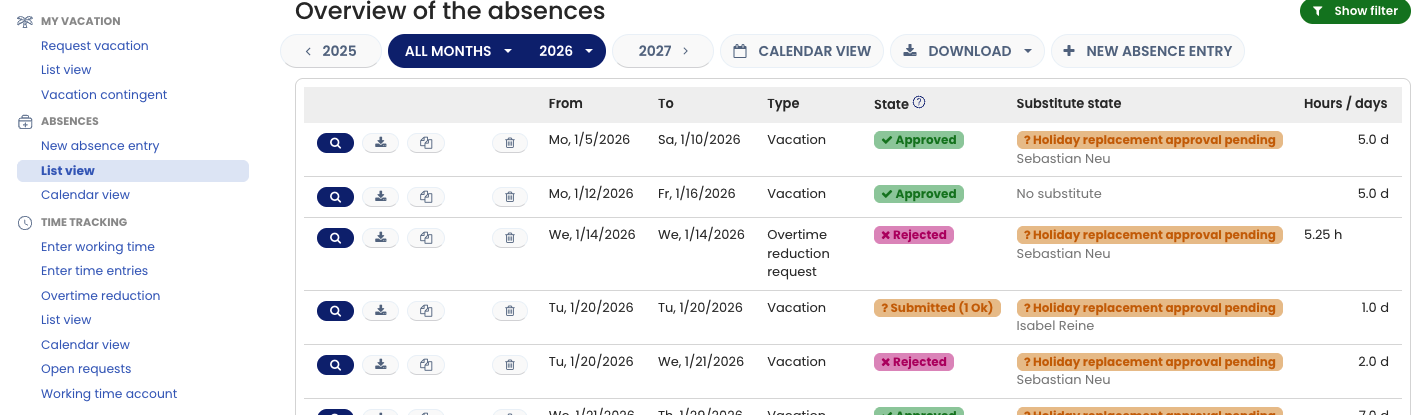
Via List View

  1. Log in to Timebutler.
  2. Click “Absences > List View” in the left-hand menu.
  3. Click the red trash can icon next to the absence entry you want to delete.

Via Calendar View

  1. Click “Absences > Calendar View” in the left-hand menu.
  2. Click the relevant absence entry in the calendar.
  3. Click the red “Delete” button on the entry details page.

Deleting an Absence Entry: Supervisors and Admins

Supervisors and admins can delete absence entries directly without submitting a cancellation request.

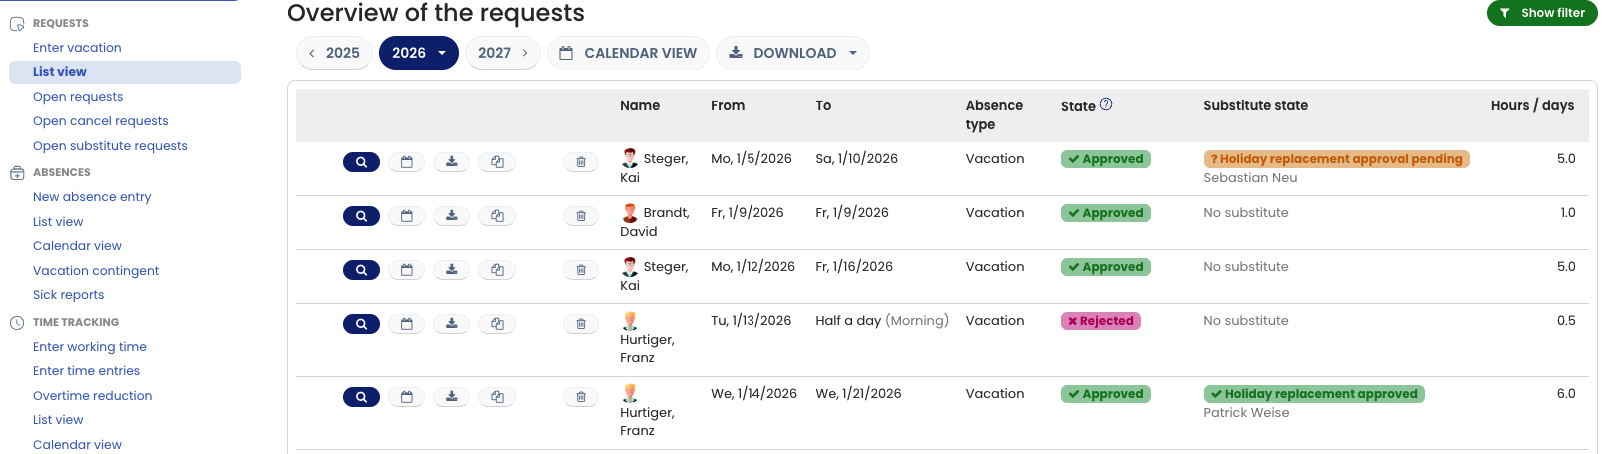
Via List View

  1. Log in to Timebutler.
  2. Navigate to “Employees > Absences > List View” in the top-left menu.
  3. Click the red trash can icon next to the absence entry you want to delete.

To find entries more quickly, the list can be filtered using the green “Filter” button in the top-right corner of the page.

Via Calendar View

  1. Navigate to “Employees > Absences > Calendar View.”
  2. Click the relevant absence entry in the calendar.
  3. Click the red “Delete” button on the entry details page.

Delete recurring entries

Instructions for deleting recurring absence entries are available in a separate help article: Delete recurring entries

Allowing Users to Edit or Delete Absence Entries

Admins can define editing and deletion permissions separately for each absence type (for example, training or home office).

This allows admins to:

  • Specify when users are allowed to edit or delete their own absence entries.
  • Allow certain absence types (such as home office) to be edited or deleted by employees without submitting a cancellation request to a supervisor.

These permissions can be configured by adjusting the editing and deletion rights for absence entries.

Allowing Deletion of Future Absence Entries

Admins can also configure whether users are allowed to delete their own future absence entries without submitting a cancellation request.

To enable this option:

  1. Log in as an admin.
  2. Click “Settings” in the lower-left corner.
  3. Select “More…”.
  4. Click “Global Settings” in the upper-right corner.
  5. Enable the option “Delete own future entries.”

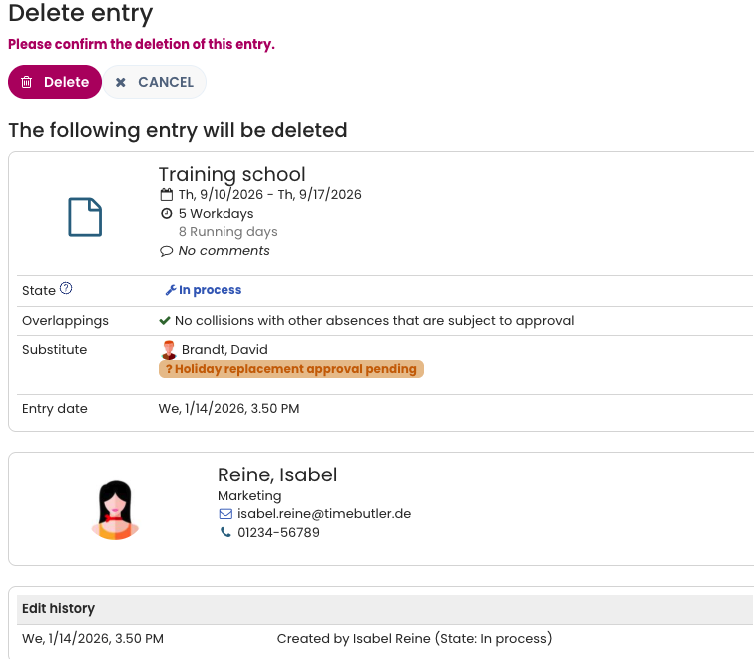
Screenshot: Delete absence entries

Approve absence requests

An admin can configure for each type of absence (vacation, home office, business trip, etc.) whether approval is required or not.

When an employee creates an absence entry that requires approval, Timebutler starts the approval workflow and notifies the supervisor(s). The approval of the absence entry works in the same way as approving a vacation request. Read here how vacation requests are approved.

Screenshot: Approve absence requests

Absence entries Recurring entries

For vacation and other types of absences, a recurring entry can be created. For example, if you plan to work from home every Tuesday and Thursday over the next two months, you don’t need to create 16 individual home office entries. Instead, you can create a single recurring entry.

Create recurring entry

To enter a recurring entry for an absence, sign in to Timebutler and open the entry form for a new absence entry (read here how to get to the entry form for Enter an absence entry.) In the entry form, activate the option “Create recurring entry”. The form now shows additional options for creating the recurring entry.

Delete recurring entries

Employee users and supervisors are given the option to undo (delete) the recurring entries immediately after they are created. If this option is not selected, the recurring entries can no longer be deleted as a whole; instead, each entry in the series must be deleted individually.

Admins can use the Undo actions option to delete entire series they have created themselves with a single click. This option is only available for a limited period of time after the recurring entries have been created. After that, even admins can only delete each entry in the series individually.

Screenshot: Recurring entries

Bulk entries

With just a few clicks, you can enter absence entries for many employees. This feature comes in handy for example, when creating a business trip for several or all employees.

The bulk entry of absence records works in the same way as the bulk entry of vacation. Learn how to enter bulk entries.

Absence bulk import

You can import a large number of leave requests and absence entries via Excel file upload. Especially during the initial setup of Timebutler, this gives you a convenient way to import dozens or hundreds of leave requests and other absence entries.

Perform bulk import

Log in to Timebutler as an admin and click “Settings > More Settings” in the bottom left, then scroll down to “Absence entries bulk import” on the right. Alternatively, you can also search for it.

In the first step, you can download the Excel file. It contains all columns required for specifying absences. Fill in the Excel file, or export the data from a third-party system and paste it into the Excel file.

In the second step, upload the completed Excel file and import a large number of absence entries with a single click.

If you want to import more absence entries than there are rows in the Excel file, simply download the Excel file multiple times, fill it multiple times, and upload it multiple times.

Undo bulk import

Read here how to undo the bulk import of absences.

Screenshot: Bulk import of absence entries

List view of absence entries

The calendar view of absence entries provides a clear overview of employee absences. Depending on your needs, the calendar can be displayed:

In addition to the calendar view, absence entries can also be displayed in a list view. The list view allows you to:

  • Filter the displayed entries
  • Download the absence data

Accessing the List View of Absence Entries

How you access the list view depends on your user role.

Accessing the List View as an Employee

  1. Log in to Timebutler as an employee user.
  2. In the left-hand navigation, under “Absences,” click “List View.”

Screenshot: Employee Absence List View

Accessing the List View as an Admin or Supervisor

  1. Log in to Timebutler as an admin or supervisor.
  2. In the top-left navigation, click “Employees.”
  3. Under “Absences,” click “List View.”

Screenshot: Admin Absence List View

You can also download your team’s absences in this screen, as shown here:

Screenshot: Download absence entries in the list view

Viewing Only Your Own Absence Entries

If you want to view only your own absence entries:

  1. Click “My Data” in the left-hand navigation.
  2. Under “Absences,” click “List View.”

Detailed view of an absence entry

The detail view of a vacation request or absence entry provides a complete overview of all information related to the entry, including:

  • The time period of the absence, as well as the number of working days and calendar days
  • The status of the request (for example, requested, approved, etc.)
  • The assigned substitute and the status of the substitute’s confirmation
  • Any overlaps with absences of colleagues
  • The edit and change history of the entry
  • For vacation requests: a short overview of the vacation balance
  • and more information.

Accessing the Detail View

The detail view of a vacation request or absence entry can be opened either via the calendar view or the list view, depending on the user role.

Access via Calendar View

Employee users

  • Log in to your Timebutler user account.
  • Click “Absences > Calendar View” in the left-hand navigation.
  • Click the desired absence entry in the calendar to open the detail view.

Supervisors and admins

  • Log in to your Timebutler user account.
  • Click “Employees > Absences > Calendar View” in the top-left navigation.
  • Click the desired absence entry in the calendar to open the detail view.

Access via List View

Employee users

  • Log in to your Timebutler user account.
  • Click “Absences > List View” in the left-hand navigation.
  • Click the blue magnifying glass icon next to the desired entry to open the detail view and review the change history.

Supervisors and admins

  • Log in to your Timebutler user account.
  • Click “Employees > Absences > List View” in the top-left navigation.
  • Click the blue magnifying glass icon next to the desired entry to open the detail view.

Screenshot: Detailed view of an absence entry

Special Case: Deleted Entries

Deleted absence and vacation entries are not displayed in either the calendar view or the list view. Once an entry has been deleted, it is therefore no longer visible in the regular views used for managing absences.

However, Timebutler still keeps a record of deleted vacation and absence entries. The system logs:

  • Which entry was deleted
  • Who deleted the entry
  • The date and time at which the entry was deleted

This ensures that deletions remain traceable, even though the entries themselves are no longer shown in the calendar or list views.

To learn how to access and review deleted entries, read here how to view deleted entries.

Calendar view

Calendar Year View

In the calendar view for absences, both absence entries and vacation requests are displayed.

Each vacation request and absence entry is clearly visible as a colored bar in the calendar.

Year Calendar: Employee Users

  1. Log in to Timebutler as an employee user.
  2. Click Absences > Calendar view in the left-hand navigation.

Year Calendar: Supervisors and Admins

Opening the Year Calendar of an Employee

  1. Log in to Timebutler as a supervisor or admin.
  2. Click Employees > Employees > Annual overview in the top-left navigation.

Screenshot: Selecting the employee to display the annual calendar

Opening Your Own Calendar

Supervisors and admins can also open their own calendar view.

  1. Log in to Timebutler.
  2. Click My data > Absences > Calendar view in the left-hand navigation.

Year Calendar Across Multiple Employees

A year calendar view across multiple employees is intentionally not available. Displaying that amount of information for multiple employees in a yearly format would not be meaningful on a single screen.

Screenshot: Employee annual calendar

Calendar view for multiple employees

In Timebutler, the calendar view displays both absence entries and vacation requests.

This allows you to view absences and vacation periods for multiple employees in a single calendar overview.

Read here how to open the calendar view for absences and vacation.

Grouping by department

In the calendar view for colleagues (employee users) or your own team (managers and admins), Timebutler lists employees alphabetically.

You can also enable grouping by department. Timebutler then groups employees by department and sorts employees alphabetically within each department.

To enable grouping, open a calendar view across multiple users and click the green “Show filters” button at the top right. Change the “Grouping” option and click the “Apply filters” button.

Screenshot: Calendar view grouped by department

Birthdays and Anniversaries in the Calendar

For each employee, you can store the date of birth and the employment start date in Timebutler.

Based on the employment start date, Timebutler automatically calculates the corresponding work anniversaries.

Here you can find all information about displaying birthdays and work anniversaries.

Substitutes in the calendar

The calendar also shows when an employee has been selected as a substitute for a colleague.

A substitute assignment is indicated by a blue box in the upper-left corner of the respective day in the calendar.

Below the calendar, you will always find a legend explaining the meaning of the colors and markings used.

If you hover your mouse over an absence entry or a substitute marking in the calendar, a small information window appears with additional details about the entry and the substitute.

Screenshot: Substitutes in the calendar.

Show school holidays in the calendar

Each user can enable the display of school holidays in the calendar and choose from different available school holiday options.

Enabling School Holidays in the Calendar

  1. Open a calendar view.
  2. In the top-left corner of the calendar, click “Show school holidays”
  3. Choose the desired school holidays to display.

Opening the Calendar View

  • Employee users
    Click Absences > Calendar view in the left-hand navigation.

  • Supervisors and admins
    Click My Employees > Absences > Calendar view in the left-hand navigation.

Screenshot: Show school holidays in the calendar

Absence types

Overview of all absence types

With Timebutler, you can create and manage any number of absence types to match your organization’s requirements.

After logging in, commonly used absence types such as vacation, sick leave, training, business trip, and others are already available. You can extend or modify this list at any time to define which absence types your employees are allowed to create and manage.

Settings for absence types

Each absence type can be configured with a wide range of settings, including:

Viewing Absence Types

To view the list of all absence types and their corresponding settings:

  1. Log in to Timebutler as an admin.
  2. Click “Settings > More…” in the lower-left corner.
  3. Select “Absence types.”

Screenshot: Absence types overview

Create or edit an absence type

When you log in to Timebutler, several absence types are already predefined for you, such as vacation, sick leave, training, business trip, home office, and others.

You can customize these absence types to fit your organization’s needs by:

  • Editing existing absence types
  • Creating new absence types
  • Deactivating or deleting absence types that are not required

This allows you to tailor Timebutler precisely to your workflows.

Creating a New Absence Type

  1. Log in to Timebutler as an admin.
  2. Click “Settings > More…” in the lower-left corner.
  3. Select “Absence types.”
  4. Click the “Create new absence type” button.
  5. Enter a name for the absence type and configure the available settings.

Once the absence type has been created, you can start creating absence entries for employees using this new type.

Editing an Existing Absence Type

  1. Log in to Timebutler as an admin.
  2. Click “Settings > More…” in the lower-left corner.
  3. Select “Absence types.”
  4. In the overview, you will see all existing absence types and their current settings.
  5. To edit an absence type, click the green pencil icon (Edit) in the row of the relevant absence type.
  6. Make the required changes and save them.

Deleting an Absence Type

Instructions on how to delete an absence type are provided in the delete an absence type chapter.

Screenshot: Create a new absence type

Delete absence type

If you no longer need an absence type, or if you want to prevent employees from creating new absence entries of a specific type, you can delete or deactivate the absence type.

Delete absence type

  1. Log in to Timebutler as an admin.
  2. Click “Settings > More…” in the lower-left corner.
  3. Select “Absence types.”
  4. In the row of the desired absence type, click the red trash can icon.
  5. A countdown starts. Click the red trash can icon again during the countdown to confirm that you want to permanently delete the absence type.

Screenshot: Delete absence type

When Deleting Is Not Possible

If the trash can icon is greyed out instead of red, the absence type cannot be deleted. This can happen for one of the following reasons:

1) Absence Entries Already Exist for This Absence Type
If absence entries have already been created using this absence type, the type cannot be deleted.

This restriction exists because deleting the absence type would result in absence entries without a name, which could no longer be displayed or interpreted correctly.

Even if all absence records of this type have been deleted, the absence type still cannot be removed. Deleted absence entries are logged by Timebutler and can be downloaded at any time. For this reason, the absence type must remain available for these records.

In this case, the absence type can be deactivated instead, which has almost the same effect as deleting it. Instructions for deactivation are provided below.

2) The Absence Type Is a Timebutler System Type
Some absence types are handled internally by Timebutler and therefore cannot be deleted. These include, for example:

  • Vacation
  • Sick leave
  • Overtime
  • Overtime reduction

This limitation also ensures that these absence types can be reactivated and used again at a later time if needed.

In this case as well, the absence type can be deactivated instead, which is nearly equivalent to deleting it.

Screenshot: Cannot delete absence type

Deactivating an Absence Type When Deletion Is Not Possible

If an absence type cannot be deleted, you can deactivate it instead.

When an absence type is deactivated:

  • Employees can no longer create new absence entries of this type.
  • Existing absence entries of this type continue to be displayed correctly.

How to Deactivate an Absence Type

  1. Log in to Timebutler as an admin.
  2. Click “Settings > More…” in the lower-left corner.
  3. Select “Absence types.”
  4. Click the green pencil icon (Edit) for the desired absence type.
  5. Under “New entries,” remove the checkmark from “Active, new entries allowed.”
  6. Click the blue “Save” button to apply the changes.

Screenshot: Deactivate absence type

Custom fields

Overview of additional fields

You can configure any number of extra fields for each absence type.

For example, for the absence type Business trip, you can define additional fields such as:

  • Destination (text input)
  • Reason for travel (multi-line text input)
  • Distance traveled (integer)

This allows you to collect additional data when creating absence entries and evaluate it later.

The configuration of extra fields is available in Extra fields for absence types.

If an employee submits a new Business trip request, the entry form displays the extra fields you configured, and the employee can enter the required information.

You can later evaluate this data via Display and evaluation of extra fields.

Screenshot: Additional fields when entering an absence

Screenshot: Configuring additional fields for absence types

Edit or delete custom fields

Custom fields can be used to store additional information for absence entries.

Using input rights and editing rights for custom fields, you can define whether Employee users and Supervisors are allowed to enter and edit custom fields for absence entries. Admins can always enter and edit all custom fields.

Edit Custom Fields in an Existing Absence Entry

Depending on the status of the absence entry, there are two ways to edit custom fields.

Edit the Entire Absence Entry

If the absence entry is in a status that allows editing:

  1. Open the absence entry.
  2. Click Edit.
  3. In the edit form, update:
    • The standard fields (for example Start date, End date)
    • The additional fields
  4. Click Save.

Edit Only the Custom Fields

If the absence entry can no longer be edited (for example, an approved vacation request with Approval required), you can edit the custom fields separately.

  1. Open the Detail view of the absence entry.
  2. Click Edit additional fields.
  3. Update the required fields.
  4. Click Save.

Open the Detail View of an Absence Entry

There are two ways to open the Detail view.

Via the Calendar view

  1. Open a Calendar view.
  2. Click the desired absence entry in the calendar.

Via the List view

  • Employee users

    1. Log in to your Timebutler account.
    2. Go to Absences > List view.
    3. Click the blue magnifying glass icon next to the desired entry.
  • Supervisors and Admins

    1. Log in to your Timebutler account.
    2. Go to Employees > Absences > List view.
    3. Click the blue magnifying glass icon next to the desired entry.

Add or Edit Custom Fields

  1. Log in as an Admin.
  2. Go to Settings > More… > Additional entry fields for absence types.
  3. For the desired absence type, click Edit custom fields.
  4. Add new custom fields or change existing ones.
  5. Click Save.

Delete Custom Fields

  1. Log in as an Admin.
  2. Go to Settings > More… > Additional entry fields for absence types.
  3. For the desired absence type, click Edit additional entry fields.
  4. Click the red trash can icon next to the custom field you want to delete.

If the custom field is already used in existing absence entries, it cannot be deleted. This ensures that the existing data remains correctly assigned.

Instead of deleting the field, set it to Inactive. This means:

  • The field remains available for existing absence entries.
  • The stored data is preserved.
  • The field is no longer shown when creating new absence entries.

Screenshot: Edit custom fields for absence types

Input permissions for custom fields

In the Extra field settings for absence types, you can define permissions for each extra field individually.

For each extra field, you can specify:

  • Whether Supervisors and/or Employee users may enter the field when creating a new absence entry
  • Whether Supervisors and/or Employee users may edit the field later in an existing absence entry

This allows you to control exactly who can enter or change specific information.

Example:

  • For the absence type Business trip, Employee users may enter the extra field Hotel costs when creating the absence entry.
  • However, you can prevent later changes and allow only Supervisors and Admins to edit the field.

Admins can always enter and edit all extra fields. Their permissions cannot be restricted. Since Admins can change permissions themselves, restricting their access would not be meaningful.

Required Field Setting

For each extra field, you can also define whether it is a required field.

If a field is marked as required but a user does not have input or editing permission for it, the field is not treated as required for that user.

Example:

  • The extra field Hotel costs is set as required for the absence type Business trip.
  • Supervisors do not have permission to enter this extra field.
  • Supervisors can still create a Business trip absence entry without filling in Hotel costs.

Edit information in the additional fields

You can control whether employee users and supervisors are allowed to enter and edit custom fields for absence entries through the input and editing permissions for custom fields.

Admins can always enter and edit all custom fields.

Editing Custom Fields for an Existing Absence Entry

There are two ways to edit custom field values, depending on the status of the absence entry.

Option 1: Edit the Entire Absence Entry

If the absence entry is in a status that allows editing, you can open the regular edit form.

In the edit form, you can modify:

  • Standard absence details (start date, end date, etc.)
  • Custom field values

Option 2: Edit Only the Custom Fields

If the absence entry can no longer be fully edited (for example, an approval-required vacation request that has already been approved), you can still edit the custom fields separately.

To do this:

  1. Open the detail view of the absence entry.
  2. Click “Edit additional fields.”
  3. The custom field edit form will open.
  4. Make your changes and save.

How to Open the Detail View

You can open the detail view in two ways:

1) Via the Calendar View

  • Open a calendar view.
  • Click on the relevant absence entry.

2) Via the List View

  • Log in to Timebutler.
  • Employee users: Click Absences > List view.
  • Supervisors and admins: Click Employees > Absences > List view.
  • Click the blue magnifying glass icon next to the relevant entry.

Displaying and reporting on custom fields

Information entered by employees in custom fields is available in several places within Timebutler.

Below you can see where custom field values are displayed and how they can be exported.

Custom Fields in the Calendar View

In the calendar view, you can hover over an absence entry to display a small information box with additional details.

If enabled, this information box also shows the values entered in the custom fields.

Important:
Custom fields are only shown in the calendar view if the option
“Display extra fields in the calendar view” is activated in Global settings.

Custom Fields in the Detail View

In the detail view of an absence entry, all custom field values are always displayed.

If you are unsure how to open the detail view, refer to the article about Edit history, which explains how to access it.

Custom Fields in Approval Emails

If an absence entry requires approval, Timebutler sends a notification email to the supervisor.

Because custom field information is often important for approval decisions, the custom field values are included in this notification email.

Exporting Custom Field Data

Custom field data is included when you download absence entries as an Excel file.

  • Each custom field appears as a separate column in the file.
  • The employee’s entries are shown in the corresponding columns.

To download the Excel file:

  1. Log in as an admin or supervisor.
  2. Go to Employees > Absences > List view.
  3. Click Download.

The exported file will include all custom field information.

Sick leave

Medical certificate status in sickness entries

For every sick leave entry, you can manage the medical certificate status.

This status shows whether the medical certificate has been received and filed by the employer, or whether it is still outstanding.

Editing the Medical Certificate Status as an Admin

Admins can update the medical certificate status for any sick leave entry.

To do this:

  1. Log in to Timebutler as an admin.
  2. Go to Employees > Absences > Sick reports.
  3. In the list of sick leave entries, use the available buttons to update the medical certificate status.

You can also update the status in the detail view:

  • Click the blue magnifying glass icon (Detail view) next to the entry.
  • Use the available buttons to change the medical certificate status.

Alternatively, you can open the detail view directly from the calendar view by clicking on the relevant sick leave entry.

Editing the Medical Certificate Status as a Supervisor

Admins can decide whether supervisors are allowed to update the medical certificate status.

To configure this setting:

  1. Log in as an admin.
  2. Click Settings > More… in the lower-left corner.
  3. Select Global settings.
  4. Review or adjust the option “Manager may edit medical certificate information.”
  5. Also review the option “Medical certificate display.”

If enabled, supervisors can update the medical certificate status in the same way as admins.

Note: Supervisors can only edit medical certificate information for employees assigned to them.
They cannot edit this information for employees they can see only through extended visibility rights.

Editing the Medical Certificate Status as an Employee

The medical certificate status does not indicate whether the employee personally has obtained a certificate. It indicates whether the employer has received the certificate.

For this reason, users with employee permissions cannot update the medical certificate status. Only admins and supervisors can make changes.

Learn how to set up additional sickness information, especially in connection with the electronic certificate of incapacity for work.

Screenshot: Sick leave entries overview.

Send reminder for missing medical certificate

Timebutler allows you to send reminder emails to employees for sick leave entries where the medical certificate is still missing.

Sending a Reminder

  1. Log in to Timebutler as an admin or supervisor.
  2. Click Employees > Absences > Sick reports
    (alternatively, go to Employees > Absences > List view).
  3. For each sick leave entry without a medical certificate, a button labeled “Send medical certificate reminder” is displayed.
  4. Click the button to send a reminder email.

Timebutler will automatically send an email to the employee requesting that they submit the missing medical certificate.

Reminder Button Behavior

Timebutler stores, for the duration of your current session, which employees have already received a reminder.

  • After sending reminders and reopening the list view, the reminder button will no longer be displayed for those specific sick leave entries.
  • If you log out of your Timebutler account and log back in, all reminder buttons will be visible again.

Screenshot: Send medical certificate reminder.

Upload medical certificate

When an employee submits a medical certificate for sick leave, the employer must retain the original document.

For data protection reasons, it is intentionally not possible to upload a digital copy of the certificate (for example, a scanned version) to Timebutler.

Data Protection and GDPR

Under the General Data Protection Regulation (GDPR), health data is classified as sensitive personal data (Article 9) and may only be processed under very strict conditions.

If a digital copy of a medical certificate were uploaded to absence management software, even though the original document must still be kept, this would generally be considered a convenience feature rather than a legally justified necessity under the GDPR.

To prevent users from unintentionally breaching data protection regulations, Timebutler does not allow medical certificates to be uploaded or stored digitally within the system.

Electronic Certificate of Incapacity for Work (eAU)

For many employees in Germany, the traditional paper-based medical certificate has been replaced by the electronic certificate of incapacity for work (eAU).

For other employees, including those outside Germany, the paper certificate may still be used.

Restrict visibility rights for sickness entries

Admins can restrict visibility of sick leave entries, especially for users with employee permissions.

The following options are available:

Completely Hiding Sick Leave Entries from Employees

Admins can configure the system so that employee users do not see sick leave entries of their colleagues.

To change this setting:

  1. Log in to Timebutler as an admin.
  2. Click Settings > More… in the lower-left corner.
  3. Select Global settings.
  4. Review or adjust the option “Employees can see colleagues’ sick leave entries.”

Masking Sick Leave Entries for Employees

Instead of hiding sick leave entries completely, you can mask them.

If masking is enabled:

  • Employees will still see that a colleague is absent in the calendar.
  • However, only a neutral label such as “Absent” is displayed, without showing the specific absence type.

The advantage of masking compared to hiding entries entirely is that employees remain informed about colleagues’ absences.

Masking can be configured individually for each absence type. Read here how to activate masking.

Visibility of Sick Leave Entries for Supervisors

Supervisors always see sick leave entries for employees for whom they have visibility rights.

This is because supervisors require full information for operational management, planning, and as a basis for approving vacation requests and approval-required absence entries.

Own Sick Leave Entries

Every user always has full visibility of their own entries, including their own sick leave entries.

Hiding Past Entries from Employees

In most cases, employees only need information about future entries for coordination with colleagues. Visibility of past entries is often not required.

You can configure the system so that employee users do not see colleagues’ past entries, but only entries that lie in the future.

To change this setting:

  1. Log in to Timebutler as an admin.
  2. Click Settings > More… in the lower-left corner.
  3. Select Global settings.
  4. Review or adjust the option “Hide past entries from employee users.”

eAttest and eAU

For a large proportion of employees in Germany, the traditional paper-based medical certificate has been replaced by an electronic certificate.

For many employees — and, of course, for employees outside of Germany — the paper-based medical certificate continues to be used.

Read here how to retrieve the electronic certificate of incapacity for work and how to configure additional sickness information.

Settings

Approval requirement for absences

An admin can define for each absence type (for example, training, home office, business trip, etc.) whether it requires approval or not. This setting can also be applied to vacation.

Viewing Approval Requirements

  1. Log in to Timebutler as an admin.
  2. Click Settings > More… in the lower-left corner.
  3. Select Absence types.
  4. In the Approval required column, you can see which absence types require approval and which do not.

Changing the Approval Requirement

  1. In the row of the relevant absence type, click the green pencil icon (Edit).
  2. Change the Approval setting.
  3. Click Save at the bottom of the page.

When the Change Takes Effect

The change applies immediately to new absence entries.

Existing absence entries remain approval-required or not approval-required based on the setting that was active at the time the absence entry was created.

Screenshot: Set vacation to not require approval

Substitute Required for Absences

For each absence type (for example, training, home office, business trip, etc.), you can define whether a substitute must be selected when a user creates a new absence entry.

If this option is enabled, the user is required to choose a substitute before the absence entry can be saved.
If the option is disabled, selecting a substitute is optional.

Viewing the Substitute Requirement

  1. Log in to Timebutler as an admin.
  2. Click Settings > More… in the lower-left corner.
  3. Select Absence types.
  4. In the Substitute mandatory column, you can see which absence types currently require a substitute to be selected.

Changing the Substitute Requirement

  1. In the row of the relevant absence type, click the green pencil icon (Edit).
  2. Change the Substitute mandatory setting.
  3. Click Save at the bottom of the page.

When the Change Takes Effect

The updated setting applies immediately to new absence entries. Existing absence entries remain unchanged.

Screenshot: Setting for substitute required

Substitute Requirement Applies to All Employees

The substitute requirement applies equally to all employees.
It is not possible to enable mandatory substitute selection for specific individuals and disable it for others.

If certain managers or employees should not be required to select a substitute, the following alternatives are available:

  • The manager or employee still selects a substitute.
    This can also be helpful for the manager’s team, as employees know who to contact during the manager’s vacation or absence.

  • You can create a new user account named “Dummy substitute” and select the option “Employee without email address.”
    The manager or employee can then select “Dummy substitute” as their substitute.

Enabling Substitute Selection

Substitute selection can be completely disabled.
If substitute selection is disabled, Timebutler does not enforce the substitute requirement, because no substitute can be selected.

To verify that substitute selection is enabled:

  1. Log in to Timebutler as an admin.
  2. Click Settings > More… in the lower-left corner.
  3. Select Global settings.
  4. Check the option “Offer substitute selection.”

Screenshot: substitute selection

Annual cap

For almost every absence type (for example, training, home office, business trip, etc.), you can define a maximum number of days per calendar year that each employee is allowed to take.

Viewing the yearly limit

  1. Log in to Timebutler as an admin.
  2. Click Settings > More… in the lower-left corner.
  3. Select Absence types.
  4. In the Maximum number of days per year column, you can see which absence types currently have a yearly limit configured.

Editing the yearly limit

  1. In the row of the relevant absence type, click the green pencil icon (Edit).
  2. Update the Yearly limit setting.

You can also choose whether the limit should apply to:

  • Working days, or
  • Calendar days

Example

  • If you set a limit of 7 days and restrict it to working days, an absence could run from Monday to Tuesday of the following week (assuming the employee does not work on Saturdays and Sundays). This period includes 9 calendar days, but only 7 working days.
  • If the limit is set to calendar days, an absence from Monday to Tuesday of the following week would not be allowed, because it spans 9 calendar days. In this case, only an absence from Monday to Sunday would be possible.
  1. Click Save at the bottom of the page to apply the changes.

When the change takes effect

The updated yearly limit applies immediately to new absence entries.

Screenshot: Annual cap for absences

Masking absences

Masking Absences for Employees

As an admin, you can configure whether employees can see the specific type of absence entered by other employees.

If masking is enabled for a particular absence type, employees will still see that a colleague is absent in the calendar. However, instead of the actual absence type (for example, sick leave or unpaid leave), only a neutral label such as “Absent” will be displayed.

This allows you to define visibility per absence type. For example:

  • Absence types such as vacation, home office, and business trip can be fully visible to employees.
  • Absence types such as sick leave or unpaid leave can be displayed in a masked way.

Masking can be configured individually for each absence type.

Configuring Masking per Absence Type

  1. Log in to Timebutler as an admin.
  2. Click Settings > More… in the lower-left corner.
  3. Select Absence types.
  4. In the Mask for employees column, you can see which absence types are currently masked.

To change the setting:

  1. In the row of the relevant absence type, click the green pencil icon (Edit).
  2. Change the Mask for employees setting.
  3. Click Save at the bottom of the page.

Screenshot: Mask absence type

Masking Does Not Apply to Supervisors or Admins

Masking applies only when employees are logged in to Timebutler.

It does not apply to supervisors or admins.
Supervisors and admins always see the full absence details, as they require complete information for operational management, planning, and for approving vacation requests and approval-required absence entries.

Edit history of absence entries

In the detail view of a vacation request or absence entry, you can find the Edit history section.

There, you can see:

  • Who created the entry
  • When it was created
  • Who edited it
  • Who approved or rejected it
  • And other status changes

This provides a complete record of all actions related to the absence entry.

Read here how to open the detail view of an absence entry.

Screenshot: Edit history in the detail view of an absence

Special case: deleted entries

Deleted entries do not appear in the calendar view or the list view.

However, Timebutler continues to log deleted vacation and absence entries and records:

  • Who deleted the entry
  • When it was deleted

Read here how to view deleted entries.

Time Tracking

Features

Time Tracking Features

Timebutler offers full-fledged time tracking, including a virtual time clock, extensive configuration options, view and edit permissions, booking to projects and categories, time accounts, statutory and custom break rules, reporting options with Excel download, and much more.

Each user can record their time via the virtual time clock or enter it directly. You can also use the time tracking terminal: activate the Timebutler time tracking terminal on a standard tablet and place the tablet at the office or company entrance. Each employee can then clock in/out and record breaks on the tablet with just a few clicks.

Here you can find an overview of the time tracking features.

Time tracking or overtime feature

Timebutler has a time tracking feature and an overtime feature. With the time tracking feature, employees enter their total working time including breaks, and Timebutler calculates the working time by comparing target and actual times. With the overtime feature, employees do not enter their total working time, but only overtime (and overtime reductions), and Timebutler uses that to calculate the overtime balance.

Because the two features determine overtime differently (calculation vs. direct entry), it is not possible to enable both the time tracking feature and the overtime feature at the same time.

If you enable the time tracking feature, the overtime feature is automatically disabled, and vice versa.

It is also not possible to enable the time tracking feature for some users and the overtime feature for others. That would be confusing, because the app would need to show different views for the working time account and the overtime account, and some employees would appear in one view and others in the other.

So you need to choose one of the two features, time tracking or overtime. This then applies to all employees and cannot be configured differently, for the reasons stated.

To enable the time tracking feature:

Sign in to Timebutler as an admin and click “Settings > More..” at the bottom left, then “Time tracking” on the right, and enable time tracking there.

To enable the overtime feature:

Sign in to Timbutler as an admin and click “Settings” at the bottom left, then “More..” below it, then “Overtime feature” on the right. Click the “Activate overtime feature” button. On the page, you have various options for managing overtime that you can configure as you wish. Then click the “Activate overtime feature” button to confirm.

Activate

Activate time tracking

Timebutler offers a full-featured time tracking system, including a virtual time clock, extensive configuration options, working time accounts for all employees, view and edit permissions, bookings to projects and categories, statutory and individual break rules, reporting options with Excel download, and much more.

All users can record their times via the virtual time clock or enter them directly. You can also use the time tracking terminal: open the Timebutler time tracking terminal view on a standard tablet and place the tablet at the office or company entrance. All employees can then clock in and out and record breaks on the tablet with just a few clicks.

You can activate time tracking in Timebutler with just a few clicks. Since all employees for whom time tracking is active must record or enter all of their working time via the virtual time clock, inform them in advance.

Important
If you have activated the overtime feature, activating the time tracking feature will automatically and immediately deactivate the overtime feature. In this case, read here how to switch from the overtime feature to time tracking.

You can first try out time tracking with a small group and later roll it out to the entire company — or you can enable time tracking for all employees right away. The following describes how to try time tracking with a small group and then extend it to all employees.

1) Activate time tracking for a limited user group

Sign in as an admin at timebutler.com and click Settings > More… > Time tracking.

  • With the first option, Activate time tracking, you activate time tracking.
  • With the second option, Start of time tracking, set the current date or the date on which you want to start time tracking.

Go through the remaining options on the page and then click the blue Save button at the bottom of the page.

If you also want to activate or deactivate time tracking for individual employees, click Employees in the top left menu, then Overview below the small Employees label. Click the green pencil icon (= Edit) in the row of the relevant user account. At the top, under Enable Time Tracking?, set the desired option. Save the change by clicking the blue Save button at the bottom of the page.

2) Set target working hours

After activating time tracking, click Settings > Working days. Here you can check the daily target working hours for each employee and, if necessary, change them by clicking the blue Edit button.

3) Set the overtime starting balance

Click Settings > Working time balance (only visible once time tracking is activated). In the column Working time balance at the start of time tracking, you can set each employee’s overtime starting balance.

4) Test time tracking

That’s it. The activated employees can now enter working times or record them via the virtual time clock (provided you activated the time clock in step 1), and you can view the list of working time entries, open working time accounts, run reports, download data, and more.

5) Enable time tracking for all employees

Once you have decided to use time tracking across the entire company, remove the restriction to specific departments (see step 1 above). You should also move the start date of time tracking forward, because newly activated users will not have entered any working time entries since the previous start date and would therefore go into negative balances. Finally, adjust the overtime starting balance as described in step 3.

Screenshot: Set the overtime starting balance

Restrict time tracking to departments or employees

You can enable time tracking for all employees in the company or only for individual departments. You can also enable or disable time tracking for individual employees.

Limit time tracking to departments

Sign in to Timebutler as an admin and click “Settings > More..” at the bottom left, then click “Time tracking” on the right. At the second option “Limit to departments” you can restrict time tracking to specific departments. Then save the changes by clicking the blue “Save” button at the very bottom of the page.

Configure time tracking for employees individually

If you want to enable or disable time tracking for individual employees, click “Employees” at the top left, then below the small “Employees” click “Overview”. In the row of the desired user account, click the green icon with the pencil (=Edit). At the top, under the option “Time tracking active?” set the desired option. Save the change by clicking the blue “Save” button at the very bottom of the page.

Supervisors and trust-based working time

Supervisors often have trust-based working time and, unlike employees, do not record working hours. Read here how to set up trust-based working time for employees.

Trust-based working hours

Supervisors often have trust-based working hours and, unlike employees, do not record working time. However, supervisors must be able to view and edit their employees’ working time and working time accounts. You can disable time tracking for these supervisors.

Even if time tracking is disabled for supervisors, supervisors can still view the working time entries and working time accounts of the employees they have permission to view.

To disable time tracking for supervisors, sign in to Timebutler as an admin and click “Employees” at the top left, then click “Overview” below the small “Employees”. Click the green icon with the pencil (=Edit) in the row of the desired user account. At the top, for the “Time tracking active?” option, select “Time tracking is hidden for this user.” Save the change by clicking the blue “Save” button at the very bottom of the page.

Switch from overtime feature to time tracking

Timebutler offers a time tracking feature and an overtime feature. Only one of the two features can be enabled at a time, not both.

If you currently have the overtime feature enabled and want to switch to time tracking, proceed as follows.

1. Test time tracking

Go to www.timebutler.com, sign out if you are signed in automatically, then click Live Demo in the top right. Sign in as a fictitious admin user and try out time tracking. For example, you can click Employees > Time tracking > Enter working time or Employees > Time tracking > Working time accounts. Or click 00:00 in the top right to try the virtual time clock. Or click Settings > More… > Time tracking to review the various configuration options.

2. Switch to time tracking

Once you have decided to use time tracking, set a cutoff date on which to activate it. The first day of a month works well.

Download overtime balances
On the cutoff date, sign in to Timebutler with an admin account and click Employees > Overtime accounts in the top left. Download the view as an Excel file: you will need the numbers from the Balance column later.

Activate time tracking
Click Settings > More… > Time tracking. Activate time tracking, set the cutoff date under Start of time tracking, configure the remaining settings, and click the blue Save button at the bottom. The overtime feature will now deactivate automatically.

Enter overtime balances
Click Settings > Working time balance at the bottom left and enter, in the Working time balance at the start of time tracking column, the values from the Balance column of the overtime accounts.

From now on, your employees can enter working times in Timebutler or record them via the virtual time clock or the time tracking terminal, and you can use time tracking with all of its features.

Enter working hours

Enter working hours: Time clock

If an admin has activated the time clock in the Time tracking settings, you can record working time via the virtual time clock with just a few clicks.

Virtual time clock in the top bar

After you sign in to Timebutler, all pages show a “ 00:00” for the time clock at the top right:

Start the time clock

Click it to expand the time clock, then click the “Start” button to start the time clock:

Time clock running

In the top-right bar on all pages, the time clock display is now green and indicates that the time clock is running:

Time clock paused

To pause the time clock, click the time display in the bar and then click the “Pause” button in the time clock. In the bar, the time clock display appears orange to indicate that the time clock is paused.

Stop the time clock, save working time

At the end of your working time, click the time display in the bar again and then click “Save working time” in the time clock. The working time entry is saved, and the bar turns blue again with the “ 00:00” display.

Interruptions, signing out

When the time clock is running or you are on a break, you can sign out of Timebutler, shut down the laptop/PC, or go to a client appointment. Timebutler continues to track working time in the background.

When you sign back in to Timebutler later, it has continued tracking your working time, and you can stop the time clock to save the working time.

Forgot to start or stop the time clock?
Read here how to proceed if you forgot to start the time clock in the morning or stop the time clock in the afternoon.

Enter working hours: Entry form

If an admin has allowed employees to enter working hours via the input form in the time tracking settings, working hours can be entered as follows.

Employee users

Sign in to Timebutler and click My Data > Time tracking > Enter working time on the left.

To enter multiple working time entries in a single form, for example for a whole week, click Time tracking > Enter time entries on the left.

Managers and admins

Sign in to Timebutler and click Employees > Time tracking > Enter working time in the top left.

To enter multiple working time entries in a single form, for example for a whole week, click Employees > Time tracking > Enter time entries in the top left.

Enter duration or start/end time

As an admin, you can set in the time tracking settings, under the Input method option, whether employees may enter only the duration, only the start and end times, or whether both options are available. With the Enter break times option, you can set whether the start and end times of breaks must also be entered. You will find many other useful settings in the time tracking settings.

Screenshot: Enter a working time entry via the input form

Screenshot: Bulk entry of working time entries via the input form

Screenshot: Bulk entry of working time entries for a single day via the input form

Enter working hours: time tracking terminal

Timebutler offers a fully integrated time tracking terminal solution.

You can activate the time tracking terminal on a standard tablet. Place the tablet at the office or company entrance (there are professional mounts for tablets), and each employee can then clock their time at the time tracking terminal in the morning as follows:

Clock time

On the time tracking terminal, a tile appears for each employee. The employee taps the tile with their name and then enters their personal PIN. They now see the time clock and can start it, pause it, end the break, or stop the time clock, also with a tap on the screen.

PIN for the time tracking terminal

Every employee can view and also change the PIN for the time tracking terminal. To do this, they log in to the Timebutler user account, click bottom left on “Settings > Your user account” and then see the PIN at the top right, along with the option to set their preferred PIN.

PIN missing?
If the employee does not see the PIN, it is because for the employee time tracking is not activated.

Employees without an email address
Read here how employees without an email address receive the PIN.

The Timebutler time tracking terminal on a tablet

Edit time entries

You can change time entries later as follows:

Employee user

The employee user logs in to Timebutler and clicks “Time tracking > List view” on the left. For the desired time entry, they click the green pencil icon (=Edit). They can now make changes to the time entry and save the change.
An admin can configure in the Time tracking settings whether the change is applied immediately, or whether the supervisor is notified of the change and must approve it first.

Supervisors and admins

The supervisor or admin logs in to Timebutler and clicks “Employees > Time tracking > List view” at the top left. For the desired time entry, they click the green pencil icon (=Edit). They can now make changes to the time entry and save the change.

An admin can configure in the Time tracking settings that working hours can only be changed up to a certain number of days in the past, that time entries for the previous month are automatically frozen on a specific day of the month, and other restrictions.

Delete time entries

A time entry can be deleted as follows:

Employee users

The employee user signs in to Timebutler and clicks “Time tracking > List view” on the left. For the desired time entry, they click the trash can icon.

An admin can configure in the time tracking settings whether the change is applied immediately or whether the supervisor is notified and must approve the deletion first.

Supervisors and admins

The supervisor or admin signs in to Timebutler and clicks “Employees > Time tracking > List view” at the top left. If needed, the view can be filtered by clicking the green “Show filter” button at the top right. For the desired time entry, they click the trash can icon.

Record errands

Employees can conveniently clock their working hours using the time clock or the time tracking terminal on a tablet.

Sometimes employees run an errand, for example to deliver outgoing mail to the local post office or to buy office supplies. You can record errands with just a few clicks via the time clock and the time tracking terminal.

Allow recording of errands

Recording errands is disabled by default. You can allow it by signing in to Timebutler as an admin, then clicking “Settings” at the bottom left, then below that clicking “More..”. Now click “Time tracking” on the right.

Here you will find the option “Record errands”. Activate the option and confirm the change by clicking the blue “Save” button at the bottom of the page.

Record errands

As soon as you allow recording errands in the time tracking settings, employees will see a “ Start errand” button in the time clock and the time tracking terminal (only when the time clock is running). Clicking it saves the start time of the errand. The time clock continues tracking working time during the errand.

During the errand, the icon appears in the top navigation bar.

When the errand ends, the user clicks the “ End errand” button.

Showing errand times

In the live status display of the time clocks, you can see which employees are currently on an errand and since what time.

You can also view errand times for each working time entry afterwards. In the detail view of the working time entry, it shows the errand times.

Working time account

Working time account - Overview

Timebutler keeps a working time account for every employee for whom time tracking is enabled. This way, all employees always have an overview of the required working time (target working time), the hours worked, any deductions and carryovers, and thus the overtime balance for any date.

In the working time account, the target working times are calculated based on the individual Target working times of the employee’s weekly working days, taking public holidays, vacation, sickness, and other absences into account. This results in the adjusted target working time. The sum of the entered time entries results in the hours worked. It also applies the settings for Capping overtime, Rounding of working times, and Setup times, which results in the working time balance.

Access the working time account

To open the working time accounts view, sign in to Timebutler and click at the top left on “Employees > Time tracking > Working time accounts”. Employee users click on the left on “Time tracking > Working time accounts”.

Note: an admin can set that employee users, supervisors, or admins are not allowed to access the working time account. If you do not see the links to the working time account mentioned above, an admin disabled the display of working time accounts for your user type.

The working time account has two views:

1) Working time balance in period

In the Working time balance in period view, you can see how many hours were worked in a specific period. It does not include carryovers and capping of overtime between months and years; it only shows the hours worked in the period.

To show the Working time balance in period view, open the working time account (see above) and then click the “Working time in period” button.

2) Overtime balance as of date

In the Overtime balance as of date view, you can see the employees’ overtime balance for any date. It also includes all historical data and the capping of overtime, rounding, setup times, and other reductions.

To show the Overtime balance as of date view, open the working time account (see above) and then click the “Overtime balance as of date” button.

Change start view
You can set which of the two views should display when opening the working time account. Open the working time account and click the “Start view” button.

The working time account

Working time in a period

In the “Working time balance in a period” view, you can view how much working time was performed in a specific period. This view does not include the carry-over and capping of overtime between months and years. It only displays the working time in the period. Read here how to open the working time account.

Read the working time account from left to right: almost all numbers in the working time account result from adding or subtracting the numbers in the respective columns. In detail:

Column in the working time account

Meaning

User

Name of the employee. Click the icon to go to the calendar view of working time entries.

Required working time

The employee’s total required working time in the selected period. It equals the sum of all required working times of the calendar days in the period.

Public holidays

The total number of hours on public holidays in the selected period. It equals the sum of all required working times on all days that count as public holidays for the employee.

Vacation

The total number of vacation hours in the selected period. It equals the sum of all required working times on all days on which the employee entered (and had approved) vacation.

Sickness

The total number of sickness hours in the selected period. It equals the sum of all required working times on all days on which the employee recorded sickness.

Other absences

The total number of hours of other absences in the selected period that are configured to reduce the required working time. It equals the sum of all required working times on all days on which the employee recorded one of these absences.

Adjusted required working time

The actual required working time. This equals the “Required working time” column minus “Public holidays”, “Vacation”, “Sickness”, and “Other absences”.

Working time incl setup time1

The actual working time performed. It equals the sum of all working time entries of the employee in the period. It does not yet include deductions due to setup times or rounding of working times.

Deduction for setup times1

The total time deducted due to the setup time setting.

Rounding to required working time1

The total time that gets deducted or added due to the working time rounding setting.

Working time performed

The actual working time performed after deducting any rounding and setup times. It equals the sum of all working time entries of the employee in the period. If setup times or rounding of working times are configured, this column includes those deductions.

Balance

Number of hours above or below the required working time. It equals “Working time performed” minus “Adjusted required working time”.

1 These columns only appear when you activate the corresponding settings.

Help for each column
If you move the mouse over the column headers in the working time account, you receive additional information.

The working time account in the “Working time in a period” view

Overtime balance as of the cut-off date

In the “Overtime balance as of the cut-off date” view, you can display how much working time was performed in a specific period. In the “Overtime status as of the cut-off date” view, you can display employees’ overtime status for any date. It also includes all historical data and the capping of overtime, rounding, setup times, and other reductions. Read here how to open the working time account.

You should read the working time account from left to right: almost all figures in the working time account result from adding or subtracting the numbers in the respective columns from left to right. In detail:

Column in the working time account

Meaning

User

Employee’s name. Click the icon to go to the calendar view of time entries.

Target working time

The employee’s total target working time in the selected period. It equals the sum of all target working times for the calendar days in the period.

Public holidays

The total number of hours on public holidays in the selected period. It equals the sum of all target working times on all days that are set as a public holiday for the employee.

Vacation

The total number of vacation hours in the selected period. It equals the sum of all target working times on all days on which the employee recorded (and had approved) vacation.

Sick leave

The total number of sick leave hours in the selected period. It equals the sum of all target working times on all days on which the employee recorded sick leave.

Other absences

The total number of hours for other absences in the selected period that are configured to reduce the target working time. It equals the sum of all target working times on all days on which the employee recorded one of the absences.

Adjusted target working time

The actual target working time. The value equals the “Target working time” column minus “Public holidays,” “Vacation,” “Sick leave,” and “Other absences.”

Working time incl. setup time1

The actual working time performed. The value equals the sum of all time entries of the employee in the period. It does not yet include deductions due to setup times or rounding.

Deduction for setup times1

The total time deducted due to the setup time setting.

Rounding to target working time1

The total time that is deducted or added due to the working time rounding setting.

Time worked

The actual time worked after deducting any rounding and setup times. The value equals the sum of all time entries of the employee in the period. If setup times or rounding of working time are enabled, the deductions are included in this column.

Balance before deduction of compensated overtime1

Number of overtime or minus hours in the period before deducting compensated overtime. Result of the “Time worked” column minus “Adjusted target working time.”

Deduction of compensated overtime1

Number of hours that are deducted due to the overtime capping setting.

Balance

The number of hours and minutes that were worked too much or too little in the period, after deducting compensated overtime. Result of the “Balance before deduction of compensated overtime” column minus “Deduction of compensated overtime.”

Balance from previous year

Overtime balance as of January 1 of the year, carried over from the overtime balance on December 31 of the previous year (the numbers don’t match? Read here how to carry over the overtime balance).

Paid overtime

Number of paid overtime hours in the period.

Overtime balance on dd.mm.yyyy

The employee’s overtime balance on the selected date (including all historical data, capped overtime, rounding, setup times, and other reductions)

1 These columns only display if you activate the corresponding settings.

Help for each column
Hover over the column headers in the working time account to see additional information.

The working time account in the “Overtime balance as of the cut-off date” view

Working time account: Expand monthly details

— BEGIN MARKDOWN — Working time account: Expand monthly details ==========================================

When you open the working time account and then open the view Overtime balance as of the cut-off date, Timebutler also calculates the overtime balance while taking into account the monthly overtime capping, the deduction of setup times, the rounding of working times, and other rules. The calculations apply to calendar months and therefore affect the carryover from one month to the next.

For this reason, in the “Overtime balance as of the cut-off date” view, you can click one of the “Details” buttons in the table header to expand the rows with the values for each individual month. This way, you can see for each month how the displayed values are calculated. — END MARKDOWN —

Carry over overtime balance into the next year

We intentionally do not automatically transfer the overtime balance (and remaining leave) to the next year. However, you can do this easily with just a few clicks, and you don’t need to laboriously calculate it and enter it manually.

Read here how to carry over overtime balance and remaining leave into the next year.

Start of time tracking

An admin can set the start date of time tracking. This is important so that Timebutler calculates the working time balance only from that date and ignores the days before it. Without a start date, there can be a large negative balance in the working time account.

Set the start of time tracking

To check or set the start date of time tracking, sign in to Timebutler as an admin and click bottom left on “Settings > More..”, then on the right on “Time tracking”. Change the “Start of time tracking” option and then click the blue “Save” button at the bottom of the page.

Note:
The start date set here applies to all employees, except for those for whom a different start date is set in the user account (see below).

The change is applied immediately in the working time account.

Set the start date individually for an employee

When an employee joins the company and you create a user account for them, you can set the start date of time tracking for this employee individually, in addition to the hire date.

However, you can also set the employee-specific start date afterwards: sign in to Timebutler as an admin and click top left on “Employees > Employees > Overview”, then click the green pencil icon (=Edit) for the desired employee. Change the value in the “Start of time tracking” field and then click the blue “Save” button at the bottom of the page.

The same applies here: the change is applied immediately in the working time account.

Change the start date for multiple employees

With just a few clicks, you can change, enter, or delete the time tracking start date for a large number of employees.

To do this, sign in to Timebutler as an admin, click bottom left on “Settings”, then underneath on “More..”. On the right, click the heading “User accounts bulk import”. There you will find the options for changing the time tracking start date in the “Start of time tracking” section.

The same applies here as well: the change is applied immediately in the working time account.

Set the overtime opening balance
You can set which overtime credit employees have at the start of time tracking. To do this, sign in to Timebutler as an admin and click bottom left on “Settings”, then underneath on “Working time balance”. In the column “Working time balance at the start of time tracking on dd.mm.yyyy” (or “Balance from the previous year”), you can set employees’ overtime opening balance at the start of time tracking. The system transfers this entry immediately to the working time account.

Convert vacation into time credit

Learn how to convert vacation into time credit.

Paid Overtime (Time Tracking)

If you have paid out overtime for an employee, you can record it in Timebutler as follows:

Sign in to Timebutler with an admin user and click “Settings > Working time balance” at the bottom left. In the row of the affected employee, increase the value in the relevant month under “Paid overtime” by the number of hours paid out. Then click the blue “Save changes” button (on the right in the row).

For example, if “0 h” is entered for March and you paid the employee 40 hours of overtime in March, enter 40 in the column for March and save the change. However, if “15 h” is already entered and you paid an additional 20 hours of overtime in the same month, enter 35 and save the change.

The change takes effect immediately in the employee’s working time account and reduces the overtime balance.

Paid overtime in the Overtime feature
If you have activated the Overtime feature instead of time tracking, read here how to enter paid overtime in the Overtime feature.

Working time details for hourly employees

For hourly employees—employees who do not receive a monthly salary but are paid by the hour—additional information about hours worked is necessary.

For hourly employees, the paid wage results from the hours worked together with the hours for vacation, sick leave, and public holidays, because these are also paid absences. The working time account does not initially show this total because only a few companies use hourly employees.

An admin can activate displaying the total with just a few clicks, as follows: sign in to Timebutler as an admin and click “Settings > More..” at the bottom left, then “Time tracking” on the right. Here you will find the option “Details for hourly employees,” which you activate. Save the change by clicking the blue “Save” button at the bottom.

When the option is active, the working time account displays an additional column “Total time hourly employees.”

Please note:
We only display the column when you choose the “Working time in period” view in the working time account. In the “Overtime balance as of the cut-off date” view, we intentionally do not display the column, because the information is not relevant for calculating overtime.

Show only hourly employees
You can create a new user group, name it “Hourly employees,” and add the relevant employees. As soon as you have created the user group, you can click the green filter button at the top right in the working time accounts view and set the filter to the “Hourly employees” user group. You will now see only the working time accounts of the hourly employees and do not have to tediously search for the hourly employees in the long list of employees.

Export and share data
You can download the working time accounts view as an Excel file with one click on the “Download” button and then, for example, send it to the payroll department or further process it (just like almost all other list views in Timebutler).

Calendar view

Open the calendar view of working time entries

In the calendar view of working time entries, you get a quick overview of an employee’s working hours, overtime, and negative hours over the course of the year. Times with heavy overtime are immediately apparent, and you can quickly find the causes if an employee has a high negative balance in the working time account.

Open the calendar view as managers and admins

Open the working time accounts view. To do this, sign in to Timebutler and click on the left on “Employees > Time tracking > Working time account”. In the working time account table, click to the left of the desired employee’s name on the icon with the tear-off calendar:

Open your own calendar view as employee users

Sign in to Timebutler and, on the left under “Time tracking”, click “Calendar view”.

Calendar view of overtime

Calendar view of overtime

In the calendar view of time entries, there are two views: the calendar view of overtime and the calendar view of working times. Use the two buttons above the calendar to switch views (note the tip further down this page).

In the calendar view of overtime, the calendar shows the number of overtime hours and deficit hours for each day. Color coding helps you identify days on which a lot of overtime was accumulated or many deficit hours occurred. Green stands for overtime, and the darker the color, the more overtime was accumulated that day. Red stands for deficit hours, and the darker the color, the more deficit hours occurred.

Note:
An admin can configure for each user type Employee, Supervisor, and Admin whether you may access the overtime view in the calendar view of time entries. If you do not see the button to switch to the overtime view, an admin has disabled this option for your user type.

Show additional information
When you hover over the calendar with the mouse, you get additional information about overtime for each calendar day. And when you click a day in the calendar, you see the time entries for the day.

Calendar view of overtime

Calendar view of work hours

In the calendar view of work time entries, there are two views: the calendar view of overtime and the calendar view of work hours. You can switch views using the two buttons above the calendar (see the note further down on this page).

In the calendar view of work hours, the calendar shows the total number of work time entries for each day. If daily setup times or rounding of work hours are configured, the information already includes the corresponding deductions or increases in work hours.

Note:
An Admin can configure for each user type—employee, supervisor, and admin—whether you may open the overtime view in the calendar view of work time entries. If you don’t see the button to switch to the overtime view, an Admin has disabled this for your user type.

Show additional information
If you move your mouse over the calendar, you get additional information about overtime for each calendar day. And if you click a day in the calendar, you see the day’s work time entries.

Calendar view of work time entries

Details for a calendar day

In the calendar view of time entries you can display the detailed information for a calendar day. Hover your mouse over the calendar days to show additional information for each calendar day.

Details for a calendar day

View and edit working time entries

In the Calendar view of working time entries, you can view the working time entries for a calendar day and edit them. Click a calendar day with the mouse to open the working time entries for that day in a new window. In the window, you can open the details of the working time entry by clicking and by clicking

Working time entries on a calendar day

Break rules

Set up break policies

Break policies ensure that your employees record working times in line with minimum break requirements. Select a break policy and Timebutler ensures that minimum breaks are met and the maximum working time per calendar day is not exceeded.

Set a break policy for all employees

Sign in to Timebutler as an admin and click “Settings > More..” at the bottom left, then “Time tracking” on the right. Under the “Break policy” option, select the policy that suits you. Click the blue “Save” button at the bottom.

Set a different break policy for individual employees

In addition to the global break policy above, you can set a different break policy for individual employees or disable it. Learn here how to assign a break policy to an employee individually.

Set a different break policy for multiple employees

If you want to change the break policy for multiple employees, changing it in each individual user account would be time-consuming. Instead, you can update many employees at once with the bulk change of working time models.

Create your own break policy
Timebutler already includes statutory break policies for various countries. If your company needs different break policies, you can create your own break policy.

Choice for the break policy
You can define whether applying break policies is mandatory, or whether employees should have a choice on whether to apply the break policy or not.

Choice for the break policy

With the Break policies you define the minimum breaks for certain working times and the maximum daily working time.

The admin can define which choices users have for the break policy. To do this, log in to Timebutler as an admin and click at the bottom left “Settings > More..”, then on the right “Time tracking”.

Here you find the setting “Choice for the break policy” with the following options:

If a user enters a working time entry that violates the requirements of the break policy that applies to them, Timebutler shows the following depending on the “Choice for the break policy” setting:

1) Allow choice

Option: The user can choose whether they want to accept the changes to the working time entry or save the working time entry without changes.

Timebutler shows a warning message and a suggestion to adjust the working time to meet the break policy requirements. The user can then either accept the necessary adjustment and let Timebutler change the entry automatically, or reject the necessary adjustment and Timebutler saves the working time entry in violation of the break policy requirements.

2) Adjustments must be confirmed

Option: The user can only save the working time entry if they accept the proposed changes to the working time entry.

Timebutler shows an error message and a suggestion to adjust the working time to meet the break policy requirements. The user must accept the change to save the working time entry. If they reject the change, Timebutler does not save the working time entry.

3) Apply adjustments automatically

Option: If changes to the working time entry are necessary, Timebutler applies and saves them automatically. The user cannot/does not have to confirm the changes.

Timebutler does not show any warning or error message, but adjusts the working time entry automatically to meet the break policy requirements. Afterwards, Timebutler only informs the user about the automatic change.

The setting for the choice for the break policy applies equally to all employees and you cannot configure it differently for different employees.

Create your own break rule

Timebutler provides the statutory break rules for employees in Germany, Austria, and Switzerland (for adults and for young workers) to choose from.

If your company has a break rule with different requirements due to an individual company agreement, industry requirements, or other reasons, you can create your own break rule in Timebutler.

To do this, sign in to Timebutler as an admin, click “Settings > More..” at the bottom left, then click “Break rules” on the right. Click the “Create new break rule” button.

Once you have created your own break rule, you can activate the break rule or assign it to individual employees.

Assign break policy to employees

You can set a default break policy that applies to all employees unless you set a different option for an employee.

You can deviate from this for individual employees by setting a different break policy or disabling it. This is useful, for example, if you have enabled the break policy for employees and have vocational students or trainees for whom you need to set the break policy for employees under 18.

Follow these steps:

Set break policy individually for one employee

Sign in to Timebutler as an admin, click “Employees” at the top left, then “Overview” below the small “Employees”. Click the green icon with the pencil (=Edit) in the row of the desired user account.

Change the “Break policy” option and then click the blue “Save” button at the very bottom of the page.

Change break policy for multiple employees

If you want to change the break policy for multiple employees, changing each user account individually would be time-consuming. Instead, you can edit many employees at once with the bulk edit of working time models.

Applying the break policy

As soon as a break policy is enabled, Timebutler checks whether the requirements from the break policy have been met.

When an employee records a work time entry via the time clock or the time tracking terminal, or enters it via the entry form, Timebutler checks the entries for compliance with the break policy. If the requirements have not been met—meaning the minimum breaks for working/presence time were not taken or the maximum daily working time was exceeded—Timebutler applies the break policy.

Depending on the setting for the choice option in the break policy, Timebutler either makes the adjustment automatically, asks the employee to confirm the adjustment, or offers the employee the option to either make the adjustment v
or decline it.

Calculating the requirements

Timebutler includes all work time entries of the calendar day when calculating working time. For example, if an employee enters one work time entry for 4 h, then one for 2 h, and another for 2.5 h, the total working time for the day is 8.5 h. Timebutler then applies the minimum break that applies to 8.5 h of working time.

Timebutler also adds up the breaks: if the three work time entries include 15 minutes break, 0 minutes break, and 10 minutes break, the total is 25 minutes of break. If the minimum break is 30 minutes, Timebutler adds 5 minutes to the break.

Breaks between multiple work time entries
For multiple work time entries, Timebutler treats the intervals between entries as breaks.

Break policy errors

Learn more about apparent break policy errors.

Notification when break policies are violated

Message in the time clock when the requirements from the break policy were not met:

Message when saving a work time entry when the requirements from the break policy were not met:

Errors with break rules

An employee saw a change due to the requirements of a break rule, and you think the system applied the break rule incorrectly?

Learn more about apparent errors with break rules.

Working time models

Weekly working days

You can define the weekly working days and the target working time for each weekday for each employee.

You can enter the weekly working days and the target working time when creating user accounts. To view or change the weekly working days later, sign in to Timebutler as an admin, then click “Settings > Workdays” in the bottom left. The far-right column displays the employee’s weekly working days. To edit the setting, click the blue “Edit” button for the desired employee.

In the detailed view of a user account you can see which weekly working days are set for the employee.

Multiple working time models
Read here how to set up multiple working time models when an employee changes weekly working days or target working times as of a specific date, for example due to a reduction in working hours.

Alternating working days
Read here how to proceed with alternating working days, for example when an employee works from Monday to Thursday one week and from Tuesday to Friday the next week.

Target working hours

You can set the target working hours for each employee and each weekday. Based on the target working hours, Timebutler calculates the employee’s working time account.

You can enter the weekly working days and the target working hours when you create the user accounts. To view or change the weekly working days later, sign in to Timebutler as an admin and click the bottom-left “Settings > Working days”. In the far-right column you see the weekly working days for the employee. To edit the setting, click the blue “Edit” button for the desired employee.

Read here how to configure multiple working time models when an employee changes weekly working days or target working hours as of a specific date, for example due to a reduction in working hours.

In the detail view of a user account you can see which weekly working days and target working hours are set for the employee.

Weekly or monthly target working hours
In the settings for weekly working days, you can define the target working hours for each weekday Monday through Sunday. Read here how to proceed if an employee does not have daily target working hours but instead a weekly or monthly target working hours.

Capping overtime

With overtime capping, you can set an overtime policy for each employee and specify whether and how much overtime should be capped in the month, for example because it is compensated with the salary or because the amount of overtime should be limited to a certain maximum.

Options for capping

Carry all overtime into the next month
This is the default setting where all overtime is carried forward and no capping takes place.

All overtime is compensated, neither overtime nor negative hours are carried into the next month
This setting is suitable, for example, for freelancers or for employees who are paid by the hour. No overtime is accumulated here, and the working time account is reset at the beginning of the month to the previous month’s balance.

Overtime in a month is compensated up to a certain number. Only overtime above the threshold is carried into the next month:
If a certain number of overtime hours per month is compensated with the salary for an employee, activate this option. Only overtime that exceeds the specified threshold will then be carried into the next month.

At most up to a certain number of a month’s overtime hours are carried into the next month.
If employees are only compensated for a maximum number of overtime hours per month, activate this option. If an employee works additional overtime beyond that, it will be capped at the end of the month.

The overtime balance on the first day of each month may not exceed a certain value - additional overtime is capped
In contrast to the previous options, this option limits the maximum total overtime at the start of the month. So it does not limit the increase per month, as in the previous options, but the maximum total overtime balance at the start of the month.

Set up overtime capping

You can view or change the overtime capping setting by logging in to Timebutler as an admin, then clicking “Settings > Working days” at the bottom left. In the rightmost column, under “Overtime”, you see the setting for the employee. To edit the setting, click the blue “Edit” button for the desired employee.

If you want to set or change capping for a large number of employees, you can do that conveniently via the Bulk change of working time models.

In the detail view of a user account you can see which weekly working days are set for the employee.

Capped overtime in the working time account

The capped overtime is shown in the working time account, view “Overtime balance as of the cut-off date”. There you can also display the details for each month to see the exact calculation for each month.

Change from a specific month
Read here how to proceed when the settings for capped overtime change from a specific month.

Rounding working hours

By rounding working hours, you can ensure that when the working time on a calendar day slightly exceeds or falls short of the target working time, the working time is rounded to the target working time.

For example, you can configure that falling short of the target working time by up to 5 minutes is rounded up, and exceeding it by up to 10 minutes is rounded down. For an employee with 8 h target working time, a working time from 7 h 55 min up to 8 h 10 min will then always be rounded to 8 h. Working times above or below these limits remain unchanged.

Configure rounding of working hours

You can view or change the rounding setting by signing in to Timebutler as an admin, then clicking “Settings > Working days” in the lower left. In the rightmost column, you will see the setting for the employee under “Round to target working time”. To edit the setting, click the blue “Edit” button for the desired employee.

If you want to set or change rounding for many employees, you can conveniently do this via the bulk change of working time models.

In the detail view of a user account, you can see which rounding setting is active for the employee:

Rounded working time in the working time account

The working time account, “Overtime balance as of the cutoff date” view shows the working time deducted due to rounding. There you can also display the details for each month to see the exact calculation for each month.

Change starting from a specific month
Read here how to proceed if the settings for rounding working hours change starting from a specific month.

Setup times

With setup times, you can set a specific number of minutes for employees that should be subtracted from or added to working time.

If, for example, employees start the time clock and then first have to put on their work clothes, and you do not want to count this changing time as working time, you can configure a deduction via setup times. Timebutler then subtracts this time from the working time entries.

If, on the other hand, changing into work clothes counts as working time but employees can only start the time clock afterwards, you can use setup times to automatically increase the working time.

Timebutler only applies the setup time deduction or increase on calendar days with at least one working time entry. If there are multiple working time entries on a workday, Timebutler still applies setup times only once, not multiple times.

Configure setup times

You can view or change the setup time setting by signing in to Timebutler as an admin, then clicking “Settings > Workdays” at the bottom left. In the far-right column, you see the setup time setting for the employee under “Setup times”. To edit the setting, click the blue “Edit” button for the desired employee.

If you want to set or change setup times for many employees, you can conveniently do that via the bulk change of working time models.

You can also view setup times in the user account detail view.

Setup times in the working time account

The deduction or increase of working time due to setup times appears in the working time account in the “Overtime balance as of the cutoff date” view.

Change starting in a specific month
Read here how to proceed if the employees’ setup time settings change starting in a specific month.

Edit working time model

The working time model combines the following settings:

An employee’s settings for the working time model

View the current working time model

In the detail view of a user account, you can see which settings are active for the employee.

To view the settings for all employees on one page, proceed as described below under “Editing the working time model”.

Editing the working time model

You can change all working time model settings as follows: sign in to Timebutler as an admin, then click the bottom left “Settings > Working days”. The far-right column shows the employee’s weekly working days and all other settings. To edit the settings, click the blue “Edit” button for the desired employee.

Notes

Change working time model as of a specific date
Read here how to proceed when the working time model settings change starting from a specific month.

Bulk change
If you want to change the working time model for many employees, use the bulk change of working time models.

Alternating weekly working days
Read here how to proceed with alternating working days, for example when an employee works Monday to Thursday one week and Tuesday to Friday the next.

Weekly or monthly required working time
In the settings for weekly working days, you can set the required working time for each weekday from Monday to Sunday. Read here how to proceed when an employee does not have daily required working times, but a weekly or monthly required working time.

Multiple working time models - change on a specific date

In Timebutler, you can, with a few clicks, schedule an employee to switch the working time model on a specific date. This is necessary, for example, in the following cases:

Add change

To set the working time model to change on a specific date, follow these steps:

Sign in to Timebutler as an admin and click “Settings > Working days” at the bottom left. For the desired employee, click the “Edit” button. Now click the blue “Add new period” button. At the top in the “Valid from:” field, enter the date from which the change should apply. You can now make, at the top, the settings for weekly working days, target working hours, public holidays, etc., that should apply from the specified date.

Then click the blue “Save” button at the bottom.

That’s it. You now see the overview of weekly working days again, and for the employee you just changed you now see multiple periods. Timebutler has recalculated all leave requests, absence entries, the leave balance, and the working time account of the employee in the background.

Create multiple periods
With the process described above, you can add only one new period. However, you can of course add multiple periods. To do so, create a new period according to the steps above. Then repeat the process and create another new period, again according to the steps above.

Alternating weekly workdays

Some employees have alternating weekly workdays, for example, they alternate week by week, working Monday through Thursday one week and Tuesday through Friday the following week.

Read here how to set up alternating weekly workdays in Timebutler.

Weekly or Monthly Target Working Hours

— BEGIN MARKDOWN — Weekly or Monthly Target Working Hours ====================================

In the weekly working days settings, you can set the target working hours for each weekday from Monday to Sunday.

Learn how to proceed if an employee does not have daily target working hours, but weekly or monthly target working hours. — END MARKDOWN —

Bulk change of working time models

You can set the working time model individually for each employee. If you want to make changes to the working time models for a large number of employees, the easiest way is the bulk change of working time models. This avoids the effort of having to edit each employee’s working time model one by one.

Log in to Timebutler as an admin and click “Settings” at the bottom left, then “More..”. Click “Bulk change of user accounts” on the right. In the “Working time model” box, you find the options for the bulk change.

Change the working time model for specific users

When you click the link “Change working time models for specific users” in the box mentioned above, you can first choose on the next page for which employees you want to change the working time model.

Then choose from which date the changes to the working time model should apply: You can select a specific date from which the new rules for the working time model apply, or select the option “For the working time model that is currently valid for the respective employee.”: Timebutler then adjusts the currently valid working time model (also retroactively, from the start of that working time model).

Next, choose which settings to change. Only the selected settings change; the remaining options stay unchanged. Click the “Apply change now” button to apply the changes to the working time models of the selected employees. Timebutler automatically recalculates all time-off entries, working time accounts, and vacation accounts of the employees. Therefore, it can take a few seconds until the change has been applied.

Example
You want to set for the employees at the Hamburg location that, starting in May, up to 10 overtime hours per month are compensated with the salary and capped. To do this, open the bulk change of the working time model, select the Hamburg location, and set the date to April 1. For the option “Number of overtime hours compensated per month” click the “Change” button and set that 10 overtime hours are compensated. Then click “Apply change now”.

Timebutler will now create a new working time model for the employees in Hamburg that applies from April 1 and that caps up to 10 overtime hours. All other settings, such as working days per week, public holiday rules, target working time, setup times, etc., remain unchanged, so the same rules as before the change apply.

Delete working time models

When you click the link “Delete working time models” in the box mentioned above, you can first choose on the next page for which employees you want to delete the working time model. At “Start date of the working time model” you can set a date: for employees who have a working time model with this start date, Timebutler deletes that working time model. It then extends the previous working time model to the end of the deleted working time model.

Example
You created a new working time model via the bulk change of working time models for all employees in Munich that is valid from April 1. However, you made a mistake with the date; the working time model should actually be valid only from May 1. You can then delete the working time models starting on April 1 for those employees.

Example
An employee has working time models for the following periods:

- Working time model 1: from start to May 31
- Working time model 2: from June 1 to August 31
- Working time model 3: from September 1 to no end date

You open the bulk change and set that the working time models starting on June 1 should be deleted. This deletes working time model 2 for the employee. Working time model 1 is then valid from start to August 31.

Real-time clock status

Open time clock status

If time tracking and the time clock or the time tracking terminal are enabled, you can view the live time clock status of employees.

Admins

Admins see a box at the top right of the dashboard, after logging in to Timebutler, with a summary of how many time clocks are running, how many are idle, and how many are on break. Click the box to open the view of the live time clock status of all employees, with details about start time, breaks, and absences.

The admin can also open the live time clock status by clicking “Employees > Time tracking > Time clock status” on the left.

Supervisors

A supervisor can open the live time clock status by clicking “Employees > Time tracking > Time clock status” on the left.

Employee users

An employee can open the live time clock status by clicking “Colleagues > Time clock status” on the left.

Note that employees need to have view permissions for the time clock status enabled.

View permissions for the time clock status

If time tracking and the time clock or the time tracking terminal are enabled, you can view employees’ Live time clock status in Timebutler. Different view permissions apply depending on the user type:

View permissions for admins

Admins always have full view and edit rights for all users, and thus for the live time clock status of all employees.

View permissions for supervisors

Supervisors always have view permissions for the live time clock status of the employees they can view.

An admin can allow supervisors to see the live time clock status of all employees. To do this, an admin signs in to Timebutler, clicks at the bottom left on “Settings > More..”, then on the right on “Time tracking”. There is the setting “Time clock status for all users”.

View permissions for employee users

For employee users to see the live time clock status, an admin must enable the corresponding setting. To do this, an admin signs in to Timebutler, clicks at the bottom left on “Settings > More..”, then on the right on “Time tracking”. Here you find the setting “Time clock status for employee users”.

Time clock terminal

Time tracking terminal on a tablet

Timebutler offers a fully integrated time tracking terminal solution.

You can enable the time tracking terminal on any standard tablet. Place the tablet at the office or company entrance (there are professional mounts for tablets), and every employee can clock their time at the terminal in the morning with just a few clicks. You get a full-featured time tracking terminal for the low cost of a tablet - and have the times automatically integrated directly into Timebutler.

The Timebutler time tracking terminal
Start screen, sign-in at the terminal, and time clock in the terminal

Set up the time tracking terminal

Read here how to set up the time tracking terminal

Activate the time tracking terminal

Once you activate the time tracking terminal on a tablet, it remains permanently activated on that tablet and you don’t need to activate it a second time.

Just do the following:

On the tablet, open a web browser and go to the page “www.timebutler.de/stempeluhr”. Follow the instructions on the website to activate the time tracking terminal on the device. To do this, you must sign in with an admin user.

As soon as activation completes, the device automatically signs the admin user out completely. This is important so that no other employee can access the admin’s user account on the device.

The time tracking terminal is now permanently activated. If you restart the tablet, for example, you only need to open www.timebutler.de/stempeluhr again, and the time tracking terminal is ready to go immediately, without reactivation or sign-in. It’s best to set the link as the browser’s homepage.

Important
To keep the activation permanent, enable cookies in the tablet’s browser. Please check whether cookies are enabled and make sure cookies are not deleted automatically, for example when closing the browser or restarting the tablet.

Tip
You can specify that all or specific employees may only clock their working time at the time tracking terminal.

Multiple time tracking terminals
You can activate multiple time tracking terminals on multiple tablets. For example, you can provide a time tracking terminal at the office entrance and another in front of the cafeteria. The terminals synchronize with each other automatically, and employees can clock in or out at any terminal.

Restrict time tracking terminal to a location

On the Timebutler time tracking terminal, a tile is displayed for each employee for whom time tracking is enabled. This lets the employee use the punch clock.

If you use multiple time tracking terminals at multiple locations, you may want to show only the employees of that location at each site. You can configure each time tracking terminal to show either all employees or only the employees of a specific location.

Restrict to a location on a new time tracking terminal

When you activate the time tracking terminal, you automatically also get the option to limit the display to a location (only if you have created at least one location).

Remove location restriction on an existing time tracking terminal

To remove the restriction to a location on an existing time tracking terminal, deactivate the time tracking terminal and then activate it again - during activation you will see the location selection.

How to deactivate the time tracking terminal.

Restrict or change location on an existing time tracking terminal

To set a location later on an existing time tracking terminal or change the current location, deactivate the time tracking terminal and then activate it again - during activation you will see the location selection.

Prerequisite: Locations set up
You will only see the option to restrict by location when activating the time tracking terminal if you have created at least one location. Read here how to create or edit locations.

Employees commute between locations
If you have employees who do not always work at the same location but sometimes commute between locations, the location restriction may be undesirable: the employee could clock in only at the time tracking terminal in their “home location,” not at the time tracking terminal at the other location. In this case, you might want to show all employees at both locations.

Alternatively, allow the employee to clock in via the punch clock in the user account as well. If you have configured that certain users may clock in only at the time tracking terminal, remove that restriction for the commuting employee too.

Deactivate time tracking terminal

If you activate the time tracking terminal on a tablet, it remains permanently activated there. You can manually deactivate the time tracking terminal again.

Deactivate the time tracking terminal on a specific tablet

To deactivate the time tracking terminal on a specific tablet, open a web browser on the tablet and go to “www.timebutler.de”. Sign in to Timebutler as an admin. Click “Settings > More..” at the bottom left, then on the right click “Time Tracking Terminal” (not “Time Tracking”). Here you will find a box titled “Time tracking terminal on this device” and in it click the link “Deactivate on this device”

Deactivate all time tracking terminals

To deactivate all time tracking terminals, sign in to Timebutler as an admin on any PC, laptop, tablet, or smartphone, click “Settings > More..” at the bottom left, then on the right click “Time Tracking Terminal” (not “Time Tracking”). At the bottom of the page, click the link “Deactivate on all devices”

Allow only the time tracking terminal

You can configure that certain employees may start the time tracking terminal time clock only at the terminal (and, if desired, may also stop it only there). You can also configure that certain employees may still start/stop the time clock in their personal user account, not only at the time tracking terminal.

This lets you ensure that certain employees can clock working time only when they are on site at the office or company — and that other employees may operate the time clock on the go via smartphone or a laptop/PC, for example because they work in field service or in the home office.

Do the following:
Sign in to Timebutler as an admin and click bottom left on “Settings > User group”. Click the “Create new user group” button and then create a new shared user group named “Time clock allowed” (or similar). As you create it, add to this new user group all employees who should not clock only via the time tracking terminal, but should also clock via the virtual time clock.

Then click bottom left on “Settings > More..”, then on the right on “Time tracking”, then on the “Time tracking terminal” tab. Enable the “Start and end only in the time tracking terminal” option. This will reveal the option to specify that stopping is allowed only in the time tracking terminal as well — you can enable or disable this. The “Exception for start and end in the time tracking terminal” option will also appear. Select the user group “Time clock allowed” that you created earlier. Then click the “Save” button. You are done.

For employees to use the time clock in their own user account, you must enable the time clock. To do this, as an admin in Timebutler click bottom left on “Settings > More..”, then on the right on “Time tracking”. Make sure the “Time clock” option is enabled. If needed, save the change by clicking the blue “Save” button at the end of the page.

Note:
The time clock in the user account will be visible to all users with time tracking enabled. If a user who may only clock at the time tracking terminal tries to start the time clock in the user account, they will see an appropriate error message and be referred to the time tracking terminal.

Note on clocking breaks:
Users can always clock breaks in the user account, regardless of the setting for the time tracking terminal. Breaks reduce working time, so you should always give employees the option to fully clock breaks. Another reason to allow clocking breaks: if clocking were only possible at the time tracking terminal on the tablet, then a break could only begin and end on the tablet. However, employees do not always start and end their breaks right in front of the time tracking terminal.

Tip on future user accounts:
If you do not see the newly created user group available for selection, it is because you saved the user group as a personal user group, not as a shared user group. Then go back to the edit screen for user groups (bottom left on “Settings > User groups”), edit the user group, and change it to “Shared user group”.

Connect hardware time tracking terminals

If you already use time tracking devices or want to purchase a time tracking terminal, you have the following options:

Purchase a time tracking device from a Timebutler-compatible vendor

There are vendors of time tracking devices who have adapted their devices to work with Timebutler. You can request a non-binding quote for the devices. You can set up the devices in a few minutes, and they integrate fully with Timebutler. Vendors offer various devices with RFID chips, PIN entry, smart cards, and much more.

We are happy to tell you on request which vendors you can obtain suitable offers from.

Connect third-party time tracking devices

You can connect third-party time tracking devices to the Timebutler interface (API).

To connect the device to Timebutler, it must be able to issue so-called HTTP requests. Please ask your hardware vendor whether the device you want supports this. For the vendor to process the request:

Our interface provides two different connection options. The vendor finds the information in the “timeclock” endpoint and the “timeimportbyevents” endpoint in our documentation:
www.timebutler.de/go/api-dokumentation

Timebutler time tracking terminal

Instead of using a third-party hardware-based time tracking solution, you can also use the time tracking terminal that is integrated into Timebutler.

You can activate the time tracking terminal on a standard tablet. Place the tablet at the office or company entrance (there are professional mounts for tablets), and every employee can then clock their time at the time tracking terminal in the morning with just a few clicks. You thus get a full-fledged time tracking terminal for the low price of a tablet - and have the times automatically integrated directly into Timebutler.

The time tracking terminal is included at no extra cost in the Timebutler flat rate. You can therefore activate it without any additional costs. You can find more information about the time tracking terminal here.

You can find more information by logging in to Timebutler as an admin, then clicking “Settings > More..” at the bottom left, then “Time tracking” on the right, and then the “Time tracking terminal” tab on that page.

Retrieve PIN for the time tracking terminal

If you provide the time tracking terminal on a tablet for your employees, they can conveniently record their working hours. To sign in to the time tracking terminal, the employee must enter their 4-digit PIN.

Where can employees find the PIN?

Any employee can retrieve the PIN by signing in to their Timebutler user account and then clicking “Settings” > “Security” at the bottom left.

Note: The PIN appears only if time tracking is enabled for the employee.

Change the PIN

Every user can set their preferred PIN. To do so, they open the page that shows the PIN as described above and click the “Change PIN” button.

The same applies here: The PIN appears only if time tracking is enabled for the employee.

Rules for the PIN
An admin can enforce certain rules for the PIN so employees cannot, for example, set a simple numeric sequence as their PIN. You can change this setting by signing in to Timebutler as an admin, then clicking “Settings” at the bottom left, then “More..” underneath, then “Global settings” on the right. There you will find the option “Rules for the PIN at the time tracking terminal”

Employees without an email address

To retrieve the PIN, the employee must sign in to their Timebutler user account. They need the login details they received by email at the start. Some employees do not have an email address stored in their user account and cannot sign in. Read here how to proceed for employees without an email address.

Settings

Entry permissions for employees

You can restrict entry of work time records via the entry form for employees, so they can only record time using the time clock in their user account or at the time tracking terminal.

You can also require approval for changes to work time entries, or restrict when entries can be made, for example with Start no earlier than a specific time, or restrict entering time in the past. You can also specify that certain employees only start the time clock at the time tracking terminal (and, if desired, only stop it there as well).

Learn how to change the settings for employees’ entry permissions.

Settings for the time tracking terminal

Settings for the time tracking terminal

Open the settings for the time tracking terminal by logging in to Timebutler as an admin, then clicking “Settings > More..” in the bottom left, then “Time tracking” on the right, and finally the “Time tracking terminal” tab.

Activation and status

Get an overview of the activation status and the option to deactivate the time tracking terminal on all devices by logging in to Timebutler as an admin, then clicking “Settings > More..” in the bottom left, then “Time tracking terminal” on the right.

Time tracking settings

Time tracking offers extensive settings so you can tailor it optimally to your company’s needs.

Edit settings

Open the time tracking settings by signing in to Timebutler as an admin, then clicking “Settings > More..” at the bottom left, then “Time tracking” on the right.

Selected settings

Allow entry via the input form

You can configure that employees may record working times only via the virtual time clock or the time tracking terminal and may not enter them directly via the input form. To do so, in the “Enter entries” option, clear the checkmarks for “Supervisor” and/or “Employee”.

Activate the time clock via the “Time clock” option.

You can specify that certain employees may start the time clock only at the time tracking terminal (and, if desired, also stop it only there).

Require approval for changes to time entries

Using the “Edit own entries” and “Delete own entries” settings, you can configure whether employee users may change or delete time entries themselves, or whether a change/cancellation request first goes to the supervisor and the supervisor must approve the change.

With the next option “Edit others’ entries”, you can also set whether the supervisor or an admin approves.

If you set that only admins approve change requests, Timebutler sends the email with the notification about a new request as follows:

  • if the employee’s supervisor has an admin user account, the email goes only to that admin
  • if the employee’s supervisor does not have an admin user account (but a supervisor user account), the email goes to all admins. Any admin can approve.

Time restrictions

There are various options you can use to restrict the entry of working times in time. Review the options “Entry in the future”, “Entry in the past”, “Earliest start time” and “Working times lock for previous months”.

Projects

You can create any number of projects for time tracking. Employees can then book their working time to the projects. At the end of the month, end of the quarter, or at any time, you can analyze and group working time by project.

Edit projects

To edit the list of projects, an admin logs in to Timebutler, clicks at the bottom left on “Settings > More..”, then on the right on “Time tracking”, and then on the “Projects” tab.

Editing categories by supervisors

In the Time tracking settings there is the option “Projects and categories”, which lets an admin decide whether only admins or both admins and supervisors can edit the list of projects and categories.

Project required field

In the Time tracking settings the “Project required field” option determines whether a project must always be selected when entering working time entries.

Assign projects to employees

Timebutler deliberately does not restrict or assign projects to specific employees or departments. Instead, each employee can choose their own project favorites, so they can book their working time quickly and conveniently to the right project. Learn more about Project favorites.

Manage projects via the API

You can also retrieve and modify projects automatically via the Timebutler API.

Categories

You can create any categories for time tracking. Employees can then allocate working hours to the categories. At the end of the month, the end of the quarter, or at any time, you can analyze and group working hours by category.

Edit categories

To edit the list of categories, an admin logs in to Timebutler, clicks “Settings > More..” at the bottom left, then “Time tracking” on the right, and then the “Categories” tab.

Editing categories by supervisors

In the Time tracking settings, the “Projects and categories” option lets an admin define whether only admins, or both admins and supervisors, may edit the list of projects and categories.

Category required

In the Time tracking settings, the “Category required” option specifies whether users must always select a category when entering time entries.

Manage categories via the API

You can also retrieve and modify categories automatically via the Timebutler API.

Analyzing and downloading working hours

Download time entries and absences by day

In the Utilization report’s daily list view, you can see working hours, breaks, required working time, absences, and other information for each calendar day. You can download the information there with a single click.

Read more about the Utilization report here.

Download time entries

Admins and supervisors can download time entries as an Excel or CSV file.

Via the list view
Sign in to Timebutler and click in the top left on “Employees > Time tracking > List view”. You can filter the view via the green “Show filters” button at the top right if you want. Then click the “Download” button.

Via the Download Center
Read here how to download time entries via the Download Center

by opening the list view of the time entries and, above the list, on

Download time accounts

In the time account, you can display working hours for a period or the overtime balance as of a specific date. There is also a “Download” button there to download the information as an Excel file.

Read more about the time account in the variants Working hours for a period and Overtime balance as of a specific date.

View and download break start and end times

If you enabled recording of break times, the detailed break times for a time entry appear in the edit history of the time entry. You can also retrieve the break times for multiple time entries.

Timebutler also logs when time entries are deleted. Read here how to download deleted time entries.

Edit history of time entries

In the detailed view of a time entry, the “Edit history” shows which user entered, changed, approved, rejected, etc., the entry and when.
You can access the detailed view of a time entry as follows:

Employee users

Sign in to your Timebutler user account and click on the left on “Time tracking > List view”. For the desired entry, click the blue magnifying glass icon to open the detailed view.

Supervisor and admin

Sign in to your Timebutler user account and click at the top left on “Employees > Time tracking > List view”. For the desired entry, click the blue magnifying glass icon to open the detailed view.

Special case: deleted entries

The list view does not show deleted time entries. However, Timebutler also keeps a log of deleted time entries and records who deleted the entry and when.
Read here how to view deleted time entries.

View and download break start and end times

If break time tracking is enabled, the detailed break times for a time entry also appear in the change history in the detailed view of that time entry.
You can also retrieve and download the information for multiple time entries. Read here how to retrieve break times for multiple time entries.

Distinguishing time clock and entry form

The edit history indicates whether someone recorded the time entry (via the time clock or the time tracking terminal) or entered the time entry via the entry form. If the edit history shows an entry “Recorded by…”, someone recorded the time entry via the time clock in the user account or the time tracking terminal. If the edit history shows an entry “Entered by…”, someone entered the time entry via the entry form.

You cannot distinguish between recording via the time clock in the user account and via the time tracking terminal on a tablet, because you can, for example, start an entry at the time tracking terminal on a tablet, pause it on a phone, and stop it on a laptop. In that case, the entry counts as recorded via both the time clock and the time tracking terminal.

Edit history of time balances
Timebutler also logs changes to time balances (working time balance at the start of time tracking, carryover of overtime balances into the next year) in the edit history of entitlement data.

History of time entry input methods

A detailed edit history is recorded for every time entry. This makes it possible to determine after the fact who entered or edited the entry, or by whom the time entry was deleted.

The edit history also provides information about how the time entry was recorded, as follows:

Via the entry form

If the edit history states “Entered via the entry form by […]”, the time entry was entered via the entry form.

Recorded via the time clock

The following overview shows how a time entry was recorded according to the information in the edit history:

Applicable to entries in the edit history up to 21 July 2023:
“Recorded by”: Recording via the time clock in the user account, the time tracking terminal, automatically started/stopped, or via the API. A distinction between the exact input method is not possible.

Applicable to entries in the edit history from 22 July 2023 onwards:

Screenshot: Edit history of a time entry

Earliest start time in time tracking

An admin can set the earliest start time in time tracking.

Set the earliest start time

Sign in to Timebutler as an admin and click bottom left on “Settings > More..”, then on the right on “Time tracking”. Configure the “Earliest start time” option and click the blue “Save” button at the bottom.

Set the earliest start time for employees individually

With the setting above, you define the earliest start time that should apply to all employees. You can still set the earliest start time individually for employees. To do this, sign in to Timebutler as an admin and click top left on “Employees > Employees > Overview”. For the desired employee, click the green button with the pencil (=Edit). Set the option “Earliest start time (time tracking)” and click the blue “Save” button at the bottom.

Effect of the earliest start time in time tracking

Entering time entries
Employees can no longer enter time with a start time before the earliest start time in the entry form for new time entries.

Time clock
If an employee starts the time clock before the earliest start time, they see that the time clock start is queued. A countdown appears so the employee knows when the time clock will start. Exactly at the earliest start time, the time clock starts automatically.

If an employee arrives before the earliest start time, they can already clock in and later, at the start time, they do not need to open the time clock again.

In the time clock, the employee can see when the time clock will start automatically:

Allow overriding the earliest start time restriction

Admins can enter time entries that violate the earliest start time, but they are informed beforehand.

For employee users and supervisors, you can allow them under certain conditions to override the earliest start time restriction as well. To do this, sign in to Timebutler as an admin and click bottom left on “Settings > More..”, then on the right on “Time tracking”. Configure the “Override earliest start time” option and click the blue “Save” button at the bottom.

Effect of the earliest start time on existing time entries

Changing the earliest start time does not affect existing time entries. So existing time entries stay the same regardless of the change to the earliest start time and are not modified.

When you change the earliest start time, the change only affects time entries that are entered or recorded after the time of the change.

Latest end time
Read the information about the latest end time.

Core working hours and latest end time

You do not need to, and cannot, enter employees’ core working hours in Timebutler.

Instead, you can set the earliest start time for time tracking, both for all employees and individually per employee.

However, you cannot define a latest end time, because such a restriction often causes problems in practice. If a latest end time were set and an employee happened to arrive at the workplace later than usual, they might not have enough time to meet their required working hours.

Hide overtime information

With time tracking, Timebutler maintains a working time account for each employee and calculates overtime based on the entered working times, the target working time, individual public holidays, rounding settings, overtime capping and setup times, and other settings.

In some companies, it is not desired that employees, supervisors, or admins can view the accumulated overtime, for example because the company has agreed on trust-based working hours.

In this case, Timebutler offers many options to restrict the display of overtime individually, as follows:

Configure capping of all overtime

You can configure that all overtime is compensated. Timebutler will still calculate and show overtime in the working time account, but at the beginning of each month, it will cap all overtime and not carry it over to the next month; the same applies to negative hours.

Set overtime capping to the option “All overtime is compensated; neither overtime nor negative hours are carried over to the next month”. Read here how to activate overtime capping.

Disable display of working time account, overtime calendar, and overtime balance

You can configure for each user type admin, supervisor, and employee user whether to show the working time account, the calendar view of overtime, and the up-to-the-second overtime balance on the dashboard.

To do this, sign in to Timebutler as an admin, click “Settings” at the bottom left, then click “More..” below it. Then on the page, click the heading “Time tracking”. On this time tracking settings page, you will find the heading “Display of information about overtime” in the lower area. Here you can configure the visibility permissions for overtime information individually.

Disable entering overtime reduction

If you do not want to show overtime, then users should also not be able to record overtime reduction. You can completely disable recording overtime reduction for all users. In the time tracking settings (see the previous section on this page), you will find the option “Entering overtime reduction”.

Automatically stopped entries in the working time account

At midnight, Timebutler automatically checks whether there are time clocks that an employee forgot to stop. These time clocks are automatically stopped, and the end time is set so that it matches the employee’s target working time for that weekday, taking into account the employee’s break policy.

Read all the details about automatically stopped time entries here.

The time entry is therefore saved with the employee’s target working time. However, in nearly every case this does not match the actual working time performed. The employee is therefore prompted to correct the end time (also by email).

An admin can configure whether this automatically stopped time entry should be credited to the working time account immediately or only after the employee has corrected the end time. The latter option has the advantage that the employee is not immediately credited with the target working time before they have edited the end time — after all, they most likely did not work exactly the target working time.

Setting for crediting in the working time account

To configure this setting, sign in to Timebutler as an admin, click “Settings” at the bottom left, then click “More..” below. Click the “Time tracking” heading on the right. Here you will find the setting “Status for automatically stopped time clock entries”. You can choose one of two options:

Option 1: Set the status of automatically stopped time entries to “In progress”. The working time is only credited once the end time has been corrected.

When the time clock is stopped and the time entry is saved, the status is set to “In progress”. The time entry is not yet counted in the working time account.

The employee can edit the time entry and correct the end time. Only then will the time entry be counted in the working time account.

Example: An employee starts the time clock at 9:00 AM and forgets to stop it. At midnight, the time clock is automatically stopped. The employee’s target working time is 8 hours, and the minimum break for that working time is 30 minutes. The time entry is then saved with an end time of 5:30 PM and 30 minutes of breaks, resulting in 8 hours of working time. Since the status is set to “In progress”, the 8 hours of working time are not yet reflected in the working time account.

When the employee later corrects the end time, the status changes to “Editing completed” (if the change requires approval, the status first changes to “Requested”), and then the new working time is credited.

Option 2: Apply the working time immediately for automatically stopped time entries, even before the employee corrects the end time.

When the time clock is stopped and the time entry is saved, the status is set to “Editing completed”. The time entry is immediately counted in the working time account.

Example: An employee starts the time clock at 9:00 AM and forgets to stop it. At midnight, the time clock is automatically stopped. The employee’s target working time is 8 hours, and the minimum break for that working time is 30 minutes. The time entry is then saved with an end time of 5:30 PM and 30 minutes of breaks, resulting in 8 hours of working time. These 8 hours of working time are immediately reflected in the working time account.

When the employee later corrects the end time, the new working time is credited (if the change requires approval, the status first changes to “Requested”).

Note: You can configure that changes to existing time entries must be approved by the supervisor. You will find this option in the time tracking settings.

This setting should not be enabled for automatic recording If you want time entries to be recorded automatically, you should deactivate the above option: automatically stopped time entries should then be credited to the working time account immediately, since the employee is not expected to edit the end time.

Read all the details about automatically creating time entries here.

Troubleshooting

Employees with a very high negative balance in the working time account

If you open the working time account in the view Overtime balance as of the key date and, for one or more employees, a very large negative number appears in the column “Overtime balance on dd.mm.yyyy”, the following causes may apply:

Time tracking start date not set

An admin can set the time tracking start date. If that has not been done, it can lead to a high negative overtime balance. For example, if you start time tracking on May 1 but have not entered a time tracking start date, Timebutler expects that working times were recorded for all days from January through April. But since no employee recorded working times before May 1, many negative hours result.

To check or set the time tracking start date, sign in to Timebutler as an admin and click at the bottom left on “Settings > More..”, then on the right on “Time tracking”. Change the “Start of time tracking” option and then click the blue “Save” button at the bottom of the page. Timebutler recalculates the working time account immediately.

Start date for a new employee not set correctly

When a new employee joins the company and you create a user account for them, you can set the time tracking start date for this employee individually, in addition to their hire date. If you did not specify the time tracking start date, you will run into the same problem described in the section at the top of this page.

To check or set the time tracking start date for the employee, sign in to Timebutler as an admin and click at the top left on “Employees > Employees > Overview”, then click the green pencil icon (=Edit) for the desired employee. Change the “Start of time tracking” option and then click the blue “Save” button at the bottom of the page. Timebutler recalculates the working time account for the employee immediately.

Absences such as vacation, sick leave, parental leave, … not entered

If an employee does not enter a longer absence such as vacation, sick leave, parental leave, etc., the working time account will not reduce the target working time. For example, an employee who does not enter 8 weeks of parental leave will not enter working times during the 8 weeks and will have overtime deducted for those 8 weeks.

You can check this by opening the Calendar view of working time entries. If calendar days are marked dark red for multiple days, many negative hours have accrued there and the likely issue is that a vacation request, sick entry, or other absence was forgotten. Enter the vacation or the absence, and the working time account will be recalculated immediately.

In some cases the vacation request or sick entry was entered but not requested, not yet approved, or entered with the status “In progress”. In this case, you must request and approve the entry or set it to the status “Processing completed” so that Timebutler includes it in the working time account.

Working time entries not recorded

If an employee does not record their working time entries, Timebutler subtracts the target working time from the overtime balance for each missing day. For time tracking, it is therefore necessary to enter all working times.

You can check this by opening the Calendar view of working time entries. If calendar days are marked dark red for multiple days, many negative hours have accrued there and the issue may be that working time entries were forgotten for those days. Click one of the days to see whether and which working times were recorded. The employee can then simply add the working times afterwards, and the working time account will be recalculated automatically.

Incorrect working time balance at the start of time tracking

You can set, for each employee, which overtime balance the employee starts with at the beginning of time tracking (=working time balance at the start of time tracking).

If, for example, an employee had an overtime balance of 42 hours at the start of time tracking, but Timebutler has, for example, 10 hours entered as the starting balance, Timebutler cannot display the correct overtime balance. Check and correct the working time balance at the start of time tracking as follows:

Sign in to Timebutler as an admin and click at the bottom left on “Settings”, then below that on “Working time balance”. If necessary, use the buttons above the list to switch to the calendar year in which you started time tracking. Check the overtime balances in the column “Working time balance at the start of time tracking” and correct them if necessary.

Absence does not reduce the target working time (for example parental leave, maternity leave, unpaid leave, …)

Timebutler automatically deducts vacation and sick leave in the working time account. For all other absence types, you can set whether they should also be included in the working time account or not.

For example, if an employee has entered 8 weeks of parental leave and the “Parental leave” absence type is set so that this absence type should not be counted in the working time account, Timebutler will deduct overtime in the working time account for those 8 weeks.

You can fix the problem by configuring which absences should reduce the target working time in the working time account. Read here how to set that Absences reduce the target working time.

Working time balance on 1/1 incorrect or does not match working time balance on 12/31

In some cases, the working time balance on 1/1 may show a very large negative number or may not match the working time balance on 12/31 of the previous year. If the starting balance on 1/1 is too low, the overtime balance will also be too low for the subsequent days in the year.

You can fix the problem with a few clicks. Read here how to proceed when the working time balance on 1/1 is incorrect.

Overtime reduction is not deducted from the working time account

When an employee enters an overtime reduction, they can specify the number of overtime hours to be reduced. A common “misconception” is that these hours from the overtime reduction request should affect the working time account. That is not the case, because the hours would be deducted twice.

Example

An employee has 8 h of scheduled working time entered for a Wednesday. They decide to reduce overtime and enter an overtime reduction of 8 h for a Wednesday, which is also approved. On Friday they open their working time account.

1) If the overtime reduction were deducted (which it intentionally is not):
For Wednesday, Timebutler would determine 8 h of scheduled working time. The employee has entered 0 h of working time (since they did not work). This results in a balance of -8 h. Now the overtime reduction of 8 h would also be deducted. So Timebutler would calculate a balance of -16 h.

2) If the overtime reduction is ignored in the working time account (this is how it is configured):
For Wednesday, Timebutler would determine 8 h of scheduled working time. The employee has entered 0 h of working time (since they did not work). This results in a balance of -8 h. The overtime reduction is ignored; it has no impact on the calculation.

That means:

By comparing scheduled and actual time, the balance arises automatically and the 8 h deduction happens automatically. Since the employee enters no working time on that Wednesday, the deduction follows automatically.

So the overtime reduction serves only for information and also to request and get approval for the day off from the supervisor. The employee could also not work on that Wednesday without an overtime reduction, and 8 h of overtime reduction would likewise be deducted in the working time account.

Working time balance Jan 1 does not match working time balance Dec 31

Timebutler does not automatically transfer the overtime balance to the next year by design. An admin can perform the transfer with a few clicks.

If employees have an overtime balance as of the cutoff date on Dec 31 that does not match the value in the following year’s working time account on Jan 1 (value under “Balance from previous year”), there can be two reasons:

Transfer has not happened yet
An admin may not have transferred last year’s overtime to the following year yet.

Changes since the last transfer
An admin may have already transferred last year’s overtime to the new year, but changes to working time entries, scheduled workdays, public holidays, etc., in the last year have occurred since the transfer. As a result, the overtime balance as of Dec 31 has changed and now differs from the balance on Jan 1.

Correcting the values for Dec 31 and Jan 1

An admin can transfer the overtime with a few clicks. Learn here how to automatically transfer the overtime balance to the next year.

Alternatively, you can manually change the “Working time balance from previous year” value for one or more employees. Sign in to Timebutler as an admin and click “Settings > Working time balance” in the bottom left. Change the value in the column “Balance from previous year” and save the change. The new value is immediately reflected in the working time account.

Verify overtime carried over to the next year

It is possible that the overtime balance as of 31 December does not match the number of overtime hours carried over to 1 January of the next year. Here is a guide for verifying this:

1) Open the working time account for the previous year

Sign in to Timebutler and navigate to “Employees > Time tracking > Working time accounts”. (Employee users click “Time tracking > Working time accounts”.)

Click “Overtime balance as of cut-off date” and set it to 31 December of the previous year. After clicking “Show”, you will see the year-end value in the “Overtime balance on 31 Dec” column on the right.

Tip: The data can be downloaded as an Excel file.

2) Retrieve the balance carried over from the previous year

Click “Overtime balance as of cut-off date” again and set it to 1 January of the following year. In the “Balance from previous year” column, you can see how many overtime hours were carried over from the previous year.

3) Compare the figures

Compare the values from both steps:

  • If the figures are the same, the correct value was carried over.
  • If the figures differ, a correction is required. You can find information on this under Carry over remaining leave and overtime.

Industrial minutes versus hours format in the Excel download

In the time tracking settings you can choose which display format working times should be output in:

  • In industrial minutes format, for example “5.75 h”
  • In h m format, for example “5 h 45 m”

You can download time entries and time accounts as an Excel file with a single click. In the Excel file, we always show the times in industrial minutes format (5.75 h), regardless of the setting above.

The reason is that Excel cannot calculate correctly with the 5 h 45 m format, unlike the industrial minutes format.

Excel cannot calculate an entry like 6 h 49 m + 7 h 37 m - and it’s also harder for a person to calculate - unlike the sum in industrial minutes format. Because the download to Excel is typically used for further processing and calculation of working times, we always provide the times in Excel in industrial minutes.

Only allow the time tracking terminal

You can configure that certain employees cannot start and stop the time clock in their own user accounts, but only via the time tracking terminal on a tablet, and you decide where to place the tablet. This way, you ensure that employees can only clock working time when they are on-site at the office or company.
Read here how to, for some employees, allow only at the time tracking terminal clocking their working time.

Duplicate initials in the time tracking terminal

In the settings for the time tracking terminal, you can choose to display only employee initials instead of full names in the time tracking terminal. Especially if the tablet with the time tracking terminal is placed at the office entrance and there is heavy customer or supplier traffic, it’s advisable for data protection reasons to replace names with initials.

It’s common for two or more employees to share the same initials. Usually you don’t need to make any changes for employees with identical initials, for two reasons:

Tile always in the same place
The sort order of the tiles on the time tracking terminal is always the same. This means that once an employee has figured out which of the two identical-looking tiles is theirs, they will keep choosing the same tile in the future. They can easily check whether they have the right tile by tapping the tile and trying their PIN.

The tiles also have different colors, which greatly improves recognition.

Initials are completed automatically
In addition, Timebutler automatically appends the second letter of the first name to the initials if there are two tiles with the same initials. In most cases, this makes the initials unambiguous.

Forgot to start the time clock

If an employee starts work and only later notices that they did not start the time clock, they have the following options:

1) Enter working time via the input form

If the admin has allowed employees or supervisors to enter working time entries via the input form, the user can enter working time.

2) Start the time clock later

1. Start the time clock later
When the employee notices that they forgot to start the time clock, they can start it right away. In the afternoon at the end of the workday, they stop the time clock. Stopping the time clock saves the working time entry with a start time that is later than the actual start time.

2. Edit entry
In the time clock window, a “Go to list view” link appears. The employee can click the link to go to the list view of working time entries. The new entry is at the top of the list. For that entry, they click the green button with the pencil (=Edit). They can now edit the start time.

3. Approve the change
In the time tracking settings, the admin defines whether changes to the working time entry take effect immediately or require supervisor approval. If the change requires approval, the supervisor receives an email and can approve or reject the change with one click.

Learn what to do if you forgot to stop the time clock.

Learn what to do if you forgot to clock working time.

Forgot to stop the time clock

If an employee started the time clock at the start of work but forgets to stop it at the end of the workday, the following happens:

1. Automatic stop at midnight
At midnight, Timebutler checks whether the time clock is still running and sets the end time so that the employee’s individual target working time for that weekday is met. If a break policy is set for the employee, Timebutler adds the required minimum break to the time entry and pushes the end time accordingly.

Timebutler saves the time entry with the label “Stopped automatically.”

2. Notification to the employee
The employee receives an email from Timebutler with a note about the automatically stopped time entry and additional details, such as how the end time was calculated. The email contains a “Correct time entry” button that the user can click.

3. Correct the end time
After clicking the “Correct time entry” button in the email, the employee goes to the edit form for the time entry and can change the end time.

The time tracking settings define whether changes to the time entry apply immediately or require supervisor approval. If the change requires approval, Timebutler informs the supervisor by email, and they can approve or reject the change with a single click.

4. The label is removed
After the end time is changed, Timebutler also removes the “Stopped automatically” label. This ensures that only time entries are labeled that were stopped at midnight and have not yet been corrected by the employee. The supervisor and the employee can immediately see in Timebutler which entries still need revision.

No stop for night shifts
Timebutler does not stop the time clock if an admin has activated night shifts and the time clock started after 12:00 noon. This ensures that for an employee on a night shift who, for example, starts work at 9:00 PM, the time clock does not automatically stop at midnight.

Read here how to proceed if you forgot to start the time clock.

Read here how to proceed if you forgot to punch your working time.

Forgot to clock working time

If an employee forgets to clock working time and only notices the next day or later, they have the following options:

1) Enter time via the input form

If the admin allows employees or managers to enter time entries via the input form, the user can enter time.

If the admin does not allow employees or managers to enter time entries via the input form, there are the following two options.

2) Create an entry via the time clock

1. Create a time entry
The employee starts the time clock and stops it again after 1 minute (time entries must contain at least 1 minute, otherwise they cannot be saved). This creates a 1-minute time entry.

2. Make a change
In the time clock window, a link “Go to list view” is displayed. The employee can click the link to go to the list view of time entries. The new 1-minute entry appears at the top of the list. For that entry, they click the green button with the pencil icon (=Edit). They can now set the desired date, for example the previous day, and the desired start and end time. In the Note field, they can enter “Correction, forgot to clock yesterday” if desired.

3. Manager approves the change
The time tracking settings define whether changes to the time entry take effect immediately or require manager approval. If the change requires approval, the manager receives an email and can approve or reject it with one click.

This creates the time entry for the desired day with the desired start / end times.

3) Employee informs manager or admin

The employee informs their manager or admin about the missing time entry. They can enter the time for the employee.

Read here how to proceed if you forgot to start the time clock.

Read here how to proceed if you forgot to stop the time clock.

Break rule calculation seems wrong

Applying break rules is a bit more complex than it appears at first glance. Several reasons can make it seem as if Timebutler applied the break rules incorrectly.

Breaks between multiple time entries

With multiple time entries, the periods between entries count as breaks.

If an employee, for example, enters a time entry from 8:00 - 12:00 (=4 h) and another from 13:00 - 18:00 (=5 h) and enters no break, Timebutler will still keep the break fields at 0 min in the time entries. The time from 12:00 - 13:00 then counts as a break, and that time was actually non-working, so the employee worked 9 h, including a 1 h break.

Attendance time versus working time

The following break rules are configured for an employee:

  • Up to 8 h working time: no minimum break
  • From 8 h to 9 h working time: at least 30 minutes break
  • More than 9 h working time: at least 45 minutes break

Case 1)
The employee enters a time entry without a break with start 8:00 and end 16:17, thus 8 hours and 17 minutes.

People often assume incorrectly that you must add a 30-minute break to this time entry. That is not correct. If you convert 30 min of the 8 h 17 min working time into a break, you get 7 h 47 min working time. At 7 h 47 min, however, the rule says no minimum break is required.

Instead, you may only convert 17 min of working time into a break. The correct adjustment is: 8 h working time and 17 min break - and that satisfies the break rule.

Case 2)
The employee enters a time entry without a break with start 8:00 and end 17:22, thus 9 hours and 22 minutes.

People often assume incorrectly that you must add a 45-minute break to this time entry. That is not correct. If you convert 45 min of the 9 h 22 min working time into a break, you get 8 h 37 min working time. At 8 h 37 min, however, only a minimum break of 30 min applies, not 45 min.

So you may only convert 30 min of working time into a break. The correct adjustment is: 8 h 52 min working time and 30 min break - and that satisfies the break rule.

Reason for the wrong assumption
The “thinking error” in both cases is that people interpret the time from arriving at the office to leaving the office as working time and apply the break rules to it. But once you apply the break rules, you often need to apply a different threshold from the break rules because the working time has changed. So the time from arriving at the office to leaving is not the working time; it is the attendance time within which the working time and the break time must be arranged so that the break rules are satisfied.

Timebutler calculates correctly

Timebutler respects all these rules and calculates the necessary adjustments to the time entries. You activate the break rules and let Timebutler handle the rest.

Record and display break times

An Admin can enable recording the start and end times of breaks when working time is recorded via the time clock in the user account or the time tracking terminal. You can also enable entering the start and end times of breaks when entering working times via the entry form.

Enable recording of break times

To record and enter break times, make sure the corresponding options are enabled:

Break times with the time clock and the time tracking terminal
Sign in to Timebutler as an Admin, click “Settings” at the bottom left, then below it click “More..”. On the right, click the “Time tracking” heading. Check or change the “Record breaks with time” option and then click the blue “Save” button at the bottom.

Break times when entering working time via the entry form
Sign in to Timebutler as an Admin, click “Settings” at the bottom left, then below it click “More..”. On the right, click the “Time tracking” heading. Check or change the “Enter break times” option and then click the blue “Save” button at the bottom.

The “Enter break times” option is only available if you select one of the two lower settings for the “Input type” option.

Retrieve break times for a working time entry

You can view the detailed break times for a working time entry in the edit history in the detail view for a working time entry.

Retrieve break times for multiple working time entries

The break times for multiple working time entries are listed in the Utilization report.

Sign in to Timebutler as an Admin and click “Reports > Utilization report” on the left. Select the option “Report type: List view on a daily basis”. In the “List view” option, enable “Also output working times” and below that “Output details for each working time entry”. Then click the blue “Show” button.

The report shows the details for each working time entry (start/end of the working time entry, start/end of the breaks) in the rightmost columns.

You can also download the report as an Excel file or CSV file by clicking the corresponding button.

Note
Timebutler only outputs the start and end of working time entries and the start and end of breaks if the options for entering/recording these times are enabled. To do this, make sure the “Input type”, “Enter break times”, and “Record breaks with time” options are set accordingly in the Settings for time tracking.

Work time entry without an end time

When you enter a work time entry via the entry form, you can enter the start time and the end time.

At the start of the workday, you sometimes want to create a work time entry and first enter only the start time and add the end time later. However, it is not possible to enter a work time entry without entering the end time. There are several reasons for this:

If it were possible to enter work time entries without an end time, these entries would have no working time duration. In the list of work time entries, you would see entries that show no working time. The view would become cluttered, and it would be unclear why some work time entries are not included in the working time account.

Based on experience, many work time entries would be forgotten, and the end time would not be added in the afternoon either. Over time, dozens or hundreds of work time entries without an end time and without a duration would accumulate, and employees would no longer know the correct end time afterwards.

Instead, you have the following alternatives:

Tracking via the time clock

Allow work time tracking with the time clock. Employees can then conveniently start the time clock with a mouse click at the start of the workday and stop it in the afternoon.

Tracking via the time tracking terminal

Provide your employees with the time tracking terminal on a tablet, so employees can conveniently clock in when they arrive at the company.

Enter an estimated end time

Employees can enter a work time entry in the morning with a start time and an approximate end time. At the end of the workday, they can edit the work time entry and correct the end time.

Allow entering the duration instead of times

An admin can set in the time tracking settings under the “Input method” option whether employees enter the start and end time when creating a work time entry or whether they can enter only the duration. If you do not need the times, you can allow entering only the duration.

Automatically create working time entries

Some companies want to enable time tracking but avoid having employees enter or record working times. Instead, the working time entries should be generated automatically for each working day and with the configured target working time for each employee.

We intentionally do not perform such fully automated creation of working time entries: the purpose of time tracking is to record actual working time. Laws also aim for employees to record their own working times and for them to be correct and complete. A time tracking setup that automatically creates working time entries therefore does not meet the requirements for time tracking.

You still have several options to enable automated time tracking almost completely while still complying with the requirements:

Automatic recording using the time clock

You can still make recording much easier for employees. Activate the Time clock and set a Break policy.

That’s it.

Employees now only need to start the time clock on the days they work and do not need to worry about anything else. Timebutler will automatically stop the time clock at midnight, add the minimum break according to the break policy, and set the end time so that the working time matches the employee’s target working time on that weekday.

Note:
Even though this option to automatically stop the time clock exists, to ensure complete time tracking we recommend that employees also clock the end time and the break times.

Time tracking terminal
You can also (additionally) enable the Time tracking terminal on a tablet to offer employees another convenient way to clock their working times.

Enter multiple working time entries

Employees can enter multiple working time entries in advance, for example at the beginning of the month for the entire month or at the beginning of the week for the rest of the week. Through the Working time entry form you can create multiple working time entries at the same time. In it, you can also enter the working time entry for the first day and copy this entry to the other days in the week/month with a few clicks.

Alternative: Overtime feature

If you do not want to record daily working times, then the Overtime feature might be the better alternative for your company. With the overtime feature, employees do not need to enter the entire working time, only overtime and overtime reduction.

Negative hours with overtime capping

You can configure Capping overtime for each employee.

For example, you can stipulate that a certain number of overtime hours per month are included in the salary. Depending on how many overtime hours the employee works, the system caps a certain number of overtime hours, i.e., it does not carry them over to the next month:

  • If the employee does not work more than the configured overtime limit in a month, the system caps the overtime and carries no overtime over.
  • If the employee works more than the configured overtime limit in a month, only the number of overtime hours above the limit carry over to the next month.

No exception for a negative overtime balance

If an employee starts a month with a negative overtime balance, the system still applies overtime capping in the next month.

An example:
An employee has capping of up to 5 overtime hours per month configured. The employee has a negative overtime balance of -3 hours at the end of April. If the employee works 4 overtime hours in May, then at the end of May they will not have an overtime balance of 1 h, but will still have a balance of -3 hours.

The reason is: with capping, up to 5 overtime hours per month are included in the salary, and only overtime beyond that counts. Therefore, the 4 overtime hours worked in May are capped and 0 hours are credited.

For the employee to offset the 3 negative hours, they must work 8 overtime hours in one month: the first 5 overtime hours are capped and 3 overtime hours are credited.

Correct approach

At first glance, this calculation may seem wrong or not sensible. On closer inspection, however, it is the correct approach: For the employee, for example, the employment contract stipulates that the monthly salary covers the 40-hour week and up to 5 overtime hours per month as well. In other words: with the salary, the company pays for a performance range of 40 h per week plus 0 to 5 overtime hours per month. The 5 overtime hours are therefore covered by the salary.

If, as an exception, those 5 overtime hours were credited in the case of a negative overtime balance, then the 5 overtime hours would be both covered by the salary and additionally booked as overtime. The overtime would therefore be wrongly counted twice.

What’s more:
An employee could, by cleverly alternating over- and underwork, manage to never work more than the lower limit of only 40 h, yet still always have an overtime balance of 0 in the working time account. In one month they work 5 hours too little, in the next month they work 5 overtime hours, etc.

Shift Planning

Assigning Employees to Shifts

Add Team Member

Assign one or more employees to a shift. Employees are automatically sorted when selecting:

  1. Department and location match
  2. Availability status
  3. Alphabetical order

Edit Assignment

You can adjust:

  • Working time
  • Department
  • Location

Delete Assignment

Removing an assignment removes the employee from the shift. The shift itself remains unchanged.

Planning Breaks

Breaks can be represented by assigning the same person multiple times with different time slots.

Example: Lunch break from 12:00–13:00

Create two assignments:

  • 08:00–12:00
  • 13:00–17:00

Creating and Managing Shifts

Add Shift

Click Add shift to create a new shift.

You can define:

  • Title
  • Date
  • Time range
  • Department (optional)
  • Location (optional)

Edit Shift

  1. Click on the shift in the calendar.
  2. Select Edit.
  3. Adjust the details.
  4. Save your changes.

Delete Shift

Deleting a shift:

  • Removes the shift completely
  • Automatically removes all employee assignments linked to it

Manager Permissions in Shift Planning

Managers have access based on their viewing rights.

When Can Managers See a Shift?

A manager sees a shift if:

  • They created it, or
  • At least one assigned employee is within their viewing scope

When Can Managers Edit or Delete a Shift?

A manager can edit or delete a shift if:

  • They created it, or
  • All assigned employees are within their viewing scope

If neither condition is met:

  • The shift menu is not displayed
  • Assignments can be viewed but not edited

Opening Shift Planning

For Admins and Managers

To manage shifts:

My Employees → Shifts → Calendar view

Here you see a weekly overview of all shifts you have permission to access.
You can create, edit, assign, publish, and delete shifts.

Viewing Your Own Shifts

To view your personal shift assignments:

My Data → Shifts → Calendar view

This view is available to all users, including admins and managers.

Overview of Shift Planning

The Shift planning feature allows you to create, assign, and publish work shifts for employees.

A shift is a planned work period with:

  • A specific date
  • A defined time range
  • An optional department
  • An optional location

You can assign multiple employees to a shift.

Shifts are managed in a weekly calendar view and can be published once finalized so employees can see their assignments.

What Is a Shift?

A shift represents a scheduled work period.

When creating a shift, you can optionally specify:

  • A department
  • A location

This improves assignment efficiency: employees who belong to the selected department or location will appear higher in the selection list.

Publishing Shifts

By default, newly created shifts are unpublished.
Unpublished shifts are visible only to admins and managers.

Employees can see only published shifts.

Publish All Shifts

Publishing makes all shifts in the displayed week visible to assigned employees.

This action:

  • Publishes all shifts you have permission to see
  • Works for past, current, and future weeks
  • Automatically publishes new shifts if the week is already fully published

Unpublish All Shifts

Unpublishing hides shifts from employees again.

This option is available only for:

  • Current and future weeks
  • Weeks where all shifts are currently published

Past weeks cannot be unpublished because they serve as historical records.

Shift Planning FAQ

Why can’t a manager see certain employees?

They do not have viewing rights for those employees.

Why can’t a manager edit a shift?

Managers can edit if they created the shift or if all assigned employees are within their viewing scope.

Why is someone marked red even though no vacation is entered?

Possible reasons:

  • Public holiday
  • Not a configured working day
  • Another absence type

Can I assign someone who is marked red?

Yes. The system warns you but allows the assignment.

When should I publish shifts?

Publish shifts only when the schedule is finalized.

Why can’t I unpublish a past week?

Past schedules serve as historical records.

Shift Status Indicators

Each assignment displays a colored dot to indicate availability:

Color Status Meaning
🟢 Available No absence, normal working day
🔴 Not available Vacation, sick leave, parental leave, holiday
🟡 Partially absent Trade fair, doctor’s appointment, business trip
🔵 Home office Working remotely but generally available

The system warns you about conflicts but does not prevent assignment.

Viewing Rights in Shift Planning

Admins

Admins can see:

  • All employees
  • All shifts
  • All assignments

Employees

Employees:

  • See My Data → Shifts
  • Cannot create, edit, or delete shifts
  • May see colleagues’ shifts depending on company settings

Company-Level Visibility Settings

No colleague view

Employees see only their own shifts.

Same department

Employees see shifts of colleagues in the same department.

Same manager

Employees see shifts of colleagues with the same manager.

Weekly Actions in Shift Planning

Copy Last Week

Copies all shifts from the previous week to the current week.

From Previous Day

Copies shifts from the previous day to the selected day.

More Options (…)

Provides additional actions such as:

  • Exporting shifts (CSV/Excel)
  • Clearing the entire week

Overtime Management

Features

Overtime Management Features

Timebutler offers comprehensive overtime management. Every employee can record their overtime and overtime reduction, and Timebutler automatically maintains the overtime balance. You can require that overtime needs approval, and with limits you can cap the maximum overtime balance.

Here you can find an overview of the overtime management features.

Overtime feature or time tracking feature

Timebutler offers an overtime feature and a time tracking feature. You cannot enable both features at the same time.

Read here why you cannot enable the time tracking feature and the overtime feature at the same time.

Activate

Activate Overtime Management

You can activate overtime management in Timebutler with just a few clicks. It makes sense to inform employees before activation so that everyone records overtime and overtime reduction correctly.

Important
If you have activated the time tracking feature, activating the overtime feature automatically and immediately deactivates the time tracking feature. Read here why the overtime feature and the time tracking feature cannot both be active.

Activate the Overtime feature

Sign in to Timebutler as an admin and click Settings at the bottom left, then More… below it, then Overtime feature on the right. Click the Activate Overtime feature button. On the page, you can configure various overtime management options as you like. Then click the Activate Overtime feature button to confirm.

This activates the overtime feature for all employees. From now on, the left navigation bar provides links to enter overtime and overtime reduction, as well as the link to the overtime account.

Set overtime starting balance

Click Settings > Vacation entitlement at the bottom left. Here, in the Overtime balance from the previous year column, you can set employees’ overtime starting balance (only displayed if the overtime feature is activated).

Overtime requires approval

Read here how you can configure that overtime requires approval.

Overtime and time off

Enter overtime

With the overtime feature, employees only enter overtime and overtime reduction, not full working hours. So if an employee has worked their target working time of, for example, 8 hours, they do not need to make any entry. Timebutler maintains an overtime account for each employee and automatically offsets overtime and overtime reduction in it, together with the overtime balance carried over from the previous year.

To enter overtime, do the following:

Employee users sign in to Timebutler and click Overtime > Enter overtime on the left. Alternatively, you can enter overtime like other absence entries, via the calendar view.

Managers and admins sign in to Timebutler and click Employees > Overtime > Enter overtime at the top left. Alternatively, you can enter overtime like other absence entries, via the calendar view. To enter your own overtime, click My data > Overtime > Enter overtime at the top left.

Overtime approval

Overtime entries do not require approval by default. You can configure that overtime entries require approval.

Overtime reduction

In the overtime feature, employees only enter the overtime and the overtime reduction, not their full working hours. So if an employee has worked their target working time of, for example, 8 hours, they do not need to enter anything. Timebutler maintains an overtime account for every employee and automatically offsets overtime and overtime reduction in it, together with the overtime balance carried over from the previous year.

To request overtime reduction, proceed as follows:

Employee users sign in to Timebutler and click Overtime > Overtime reduction on the left. Alternatively, you can enter overtime reduction like other absence entries, via the calendar view.

Managers and admins sign in to Timebutler and click Employees > Overtime > Overtime reduction at the top left. Alternatively, you can enter overtime reduction like other absence entries, via the calendar view. To enter your own overtime reduction, click My data > Overtime > Overtime reduction at the top left.

Approval of overtime reduction

An admin can decide whether overtime reduction requires approval or whether employees can enter it without approval. Read here how to define whether an absence type requires approval.

Overtime requiring approval

You can set whether employees can enter overtime and have it immediately credited to the overtime account, or whether overtime entries must first be approved by a manager.

You can also configure other absence types to require approval or not, for example working from home or business trips. So to set overtime as requiring approval, follow the same procedure as for all other absence types. Read here how to set overtime as requiring approval.

Not applicable to time tracking
Please note that the approval requirement for overtime described here applies only to the overtime feature, not to the time tracking feature. In the time tracking feature, employees enter their working hours in full and Timebutler calculates overtime automatically, so employees do not make separate overtime entries.

Delete overtime and overtime reduction

To delete overtime entries or overtime reduction requests, do the following:

Employee users sign in to Timebutler and click Absences > List view on the left. For the desired entry, they click the red button with the trash can. A countdown starts to confirm the deletion. They click the delete button a second time within the countdown to confirm.

Managers and admins sign in to Timebutler and click Employees > Absences > List view at the top left. For the desired entry, they click the red button with the trash can. They click the delete button a second time within the countdown to confirm.

Only admins or managers can delete overtime entries or overtime reduction requests. If an employee user wants to delete an overtime entry or an overtime reduction request, the system instead sends a cancellation request to the manager. The manager can approve the cancellation request (= the entry is deleted) or reject it.

Overtime account

View overtime account

With the overtime feature, employees only enter overtime and overtime reduction, not full working hours. So if an employee has worked their target working time of, for example, 8 hours, they do not need to enter anything. Timebutler keeps an overtime account for each employee and automatically posts overtime and overtime reduction there, together with the previous year’s overtime balance.

Access the overtime account

To access the overtime account, proceed as follows:

Employee users sign in to Timebutler and click Overtime > Overtime account on the left.

Managers and admins sign in to Timebutler and click Employees > Overtime > Overtime accounts at the top left. To open your own overtime account, click My data > Overtime > Overtime account at the top left. You can click the Download button to download the view as an Excel file, then process or send it further.

Carry over overtime to the next year

In the overtime account, under Overtime balance from the previous year, you can see the overtime balance as of December 31 of the previous year and carry the overtime credit from the previous year over to the vacation balance of the next year. Timebutler intentionally does not transfer the overtime credit (and the remaining vacation) to the next year fully automatically. Read here how to carry over overtime to the following year.

Download overtime account

To download the overtime account as an Excel or CSV file, follow these steps:

Sign in to Timebutler as an admin and click Employees > Overtime > Overtime accounts at the top left. To open your own overtime account, click My data > Overtime > Overtime account at the top left.

Click the Download button to download the view as an Excel file, then process or send it further.

Paid-out Overtime (Overtime Feature)

If you have paid out overtime for an employee, you can record it in Timebutler as follows:

Create an overtime reduction request for the employee and approve it immediately. The overtime is deducted from the overtime account right away and reduces the employee’s overtime balance.

In the overtime reduction request, enter the number of overtime hours that were paid out. In the Note field, you can add a comment such as “Paid out on dd.mm.yyyy”. To make it clear to colleagues that this is not time off but paid-out overtime, you can set a distinctive date, for example always January 1 of the year.

Paid-out overtime in time tracking
If you have enabled time tracking instead of the overtime feature, read here how to record paid-out overtime in time tracking.

Overtime limits

Limit settings

When the overtime feature is enabled, you can set an overtime limit and a deficit-hours limit.

Learn more about limits here.

Digital Personnel File

Features

Features of the Personnel File

With Timebutler, you can maintain a Digital Personnel File for every employee.

You can:

  • Customize the structure and fields to match your requirements
  • Store documents centrally (for example employment contracts)
  • Retrieve information quickly using reporting functions
  • Use search favorites for faster access to frequently needed reports

Permissions

Using viewing and editing permissions, you define:

  • Which users can access specific Digital Personnel Files
  • Which users are allowed to edit the data

Learn More

Find a detailed overview here: Overview of the features of the Digital Personnel File

Activate

Activate personnel file

An Admin can configure whether the Digital Personnel File feature is enabled.

Activate the Digital Personnel File

  1. Log in to Timebutler as an Admin.
  2. Go to Settings > More… > Digital Personnel File.
  3. Activate the option Activate personnel file.
  4. Click Save.

Once the Digital Personnel File is activated, the option Salaries and bonus payments becomes available.
This allows you to decide whether salary information and bonus payments should also be managed in Timebutler.

Customize Before Activation

Before activating the Digital Personnel File, it is recommended to:

  • Adjust the structure and fields to your requirements
  • Configure the appropriate viewing and editing permissions

Deactivate the Digital Personnel File

To deactivate the Digital Personnel File:

  1. Go to Settings > More… > Digital Personnel File.
  2. Deactivate the option Activate personnel file.
  3. Click Save.

Deactivating the Digital Personnel File does not delete any data.
If you activate it again later, all previously stored data will be available again.

Salary information and bonus payments

In addition to the Digital Personnel File, you can manage Salary information, variable compensation, and bonus payments for each employee.

You can:

  • Record salary data for different periods
  • Record variable payments for different periods
  • Add multiple bonus payments for different dates

Monthly or Annual Gross Amount

When entering the gross amount, you can choose between:

  • Monthly amount
  • Annual amount

Companies typically use either monthly or annual figures. You should use the same option consistently for all employees.

This ensures:

Enable or Disable Salary Data

You can activate or deactivate salary data in the settings of the Digital Personnel File:

Activate the Digital Personnel File

Foreign Currencies

For employees working abroad, dozens of currencies are available.

  • Exchange rates are updated daily using data from the European Central Bank.
  • Salaries and bonus payments can be filtered and compared by amount when downloading the data.

Permissions

Use the Viewing and editing permissions
to define who may view and edit salary data.

Example

Edit personnel file

Edit a personnel file

If you have the appropriate Viewing and editing permissions, you can edit data in the Digital Personnel File and Salary data as described below.

Edit a Digital Personnel File

  1. Log in to Timebutler as an Admin.
  2. Go to Employees > Overview.
  3. Click the blue magnifying glass icon next to the desired user account to open the Detail view.
  4. Open the Personnel file or Salary data tab.

To edit the data:

  • Click Edit to modify existing entries.
  • Click Add entry to create a new entry.
  • Use the available buttons to edit or delete existing salary entries.

If one or both tabs are not visible:

  • You do not have viewing rights for the data, or
  • An Admin has deactivated the Digital Personnel File or Salary data.

See:
Activate the Digital Personnel File

View Your Own Digital Personnel File

If you have the required viewing rights, you can access your own data:

  1. Log in to your Timebutler user account.
  2. Go to Settings > My Account > My Profile.
  3. Open the Personnel file or Salary data tab.

If the tabs are not visible, you either do not have viewing rights or the feature has been deactivated by an Admin.

Screenshot

Bulk edit personnel files

You can edit the Digital Personnel File of individual employees.
If you want to update the data of multiple employees at once, use the bulk edit function.

Only Admins have permission to perform bulk edits.

Open the Bulk Edit Function

  1. Log in to Timebutler as an Admin.
  2. Go to Settings > More… > Digital Personnel File Bulk Change.

Step 1: Download the Excel File

Download the Excel file containing all data from the Digital Personnel Files of all employees.

Step 2: Edit the File

  1. Open the Excel file.
  2. Edit the data as required.
  3. Save the file.

Step 3: Upload the Updated File

  1. Upload the completed Excel file in step 3.
  2. The data in the Digital Personnel Files will be overwritten with the values from the uploaded file.

Important

All fields of all Digital Personnel Files are overwritten with the values in the uploaded Excel file. After uploading, only the data contained in the Excel file will remain in the Digital Personnel Files.

Ensure that the Excel file contains all required data before uploading it.

If you upload an empty or incorrect file, Timebutler displays an error message and does not delete any existing data.

Screenshot

Edit salary information

If you have the appropriate editing permissionsø, you can edit the salary information as follows:

Edit salary information

If you have the appropriate Viewing and editing permissions, you can edit Salary data as described below.

Edit Salary Data for an Employee

  1. Log in to Timebutler as an Admin.
  2. Go to Employees > Overview.
  3. Click the blue magnifying glass icon next to the desired user account to open the Detail view.
  4. Open the Salary data tab.

To manage salary information:

  • Click Add entry to create a new salary entry.
  • Use the available buttons to edit or delete existing salary entries.

If the Salary data tab is not visible:

  • You do not have viewing rights for the data, or
  • An Admin has deactivated Salary data.

See: Activate the Digital Personnel File

View Your Own Salary Data

If you have the required viewing rights, you can access your own salary information:

  1. Log in to your Timebutler user account.
  2. Go to Settings > Your user account.
  3. Open the Salary data tab.

If the tab is not visible, you either do not have viewing rights or the feature has been deactivated by an Admin.

To manage access rights, see: Viewing and editing permissions

Screenshot

Documents and files

Define Document Fields in the Digital Personnel File

You can customize the Digital Personnel File to match your company’s requirements by defining groups and fields.

This allows you to store and evaluate exactly the data that is relevant for your organization.

You can also store up to 100 documents per employee, for example:

  • Employment contracts
  • Additional agreements
  • Other personnel-related documents

Create a Document Field

To upload documents, you must first define the corresponding field.

  1. Log in to Timebutler as an Admin.
  2. Go to Settings > More Settings > Digital Personnel File.
  3. Open the Input Fields tab.
  4. Click Edit.
  5. Create a new field in the desired group.
  6. Select Document / File as the field type.
  7. Save your changes.

Once the field is created, documents can be uploaded in the Digital Personnel File.

Screenshot

Add new document field

Upload documents

You can customize the Digital Personnel File and define fields for uploading documents.

Upload Documents for an Employee

  1. Open the Detail view of the desired employee.
  2. Open the Personnel file tab.
  3. Click Edit.

For fields of type Document:

  1. Click Edit next to the document field.
  2. Click Select file (or a similar button) to choose the file you want to upload.
    Alternatively, drag and drop the file into the marked upload area.
  3. Confirm the upload.

Permissions

The Edit buttons are only visible if your user account has permission to edit the Digital Personnel File.

Screenshots

Edit button for uploading documents

Select file

Download documents

You can download documents stored in the Digital Personnel File in different ways.

Download a Single Document

  1. Open the Detail view of the desired employee.
  2. Open the Personnel file tab.
  3. Click the name of the document you want to download.

Download All Documents for One Employee

  1. Open the Detail view of the desired employee.
  2. Open the Documents tab
    (only visible if at least one document field is configured).
  3. Click Download all.

The button is only available if at least one document has been uploaded.

Download Documents for Multiple Employees

  1. Log in to Timebutler as an Admin.
  2. Go to Reports > Download Center.
  3. Open the Documents tab
    (only visible if at least one document field is configured).
  4. Define the required filters to select employees.
  5. Download the documents.

Troubleshooting Downloads

  • Downloads open in a new browser window.
  • In some cases, files are downloaded directly without being displayed.
  • Check your browser’s default download folder if the file does not open automatically.

When downloading multiple documents:

  • All files are provided as a ZIP file.
  • The ZIP file is saved in your browser’s download folder.

Delete documents

You can customize the Digital Personnel File and define fields for uploading documents.

Delete a Document

To delete a document stored in the Digital Personnel File:

  1. Open the Detail view of the desired employee.
  2. Open the Personnel file tab.
  3. Click Edit.
  4. Click Delete next to the document you want to remove.
  5. Click Delete now to confirm.

Important

Deleting a document is permanent. The document cannot be restored after deletion.

Automatic Deletion of Documents

You can configure automatic deletion of documents after a defined period.

Screenshot

Delete a document from the personnel file

Permissions and settings

Viewing and Editing Permissions

Using Viewing and editing permissions, an Admin can define:

  • Which employees may view specific Digital Personnel Files
  • Which employees may view Salary data
  • Which employees may edit the information

Change Permissions

  1. Log in to Timebutler as an Admin.
  2. Go to Settings > More… > Digital Personnel File.
  3. Adjust the available permission settings as required.

You can configure different visibility and editing rights depending on your organizational requirements.

You can also customize the structure of the Digital Personnel File:

Customize the Digital Personnel File

Customize personnel file

You decide how the Digital Personnel File should be structured for your company.

You can fully customize the layout and fields according to your requirements — including naming, grouping, and ordering.

Edit the Structure and Fields

  1. Log in to Timebutler as an Admin.
  2. Go to Settings > More… > Digital Personnel File.
  3. Open the Input Fields tab.
  4. Click Edit.

You will see a list of all groups and fields in the Digital Personnel File.

Available Customization Options

You can:

  • Add new fields
  • Delete existing fields (if no data has been entered yet)
  • Deactivate fields (if data already exists)
  • Create and delete groups with headings
  • Move fields up or down, including into other groups
  • Move entire groups (including their fields) up or down
  • Define the field name (German and English)
  • Select the data type for each field

Available data types include, for example:

  • Text field
  • Date
  • Integer
  • Yes/No selection
  • Document/File upload

Apply Changes

After clicking Save, all views of the Digital Personnel File are automatically updated according to your configuration.

Download data

In the Download Center

You can download data from the Digital Personnel File and Salary data in the following ways.

Via the Download Center

Use the Download Center to download employees’ Digital Personnel File data and Salary data.

Data for Individual Employees

From the Employee overview you can download the Digital Personnel File data and Salary data for individual employees.

Detailed Reporting

With the Personnel File Reporting feature, you can filter and download personnel files based on specific criteria.

In the employee overview

In the Employee overview, you can download data from the Digital Personnel File and Salary data for multiple employees.

In the Detail view of a user account, you can download the data for a single employee.

Download Data for Multiple Employees

  1. Log in to Timebutler as an Admin.
  2. Go to Employees > Overview.
  3. Click Download.
  4. Select the data you want to download.

A list of available download options will be displayed.

Download Data for One Employee

  1. Log in to Timebutler as an Admin.
  2. Go to Employees > Overview.
  3. Click the blue magnifying glass icon next to the desired user account to open the Detail view.
  4. Click Download.
  5. Select the data you want to download.

Missing Download Options

If no option to download Digital Personnel File data or Salary data appears after clicking Download, then:

  • You do not have viewing rights for this data, or
  • An Admin has deactivated the Digital Personnel File or Salary data.

To manage access, use:

Analysis

Evaluating Personnel Files

An Admin can use the Digital Personnel File to filter, analyze, and export employee data using flexible criteria.

Open the Personnel File Reporting

  1. Log in to Timebutler as an Admin.
  2. Go to Reports > Personnel file.
  3. Define the desired filter criteria.
  4. Click Run the report.

You can filter both:

  • Digital Personnel File fields
  • Employee selection criteria

Digital Personnel File Filters

Digital Personnel File Field Filters

In the Digital Personnel File filters section, you can add one or more filter conditions:

  • Select any field from the Digital Personnel File.
  • Choose conditions depending on the data type.

Examples:

  • For a date field, you can specify a particular week.
  • For a text field, you can specify a minimum string length.

If you define multiple filters, they are combined using AND logic — only records that meet all criteria are included in the results.

Employee Filters

Use Employee filters to define which employees’ personnel files should be included in the report.

For example:

  • Employees at a specific location
  • Employees in a specific department

Run the Report

After clicking Search, Timebutler displays employees who meet all selected filters.

For readability, only the Digital Personnel File fields used in your filters are shown in the results (maximum of 7 fields).

To export full employee data:

  • Click Download to export all data fields from the Digital Personnel File (for example, as an Excel file).

Save and Reuse Searches

If you frequently use certain filter combinations, you can save them:

Example Analyses

  • Which employees’ probation period ends within the next 30 days?

  • Which employees in marginal employment are covered by statutory health insurance?

Note

Employees in marginal employment refers to a German-specific employment category (often called “mini job” or low-earning part-time employment with simplified tax and contribution rules). Similar forms of low-earning part-time employment exist in some other countries, but the specific legal classification and benefit structure is unique to Germany. In Austria a similar marginal employment concept exists; equivalent classifications in other countries vary and are not standardized internationally (for example, contingent work or casual employment in the US and UK).

Saved Searches

Learn how to save searches so you can reuse them at any time.

Even Faster: Favorites

You can mark saved searches as favorites.

Favorites are displayed on the dashboard, allowing you to run the report directly from the dashboard with a single click.

Learn more about search favorites on the dashboard.

Reports

Download center

Absence entries

You can download employees’ absence entries via the Download Center as an Excel file or CSV file.

Download Absence Entries

  1. Log in to Timebutler as an Admin or Manager.
  2. Go to Reports > Download Center.
  3. Open the Absence entries tab.

You can then download the data as:

  • Excel file
  • CSV file

Note

The Report Center is always available to Admins. Managers can access the Report Center only if an Admin has enabled access. Employee users do not have access to the Report Center.

Time entries

You can download employees’ time entries via the Download Center as an Excel file or CSV file.

Download Time Entries

  1. Log in to Timebutler as an Admin or Manager.
  2. Go to Reports > Download Center.
  3. Open the Working times tab.

You can then download the data as:

  • Excel file
  • CSV file

Note

The Report Center is always available to Admins. Managers can access the Report Center only if an Admin has enabled access. Employee users do not have access to the Report Center.

Screenshot

Vacation Accounts

You can download employees’ vacation balances via the Download Center as an Excel file or CSV file.

Download Vacation Balances

  1. Log in to Timebutler as an Admin or Manager.
  2. Go to Reports > Download Center.
  3. Open the Vacation contingents tab.

You can then download the data as:

  • Excel file
  • CSV file

Note

The Report Center is always available to Admins. Managers can access the Report Center only if an Admin has enabled access. Employee users do not have access to the Report Center.

Screenshot

Employee data

You can download employee data via the Download Center as an Excel file or CSV file.

Download Employee Data

  1. Log in to Timebutler as an Admin or Manager.
  2. Go to Reports > Download Center.
  3. Open the Employee data tab.

You can then download the data as:

  • Excel file
  • CSV file

Note

The Report Center is always available to Admins. Managers can access the Report Center only if an Admin has enabled access. Employee users do not have access to the Report Center.

Screenshot

Personnel files and salary data

You can download data from Personnel files and Salary data via the Download Center as an Excel file or CSV file.

Download Personnel Files or Salary Data

  1. Log in to Timebutler as an Admin or Manager.
  2. Go to Reports > Download Center.
  3. Open the Personnel files or Salary data tab.

You can then download the data as:

  • Excel file
  • CSV file

Detailed Analysis

You can download personnel files directly via the Download Center.

For more advanced filtering options, use the Analysis function.

This allows you to search for personnel files based on specific criteria and download them.

Note

The Report Center is always available to Admins. Managers can access the Report Center only if an Admin has enabled access. Employee users do not have access to the Report Center.

Screenshots

Personnel files download

Salary data download

Personnel file documents

The Download Center allows you to conveniently download the documents stored in the personnel files, including documents for a large number of users.

To download the documents, sign in to Timebutler as an admin or supervisor, click “Reports” on the left, then click “Download Center” below. Then click the “Documents” tab.

Please note:

The Download Center is always available to admin users. Supervisors can access the Download Center only if admins have enabled access for them. Employee users do not have access to the Download Center.

Screenshot: Download documents from the personnel file

Deleted absence entries

Timebutler logs deleted absence entries with a timestamp and information about who deleted the entry.

You can download deleted absence entries via the Download Center as an Excel file or CSV file.

Download Deleted Absence Entries

  1. Log in to Timebutler as an Admin or Manager.
  2. Go to Reports > Download Center.
  3. Open the Deleted entries tab.

You can then download the data as:

  • Excel file
  • CSV file

Note

Timebutler records which user deleted which absence entry and when, ensuring full traceability.

The Edit history is also logged for existing absence entries so that all changes can be tracked.

Please note

The Report Center is always available to Admins. Managers can access the Report Center only if an Admin has enabled access. Employee users do not have access to the Report Center.

Screenshot

Deleted time entries

Timebutler logs deleted time entries with a timestamp and information about who deleted the entry. In the Download Center, you can easily download the deleted time entries as an Excel file or CSV file with just a few clicks.

To download the deleted time entries, sign in to Timebutler as an admin or supervisor, click “Reports” on the left, then “Download Center” below it. Then click the “Deleted time entries” tab.

Note:
Timebutler logs which user deleted which time entry and when, so you can fully trace the edit history. For existing time entries, the edit history is logged as well, so you can trace the changes.

Please note:
The Reports Center is always available to admin users. Supervisors can access the Reports Center only if admins have enabled access. Employee users do not have access to the Reports Center.

Report center

Access and analyze the Report Center

In the Report Center, you can analyze employee data and display it in graphical form.

Open the Report Center

  1. Log in to Timebutler as an Admin or Supervisor.
  2. Go to Reports > Report Center.
  3. Configure the desired settings.
  4. Display the report.

Available Report Types

You can choose between the following report types:

  • Chart (Sum)
  • Chart (Average per user)
  • Cumulative
  • List view

Access for Supervisors and Employee Users

  • Admins always have access to the Report Center.
  • Supervisors can access the Report Center only if access has been enabled by an Admin.
  • Employee users do not have access to the Report Center.

Enable Access for Supervisors

  1. Log in to Timebutler as an Admin.
  2. Go to Settings > More… > Global settings.
  3. Check or change the option Managers may use reports.

Utilization report

Utilization Report - Cumulative Report

The Employee utilization report is available in four variants:

Open the Cumulative Absences Report

  1. Log in to Timebutler as an Admin.
  2. Go to Reports > Employee utilization.
  3. Select Cumulative absences report.
  4. Click Show report.

You can download the report as:

  • Excel file
  • CSV file

Content of the Report

The Cumulative absences report shows the total number of:

  • Workdays
  • Vacation days

for all absence entries within the selected period.

The calculation is strictly monthly.

Example: If a vacation request starts in May and extends into June, and you generate the report for May, only the vacation days that fall within May are included.

For certain use cases, such as calculating provisions, a strictly monthly evaluation may be required.

Utilization Report - Grouped Report

The Employee utilization report is available in four variants:

Open the Grouped Absences Report

  1. Log in to Timebutler as an Admin.
  2. Go to Reports > Employee utilization.
  3. Select Grouped absences report.
  4. Click Show report.

You can download the report as:

  • Excel file
  • CSV file

Content of the Report

The Grouped absences report provides an overview of:

  • The number of employees with absences per month, week, or day
    or
  • The number of workdays per month, week, or day

(depending on the selected settings).

This allows you to quickly identify:

  • Days, weeks, or months with many absences
  • Periods with high sickness levels
  • Training periods
  • Potential staffing bottlenecks

The report helps simplify scheduling and workforce planning.

Utilization report - daily list view

The Employee utilization report is available in four variants:

Open the List View on a Daily Basis

  1. Log in to Timebutler as an Admin.
  2. Go to Reports > Employee utilization.
  3. Select List view on a daily basis.
  4. Click Show report.

You can download the report as:

  • Excel file
  • CSV file

Content of the Report

This report provides a day-by-day overview for the selected employees, including:

  • Workdays
  • Absences

If the time tracking feature is enabled, the report also shows cumulative working time information per calendar day, such as:

  • Scheduled working time
  • Hours worked
  • Breaks

Start and End Times of Time Entries

The report does not display the start and end times of individual time entries.

Employees can create multiple time entries per calendar day. Displaying several start and end times within a single row would lead to unclear results and make Excel processing difficult.

To view and download detailed start and end times for each time entry:

  1. Log in to Timebutler.
  2. Go to Employees > Time Tracking > List view.

Personnel file

Analyze personnel files

An Admin can analyze data from the Digital Personnel File using flexible filter criteria.

Open the Personnel File Analysis

  1. Log in to Timebutler as an Admin.
  2. Go to Reports > Personnel file.
  3. Define the required filter criteria.
  4. Click Show to run the analysis.

You can define:

  • Filter criteria for personnel file fields
  • Filter criteria for selecting employees

Personnel File Filter Criteria

In the Personnel file filter criteria section, you can add one or more filter conditions.

For each filter:

  • Select a data field from the personnel file.
  • Choose the available condition based on the field type.

Examples:

  • For a date field, you can filter for a specific week.
  • For a text field, you can filter by minimum length.

If you define multiple filter criteria, they are combined using AND logic.
This means that only personnel files and employees matching all criteria are included in the results.

Employee Filter Criteria

Use the Employee filter criteria to define which employees’ personnel files should be analyzed.

For example, you can filter:

  • Employees at a specific location
  • Employees in a specific department

Run the Analysis

After clicking Show, Timebutler displays all employees who meet the defined criteria.

For clarity, the results view displays only the personnel file fields used in the filter criteria (maximum of 7 fields).

To export the full dataset:

  • Click Download to export all data fields from the Digital Personnel File (for example as an Excel file).

Save Analyses and Use Favorites

If you frequently use certain filter combinations, you can save the analysis.

Saved searches can also be added to search favorites.

Favorites are displayed on the dashboard and can be opened with a single click.

Example Analyses

Analysis: Which employees’ probation period ends in the next 30 days?

Analysis: Which employees in marginal employment are covered by statutory health insurance?

Note

Employees in marginal employment refers to a German-specific employment category (often called “mini job” or low-earning part-time employment with simplified tax and contribution rules). Similar forms of low-earning part-time employment exist in some other countries, but the specific legal classification and benefit structure is unique to Germany. In Austria a similar marginal employment concept exists; equivalent classifications in other countries vary and are not standardized internationally (for example, contingent work or casual employment in the US and UK).

Save analyses and searches

Use the Personnel file analysis to search and analyze employees’ personnel files.

Many analyses are needed regularly, for example:

  • Employees whose probation period ends soon
  • Employees with an upcoming medical examination

To avoid recreating filter criteria each time, you can save searches and run them again with one click.

  1. Open the Personnel file analysis.
  2. Define the required filter criteria.
  3. Click Show to run the analysis.
  4. Click Save search.
  5. Enter a name for the search and confirm.

The search is now saved.

  1. Open the Personnel file analysis.
  2. Open the My saved searches tab.
  3. Click the desired search to run the analysis.

To delete a saved search:

  • Click the trash can icon next to the saved search.

Saved searches are personal. Other users cannot see your saved searches.

Favorites

You can mark saved searches as favorites.

Favorites appear on the dashboard and allow you to start the analysis directly with one click.

For more details, see Search favorites on the dashboard.

Screenshot

Search favorites on the dashboard

An Admin can save searches for evaluating the personnel file. Saved searches can be marked as favorites.

Favorites are displayed on the dashboard (the page shown after logging in). This allows you to start an analysis directly from the dashboard with one click, without opening the overview of saved searches.

Save or Modify a Favorite

Save a Search as a Favorite

When saving a search, activate the option Save as favorite to store it as a favorite.

Add or Remove an Existing Favorite

  1. Open the overview of saved searches.
  2. Click the heart icon next to the desired search.

Clicking the heart icon again removes the search from your favorites.

Screenshot

Display Favorites on the Dashboard

Hide Saved Searches on the Dashboard

If you do not want saved searches to appear on the dashboard:

  • Click the cross icon next to the saved searches section on the dashboard.

Show Saved Searches on the Dashboard

If you previously hid saved searches and want to display them again:

  1. Log in to your Timebutler user account.
  2. Go to Settings > Your user account.
  3. In the Your personal settings section, click Edit.
  4. Activate the option to display saved searches on the dashboard.

Screenshot

Users & Permissions

User types

Employees

The employee user type fits most employees in the company. With this account type, employee users always see their own vacation and absence entries, their own time entries, their own vacation balance, and their own overtime or working time balance.

They have no supervisory authority. For this reason, they cannot create or edit entries for other employees, and they cannot approve vacation or absence requests.

In the calendar, employees see colleagues with the same supervisor. However, they only have access to the Calendar view of absences, not to other people’s vacation balances, working time and overtime balances, or detail views of other people’s entries. They also do not see master data or any other details of colleagues.

An admin can restrict or extend visibility and entry permissions for all users or individually for specific users. The rights of a specific user appear in the detail view of the user account.

Supervisors

The supervisor user type is (as the name suggests) intended for supervisors in the company. Supervisors have assigned employees and can see their vacation and absence entries, time entries, vacation balances, master data, and overtime or working time balances.

Supervisors have the necessary permissions and can create, edit, and delete entries for the employees assigned to them, and approve or reject vacation and absence requests.

In the calendar, supervisors see the employees assigned to them and can access the detail view of entries as well as their master data.

Every user in Timebutler always has one or more supervisors assigned — including supervisors themselves. A supervisor’s requests are therefore approved by their own supervisor.

An admin can restrict or extend visibility and entry permissions for all users or individually for specific users. The detail view of the user account shows a specific user’s permissions.

Note: In Timebutler, the terms supervisor and manager are used interchangeably and refer to the same role.

Administrators

As an administrator, you have the same permissions as supervisors, but you can also make settings that affect all users in Timebutler and that no other user may edit. You always have viewing, editing, and approval permissions for all users, all entries, all vacation balances, working time balances, master data, and all other data in Timebutler.

Many settings can only be changed by admins, for example assigning employees to supervisors, vacation blackout periods, Holiday sets, changing permissions for other user accounts, absence types and their extra fields, Global settings, and much more.

You still have your own vacation balance as well as an overtime or working time balance. You are assigned a supervisor who approves your vacation requests. Employees can also be assigned to you, making you their supervisor.

Typically, employees in the HR department and management receive admin rights. In a company with 230 employees, for example, organizations usually create 3–5 administrator accounts, 10–20 supervisors, and 200 employee user accounts.

Because many settings and changes can only be made by admins, you should always have more than one administrator. You can create as many administrators as you need.

Change user type

You can change the user type of an existing user account. Proceed as follows:

Change user type

  1. Log in to Timebutler as an admin and click Employees at the top left, then click Overview under the smaller Employees heading.
  2. For the relevant user account, click the green button with the pencil icon (Edit).
  3. At the top, set User type to the user type you want.
  4. Click the blue Save button at the bottom to save the change.

Error message: Employees assigned

If you want to change a supervisor or admin to an employee user and that supervisor or admin still has employees assigned, you will receive an error message. First, assign all of that supervisor’s or admin’s employees to a different supervisor. After that, you can change the user type to an employee user.

Change your own admin user account

An admin cannot change their own admin user account to a supervisor or employee user account. This ensures that there is always at least one user with admin rights. Instead, another admin logs in and changes the user account as described above.

Note: If the user is logged in to their Timebutler user account while the admin makes the change, the change only takes effect after the user logs out and logs back in.

Permissions

Overview in the user account detail view

In the detail view of a user account, an admin or supervisor sees all the information about the user account at a glance, including:

  • Master data
  • The user’s visibility, input, and edit permissions
  • Assigned supervisors
  • Vacation balance overview
  • Weekly working days
  • Break policy (only when time tracking is enabled)
  • User account creation date and last login
  • Information about the email delivery status
  • Holiday policy

To open the detail view of a user account, log in to Timebutler as an admin or supervisor, click Employees at the top left, then click Overview under the smaller Employees heading. Now click the blue magnifying glass icon for the relevant user account.

Employee users cannot view the detail view of a user account, except for their own.

Visibility permissions

The user types have the following visibility permissions:

  Employee Supervisor Admin
Own data      
All your own data (absences, working times, vacation balances, etc.)
Data of employees on the team (same supervisor)      
Absence entries – Calendar view ✅ (1)
Absence entries – List view
Absence entries – Detail view
Vacation balances
Time entries and working time balances
Overtime balances
Master data of user accounts
Data of employees of other supervisors      
Absence entries – Calendar view ❌ / ✏️ (1, 2) ❌ / ✏️ (2)
Absence entries – List view ❌ / ✏️ (2)
Absence entries – Detail view ❌ / ✏️ (2)
Vacation balances ❌ / ✏️ (2, 3)
Time entries and working time balances ❌ / ✏️ (2, 4)
Overtime balances ❌ / ✏️ (2)
Master data of user accounts ❌ / ✏️ (2)

Legend

✅ Visibility permissions ❌ No visibility permissions ❌ / ✏️ No visibility permissions by default / you can enable visibility permissions

(1) An admin can extend or restrict visibility permissions for employees:

(2) An admin can extend visibility permissions for supervisors and employees:

(3) An admin can disable visibility permissions for the vacation balances of employees of other supervisors (the Visibility permissions for supervisors to vacation entitlement of the extended visibility permissions option in the Global settings).

(4) An admin can disable visibility permissions for the working times of employees of other supervisors (the Visibility permissions for supervisors to working time of the extended visibility permissions option in the Global settings).

Input permissions and editing permissions

The user types have the following input permissions:

  Employee Supervisor Admin
Enter and edit your own entries      
Vacation, absences, overtime, compensatory time off
Time entries ✅ (1) ✅ (1)
Time clock (if enabled) ✅ (2) ✅ (2) ✅ (2)
Time Recording Terminal (if enabled)
Data of employees on the team (same supervisor)      
Vacation, absences, overtime, compensatory time off ❌ / ✏️ (3) ✅ / ✏️ (4)
Time entries ✅ / ✏️ (4)
Time clock (if enabled)
Time Recording Terminal (if enabled)
Data of employees of other supervisors      
Vacation, absences, overtime, compensatory time off ❌ / ✏️ (3) ✅ / ✏️ (4)
Time entries ✅ / ✏️ (4)
Time clock (if enabled)
Time Recording Terminal (if enabled)
User accounts and settings      
Create or change user accounts ✅ / ✏️ (5)
Make settings (vacation entitlement, Holiday sets, time tracking, …)

Legend

✅ Input permissions ❌ No input permissions ✅ / ✏️ Input permissions by default / input permissions can be restricted ❌ / ✏️ No input permissions by default / input permissions can be enabled

(1) An admin can forbid or restrict input permissions for employees and supervisors:

(2) An admin can specify that certain users may not use the time clock and may only clock in/out at the Time Recording Terminal.

(3) An admin can extend input permissions for individual employees so that they can also enter absences, vacation requests, overtime, and compensatory time off for other employees.

(4) An admin can specify that supervisors may not enter entries for other users (the Supervisor may enter absences for other users option in the Global settings).

(5) An admin can specify that supervisors may not create user accounts or change master data (the User rights for supervisors and admins option in the Global settings).

Approval rights for requests

These user types have the following rights to approve requests:

  Employee Supervisor Admin
Own requests      
Vacation requests
Absence requests, overtime, and compensatory time off
Change requests for time entries
Requests from own employees      
Vacation requests ✅ / ✏️ (1)
Absence requests, overtime, and compensatory time off ✅ / ✏️ (1)
Change requests for time entries ✅ / ✏️ (1)
Requests from employees of other supervisors      
Vacation requests
Absence requests, overtime, and compensatory time off
Change requests for time entries
Requests as a delegate during the supervisor’s absence      
Vacation requests ✅ / ✏️ (2)
Absence requests, overtime, and compensatory time off ✅ / ✏️ (2)
Change requests for time entries

Legend

✅ Approval rights ❌ No approval rights ✅ / ✏️ Approval rights by default / approval rights can be restricted

(1) An admin can restrict supervisors’ approval of requests:

  • Forbid supervisors from approving requests (the Supervisors may approve requests option in the Global settings).
  • Set a time restriction for deleting vacation requests (the Supervisor may delete / cancel past vacation requests and Supervisor may delete / cancel future vacation requests options in the Global settings).

(2) An admin can disable a delegate’s approval of requests (the Delegates may approve requests option in the Global settings).

Visibility permissions for medical certificate information

For each sick leave entry, you can use the Medical certificate status in Timebutler to record whether the doctor’s note has reached the employer. An admin defines the visibility permissions for the certificate status.

Restrict visibility permissions for sick leave entries

You can partially or fully restrict employee users’ visibility of other people’s sick leave entries. In this case, employee users do not have visibility of the certificate information. Learn how to restrict visibility permissions for sick leave entries for employee users here.

Set visibility permissions for the certificate status

Log in to Timebutler as an admin and click Settings > More… at the bottom left, then Global settings on the right. Review or change the Medical certificate display option.

Restrict visibility permissions for sick leave entries

An admin can restrict the visibility permissions for sick leave entries, especially for employee users.

Read how to restrict visibility permissions for sick leave entries here.

Extend visibility permissions

Depending on their user type, employees have different visibility permissions. An admin can extend these visibility permissions as follows:

Extend visibility permissions for departments, employees, or user groups

Admins have visibility permissions for all users and all absences and entries. Supervisors and employees, on the other hand, only have visibility permissions for employees with the same supervisor. You can extend visibility permissions individually for each supervisor and employee.

To do this, log in to Timebutler as an admin and click Settings > Viewing rights at the bottom left. Here you can grant each user extended visibility permissions for departments, individual employees, or user groups.

Visibility permissions for employees: by department or supervisor

An admin can set whether employee users may see colleagues with the same supervisor or the same department name. To do this, log in to Timebutler as an admin and click Settings > More… at the bottom left, then Global settings on the right. Now check or change the Employees see colleagues with the same supervisor or department option (at the bottom of the page).

Set visibility permissions individually in the user account

You can also adjust visibility permissions individually for specific employees directly in their user account. The following options are available:

  • Default setting: may see colleagues according to the selection in Global settings (same supervisor or same department).
  • May see colleagues who have the same supervisor, regardless of the department name.
  • May see colleagues who have the same department name, regardless of the supervisor.
  • May not see any other colleagues.

To change this setting in the user account, log in to Timebutler as an admin and click Employees > Employees > Overview at the top left, then click the green pencil icon (Edit) for the relevant employee. Change the Visibility permissions option.

Grant visibility permissions for all employees to all employees

In small companies, there is often a desire to grant all employees visibility of all colleagues. You can do this in just a few clicks. To do this, log in to Timebutler as an admin and click Settings > More… at the bottom left, then Global settings on the right. Now check or change the Visibility to all users option (at the bottom of the page).

You can view a user account’s visibility permissions in the detail view of the user account.

Screenshot: Set up extended visibility permissions

Extend entry permissions

Depending on their user type, employees have different entry and editing permissions.

Extend entry permissions for employee users

Employee users can only enter vacation and absences for themselves. An admin can grant specific employees the right to enter vacation and absences for other employees as well.

To change this setting on the user account, log in to Timebutler as an admin and click Employees > Employees > Overview at the top left, then click the green pencil icon for the relevant employee. Change the setting under Entry permission.

The following options are available:

  • Default for employee users: cannot create entries for any other users.
  • Can create entries for all users they have visibility permissions for (including visibility permissions from the “Extended visibility permissions”).
  • Entry permission for all users: can create entries for all users in the company.
  • No entry permission: cannot create entries for any other users.

Define entry permissions by absence type

Admins can always enter any absence type. For each absence type, you can specify whether employee users or supervisors may also enter it.

Log in to Timebutler as an admin, click Settings > More… at the bottom left, then click Absence types on the right. In the overview, you can see the settings for each absence type, including whether it requires approval. To edit an absence type, click the green Edit button in the row of the relevant absence type. Make the changes you want and save them.

For each absence type, you can also set whether the entries require approval.

Masking absences

An admin can configure the calendar so that employees see other employees’ absence entries only as a neutral Absent label, without showing the absence type.

You can enable masking individually for each absence type. Read how to enable masking here.

Supervisors

Assign supervisors

You can assign a supervisor for each user in Timebutler, or multiple supervisors. Supervisors thereby receive visibility permissions, editing permissions, and the right to approve employees’ requests. When an employee submits a vacation request or another absence entry requiring approval, the approval workflow starts automatically. The responsible supervisors are notified by email about the new request and can approve or reject it.

Edit supervisor assignment

To view or edit the assignment of employees to supervisors, log in to Timebutler as an admin and click Settings > Managers at the bottom left.

Managing director / Own supervisor

You must always assign at least one supervisor to every employee. Some employees have no supervisor, for example the managing director. In this case, simply set the managing director as their own supervisor. When the managing director submits a vacation request for themselves, Timebutler recognizes that they are their own supervisor. The approval workflow does not start; instead, the vacation request is immediately set to Approved.

Screenshot: Assign supervisors

Screenshot: Assign multiple supervisors

Multiple supervisors

You can assign one or multiple supervisors to each user.

Read how to assign multiple supervisors to employees here.

User groups and teams

Purpose and benefits of user groups

You can group any users into user groups. User groups serve the following purposes:

Filter option

Timebutler offers a filter option in many views, for example the Calendar view or the List view of absences and time entries. As soon as you have created at least one group, the filter also shows the User groups option. You can use it to filter the view to a user group.

Because a user group can include any employees from various departments or locations, you can filter views to a very specific group of employees this way. For example, you can create a user group called “Summer party planning team” with employees from various departments and locations and then filter the Calendar view to those employees.

Extending visibility permissions

You can extend employees’ and managers’ visibility permissions to additional departments, individual employees, or user groups. As soon as you have created at least one user group, you can also enable user groups in the settings for Extended visibility permissions.

Note: When you create a user group, the employees in the user group do not automatically get visibility permissions for each other.

Example: Employee Schmitt has visibility permissions for Meier and Müller. You now create a user group with employees Schmitt, Huber, and Hoffmann. This does not give Schmitt visibility permissions for Huber and Hoffmann; Schmitt still only has visibility permissions for Meier and Müller.

Use in many settings

In Timebutler, you can restrict many settings to employees, departments, locations, and user groups, for example Limits, Transferring remaining vacation, the Download Center, and many more.

Record working time only at the Time Recording Terminal

You can require that certain employees start the time clock only at the Time Recording Terminal (and, if desired, only stop it there as well). You need a user group for that.

Create and edit user groups

Every user can create and edit user groups. To do this, log in to your user account in Timebutler and click Settings > User groups at the bottom left.

Personal and shared user groups

  • Personal user groups are user groups that only the person who created them can see and select.
  • Shared user groups are user groups that all other users can also see and select.

Who can create and edit user groups

Only admins are allowed to create and edit global user groups. Managers and employee users can only create personal user groups.

Set Up

Corporate design

Edit corporate design and company logo

With the Corporate Design Manager, you can adapt Timebutler to your company’s branding.

You can:

  • Adjust the interface colors to match your corporate design
  • Upload and display your company logo

Edit the Corporate Design

  1. Log in to Timebutler as an Admin.
  2. Go to Settings > More… > Corporate Design.
  3. Click Edit Corporate Design.
  4. Make the desired changes and save them.

Permanently enable Corporate Design

You can define whether employees see Timebutler in your Corporate Design immediately after logging in or in the default design.

Set the Default Design After Login

  1. Log in to Timebutler as an Admin.
  2. Go to Settings > More… > Corporate Design.
  3. In the Default design after login section, select the desired option.
  4. Save your changes.

For more information, see:
Edit Corporate Design and Company Logo

Languages

Selecting the display language

Each user can choose which language to use in Timebutler. The following options are available:

Language selection when signed in

When signed in to Timebutler, users can click the globe icon in the top right corner on any page and select their preferred language. Language links are also available in the footer at the bottom of every page (**Deutsch English (UK) English (US)**).

Language selection when not signed in

When not signed in, users can click the globe icon in the top right corner on any page and select their preferred language.

Timebutler is available in the following languages:

  • German
  • English (UK): British English with date format dd/mm/yyyy
  • English (US): US English with date format mm/dd/yyyy

Note: A language can also be set per user account. However, this only determines the language used for emails sent to that user and has no effect on the display language the user selects when using Timebutler.

Screenshot: Selecting the display language in the user account

Screenshot: Selecting the display language in the footer

Language setting in the user account for emails

A language can be set for each user account. This determines the language in which Timebutler sends emails to that user.

Check the language for sending emails

You can find the current language setting for email delivery in the detail view of each user account.

Change the language for sending emails

To change the language, sign in to Timebutler with an admin user, click Employees at the top left, then click Overview below the small Employees heading. Click the green pencil icon next to the relevant user to edit their account. Change the selection under Language and save by clicking the blue Save button at the bottom.

Note: This language setting only affects the language used for emails sent to the user. It does not affect the language in which the user views Timebutler. Users can change their display language at any time.

Incorrect display of text and language

Some users report a display issue in Timebutler. Individual terms appear to be incorrectly translated, or inappropriate phrasing and terms are used. This problem can occur when accessing Timebutler on a smartphone as well as on a laptop/PC or tablet. Often the issue only appears on one of the devices, not on the others.

Cause of the problem

The cause has always been the following:

The user has (accidentally) switched the language selection in Timebutler to a different language, and automatic translation of web pages is enabled in the browser on that device. As a result, Timebutler delivers the correct text in the selected language, but the browser attempts to translate the page. This often fails and leads to the described issue of inappropriate phrasing and terms appearing in Timebutler.

Solution steps

The incorrect display can be resolved as follows:

1) Change the language to the correct setting

Open Timebutler and change the language to your desired language. Read here how to select the display language.

2) Disable automatic translation

In the browser settings, you should disable the automatic translation of web pages — or at least disable it for Timebutler. This prevents the problem from recurring if you accidentally switch the language again.

Example of an incorrect translation

The English term “Calendar view” was incorrectly translated to “Kalender Sicht”, the button for the month “May” was translated as “Duerfen”, and “Today” was translated to “Am Tag”.

Global settings

Edit Global Settings

The Global Settings offer a wide range of options to tailor Timebutler to your company’s needs.

When you first sign in to Timebutler, the options in the Global Settings are set to defaults that work correctly for most companies. It is still a good idea to review the options at the start and adjust any settings that may need to be different for your setup. As a rule, the Global Settings only need to be reviewed and configured once at the beginning — no further changes are typically necessary after that.

To edit the Global Settings, sign in to Timebutler with an admin user, click Settings > More… at the bottom left, then click Global Settings on the right.

Holidays

Assign holidays to employees

Holiday calendars define which holidays apply to employees.

Assign Holiday Calendar When Creating a User

When creating a single user account:

  • Select the desired Holiday calendar in the Holiday calendar option.

Assign Holiday Calendar via Bulk Import

When importing multiple user accounts via Excel:

  • You can select from predefined Holiday calendars in the file.

If your custom Holiday calendar is not available in the Excel file:

Step 1: Set Default Holiday Calendar

  1. Go to Settings > Standard settings for new users.
  2. Define the desired Holiday calendar as the default.

Step 2: Use Default in Excel Import

  • In the Excel file, select - Default holiday calendar - in the Holiday calendar column.

Change Holiday Calendar for an Existing Employee

  1. Log in to Timebutler as an Admin.
  2. Go to Settings > Working days.
  3. Click Edit next to the desired employee.
  4. Select the required Holiday calendar.
  5. Save your changes.

Assign Holiday Calendar to Multiple Employees

  1. Log in to Timebutler as an Admin.
  2. Go to Settings > More… > Holiday sets.
  3. Select the desired Holiday set.
  4. Click Assign to users.
  5. Click Assign to multiple users.
  6. Follow the instructions to assign the Holiday set.

Change Holidays from a Specific Date

If an employee’s holidays change from a specific date (for example, due to a location change):

  • Configure multiple time periods in the working time model to reflect the change.

Default Setting for New Users

You can define a default Holiday calendar for new user accounts:

  • Set this in Settings > Standard settings for new users

This ensures that the correct Holiday calendar is preselected when creating new users.

Add public holidays

You can create custom public holidays and use them in your holiday calendars.

Create a New Public Holiday

  1. Log in to Timebutler as an Admin.
  2. Go to Settings > More… > Holidays.
  3. Click Create new holiday.

Timebutler already provides a list of public holidays, including automatically calculated variable holidays such as:

  • Easter Monday
  • Good Friday

These are calculated automatically for each year.

If a required holiday is not available (for example, country-specific holidays), you can create it manually.

Configure the Holiday

When creating a new public holiday, you can define:

  • The holiday applies only in a specific year
  • The holiday applies every year on the same date
  • The holiday applies every year on the same date starting from a specific year

Effect on Employees

New public holidays do not automatically apply to employees.

Public holidays are not assigned directly to employees. Instead, employees are assigned Holiday calendars, which are collections of multiple public holidays.

Assign Holidays via Holiday Calendars

To make a public holiday effective for employees:

  • Add the new holiday to a holiday calendar together with all other relevant holidays
  • Assign the holiday calendar to the desired employees

You can:

  • Create a new holiday calendar, or
  • Add the holiday to an existing holiday calendar

For more details, see Add company-specific holidays

Add Christmas Eve, New Year’s Eve, Women’s Carnival Day, and more

You can define the applicable public holidays for each employee.

In addition to statutory public holidays, you can also create company-specific holidays, for example:

  • Christmas Eve
  • New Year’s Eve
  • Carnival-related days (such as Rose Monday or Women’s Carnival Day)
  • Other internal company holidays

These days are not statutory public holidays and are therefore not included in the predefined holiday calendars provided by Timebutler.

Create a Custom Holiday Calendar

  1. Log in to Timebutler as an Admin.
  2. Go to Settings > More… > Holiday Set.
  3. Click Create new holiday set.
  4. Enter a name (for example, “Company Holidays”).

Configure the Holidays

Configure the holiday calendar in two steps.

Step 1: Select Base Public Holidays

Under Associated holidays, select an existing holiday calendar that matches your company’s location (for example, a specific country or federal state).

All statutory public holidays for that region will be preselected automatically.

Step 2: Add Additional Company Holidays

Select any additional days that should apply in your company, for example:

  • Christmas Eve (half day or full day)
  • New Year’s Eve (half day or full day)
  • Carnival-related days (where relevant)

Click the desired entries to activate them.

  1. Click Save.

Assign the Holiday Calendar

After saving, you can immediately assign the new holiday calendar to selected users.

You can also assign it later via:
Assign holiday calendars to employees

Recalculation of Leave

After updating a holiday calendar, Timebutler automatically recalculates:

  • All leave requests
  • All vacation balances

The new holidays are taken into account immediately.

Set as Default for New Users

If the holiday calendar should apply to future user accounts as well, configure it in the:

Default settings for new users

Public holiday rule sets for additional countries

You can define custom holidays in Timebutler and group them into Holiday sets.

Predefined Holiday sets, with regions, are already available for:

  • Germany (federal states)
  • Austria
  • Switzerland
  • United Kingdom
  • United States
  • Andorra
  • Belgium
  • Bosnia and Herzegovina
  • Czech Republic
  • Vatican City
  • Montenegro
  • Denmark
  • Spain
  • France
  • Croatia
  • Italy
  • Liechtenstein
  • Malta
  • Monaco
  • The Netherlands
  • Norway
  • Poland
  • Portugal
  • San Marino
  • North Macedonia
  • Albania
  • Slovenia
  • Slovakia
  • Serbia
  • Sweden

For additional countries, you can create your own Holiday calendars. There is also the option of having no holiday set configured.

Create a Holiday Calendar for a New Country

The following example shows how to create a Holiday calendar for Ireland:

Step 1: Identify Relevant Holidays

First, determine which holidays apply in the selected country.

You can:

  • Research public holidays online
  • Consult local colleagues at your company location

Step 2: Create Missing Holidays

  1. Log in to Timebutler as an Admin.
  2. Go to Settings > More… > Holidays.

Timebutler already provides many holidays, including automatically calculated variable holidays such as:

  • Easter Monday
  • Good Friday

If a required holiday is missing (for example, a national holiday), create it manually:

  1. Click New holiday.
  2. Enter the holiday details (for example, name and date).
  3. Save the holiday.

Example:

  • St. Patrick’s Day (March 17, every year)

Repeat this step for all missing holidays.

Step 3: Create a Holiday Calendar

  1. Go to Settings > More… > Holiday Set.
  2. Click Create new holiday calendar.
  3. Enter a name (for example, Holidays Ireland).

Step 4: Assign Holidays to the Holiday Calendar

  1. Select all holidays that apply to the country.
  2. Activate them by selecting them in the list.
  3. Click Save.

Step 5: Assign the Holiday Calendar to Employees

After saving, you can assign the Holiday calendar to employees.

  • Assign it immediately, or
  • Assign it later to user accounts

Repeat for Additional Countries

To create Holiday calendars for other countries, repeat the steps above for each country.

More settings

Rules for calculating vacation entitlement

If an employee joins or leaves the company part-way through the year, their vacation entitlement for that calendar year is reduced accordingly. The same applies when an employee’s working days are adjusted — for example, if they reduce their working week from Monday to Friday to Monday, Wednesday, and Thursday only.

In these cases, Timebutler will automatically recalculate the vacation entitlement. You can customize the rules used for this calculation.

To adjust the settings, sign in to Timebutler as an admin, click Settings > More… at the bottom left, then click Calculation rules for the vacation entitlement on the right.

Screenshot: Settings for calculating vacation entitlement

Multi-level approval workflow

You can assign one or multiple managers to each user and thereby set up a multi-level approval workflow.

Read here how to assign multiple managers to employees.

Default settings for new users

You can define which settings are preselected when you accounts. These default settings are especially important when bulk-importing user accounts, as they allow you to conveniently import users with different working time models.

To edit the default settings, sign in to Timebutler as an admin, click Settings > More… at the bottom left, then click Default Settings for New Users.

Here you can configure default options for the holiday set, annual leave, and weekly working days.

If the time tracking feature is enabled, you can also set defaults for capping overtime, rounding working times, and setup times.

Note: When bulk-importing user accounts, the default settings determine which holiday set is assigned to the new accounts and enable you to import users with different working time models.

Email copies to HR or other recipients

Timebutler sends email notifications to managers and employees on various occasions during absence management. For example, a manager is notified when an employee submits a vacation request or enters an absence entry that requires approval.

You can configure Timebutler to also notify HR or other email recipients. To do this, sign in to Timebutler as an admin, click Settings > More… at the bottom left, then click Copy of absence request emails on the right. Enter the desired recipient email addresses here.

You can also restrict notifications to employees in specific departments or locations, and specify that copies are only sent for certain absence types — for example, only for vacation and sick reports.

The recipient will first receive an email with a confirmation link to opt in to receiving the notification emails. Sending is only activated after they confirm.

Note: Email notifications are only sent for absence entries that require approval. It is therefore not possible to notify recipients about absences that do not require approval. There is one exception: you can enable notification for sickness entries.

Copy of absence request emails

Automatic deletion of data

The General Data Protection Regulation (GDPR) stipulates, among other things, that personal data must not be stored and processed longer than necessary. Timebutler helps you comply with this requirement: you can configure employee data to be deleted automatically after a specified period. In addition, you can set an individual deletion date for documents uploaded to the Digital Personnel File.

Settings for automatic deletion

You can define how long personal data is retained and when it is automatically deleted. Sign in to Timebutler as an admin, click Settings > More… at the bottom left, then click Automatic Data Deletion on the right. Here you can set the retention period for employee data and, separately, the retention period for Personnel File documents.

Log of automatic deletion operations

On the same page, under Protocol on the automatic deletion jobs, you can see which deletion operations have been carried out and who changed the settings and when.

Which employee data will be deleted?

Only employees’ transactional data older than the configured period will be deleted:

  • Absence entries
  • Working time entries
  • Overtime entries and overtime reduction requests
  • Vacation entitlement values
  • Vacation blackout periods
  • Working time change requests

User accounts will not be deleted.

Which employee data will not be deleted?

Only the data listed above will be deleted. All other data will be retained, for example:

  • User accounts
  • Settings
  • Holidays and holiday sets
  • User groups
  • Personnel File
  • etc.

Which Personnel File documents will be deleted?

All documents where the upload date is older than the configured retention period will be deleted.

Documents are deleted based on their upload date. Personnel File documents are deleted based on the date they were uploaded to Timebutler — not the document’s creation date or any other date.

Which Personnel File data will not be deleted?

Only documents are deleted, as described above. All other data in the Personnel File will not be deleted.

When will the data be deleted?

  • When you change the retention or deletion settings, the affected data will be deleted within the following 48 hours.
  • In addition, an automatic deletion routine runs regularly to identify and delete data that has exceeded the configured retention period.

How can data that is not automatically deleted be removed?

If you no longer need a user account and its data, delete the user account. This will permanently and irreversibly delete all data for that user, including all Personnel File data and documents.

Can deleted data be restored?

Data protection regulations require that data be deleted permanently and irreversibly. Deletion is therefore a final and irreversible action — deleted data cannot be restored.

Warning: Deleted data cannot be restored. Make sure you do not configure a retention period that is too short.

Automatic Data Deletion

Message center

Create a message

Using the Message Center, a manager can send a message to their team, or an admin from HR can send a message to specific employees or to all employees in the company.

To open the Message Center, sign in to Timebutler and click the envelope icon in the top right corner.

Recipients will see a notification for unread messages on the envelope icon in the top right corner, visible on every page in Timebutler. Clicking it allows employees to view and read their open messages.

To make sure employees read the message, you can opt to send a notification email to all recipients when creating the message.

Create a new message

Inform employees about new messages

When an admin or a manager creates a message in the Message Center, recipients will see a notification for unread messages on the envelope icon in the top right corner the next time they sign in to Timebutler.

To make sure recipients read the message, you can enable the option Send notification email to all recipients when creating the message. Timebutler will then send a notification email to all recipients with a link that leads directly to the Message Center and the unread message.

Birthdays and anniversaries

Edit birthdays and company anniversaries

For each employee, you can store the Birthday and the Start date in Timebutler.
Based on the start date, Timebutler calculates the employee’s company anniversaries.

Enter Birthday and Start Date for New User Accounts

When creating a new user account, you can enter the information in the fields:

  • Birthday
  • Start date

The Excel file for bulk importing user accounts also contains the columns:

  • Birthday
  • Start date

Change Birthday and Start Date for an Existing User Account

  1. Log in to Timebutler as an Admin.
  2. Go to Employees > Overview.
  3. Click the green pencil icon next to the desired user account.
  4. In the edit form, update the fields Birthday and/or Start date.
  5. Click Save.

Display of Birthdays and Company Anniversaries

Read here where birthdays and company anniversaries are displayed: Display of Birthdays and Company Anniversaries

Displaying Birthdays and Company Anniversaries

For each employee, you can enter the date of birth and the start date. Timebutler automatically calculates upcoming birthdays and company anniversaries and informs you about upcoming dates.

Read here how to enter birthdays and start dates.

Dashboard

On the dashboard (the start page after logging in), Admins and Managers see upcoming birthdays and company anniversaries for employees they have viewing rights for.

Employee users do not see birthdays or company anniversaries on the dashboard.

In the birthdays and company anniversaries widget, a gear icon is displayed in the top-right corner. Click it to define how many days into the future and past should be shown on the dashboard.

Calendar

In the calendar, birthdays and company anniversaries are displayed for Admins and Managers using:

  • A gift icon for birthdays
  • A trophy icon for company anniversaries

When you move the mouse over the calendar day, additional information is shown in a small pop-up window.

An Admin can define whether Employee users should also see birthdays and company anniversaries in the calendar.

In that case, birthdays are displayed without the year (for example, Birthday on 5 March), because many employees do not want their year of birth and therefore their age to be visible.

To change this setting, use the option Employees see colleagues’ birthdays and company anniversaries in
Global settings.

Screenshot

Birthdays and company anniversaries on the dashboard

List View and Download

You can also download birthdays and company anniversaries as a list.

All Anniversaries and Birthdays Are Displayed

Timebutler displays birthdays and company anniversaries for all years as described above.

Subscribe in External Calendars

You can subscribe to the Timebutler calendar in an external calendar so that absence entries are transferred automatically and displayed there.

When subscribing to the Timebutler calendar in an external calendar, you can choose whether birthdays and company anniversaries should also be transferred.

They are displayed in the external calendar as follows:

  • Birthdays
    Yearly recurring entry on the day and month of the birthday. The recurring entry always starts 10 years in the past and not in the employee’s year of birth, so that information about the employee’s age is not transferred to external systems.

  • Company anniversaries
    Yearly recurring entry on the day and month of the employee’s first day in the company, starting from the year in which the employee joined the company.

Only for Team Calendars

The option to transfer birthdays and company anniversaries is only available if:

  • A Manager synchronizes the entries of their team, or
  • An Admin synchronizes the entries of their team or of all employees

If you subscribe only to your own calendar, your own birthday and company anniversary are not transferred.

Download birthdays and work anniversaries

In Timebutler, you can store employees’ birthdays and start dates. Timebutler uses the start dates to calculate company anniversaries.

Birthdays and company anniversaries are displayed in the dashboard and calendar.

Download the Data

  1. Log in to Timebutler as an Admin or Manager.
  2. Go to Employees > Overview.
  3. Click Download.
  4. Download the data as an Excel file.

In the Excel file, you will find the following columns:

  • Birthday
  • Start date

Contract and Prices

Pricing and ordering

Apply a coupon code to your subscription

You can apply a coupon code in Timebutler to discount your subscription during the subscription process.

When you can apply a coupon

A coupon code can only be entered when you do not currently have an active paid subscription. This means:

  • When you subscribe for the first time
  • When you renew after your previous subscription has ended

Note: If you already have an active paid subscription, the coupon code field is not available. You can apply a coupon code at your next renewal.

Apply a coupon code

  1. In the left-hand menu, go to Account balance > Account balance.
  2. Click the blue button Order a subscription now.
  3. Select the duration of the plan you want: 1 month, 3 months, 6 months, or 12 months. The plan shown is based on your current number of employees.
  4. If your billing and payment details are not yet set, you are redirected to a page to enter them. Complete this step to continue.
  5. On the subscription summary screen, you will see your selected subscription, billing address, payment method, and a field to enter a coupon code.
  6. Enter your code in the coupon code field.
  7. Click Subscribe.

Your subscription is activated with the discount from your coupon code applied.

Pricing model

Timebutler uses a simple and affordable pricing model.

Go to pricing.

Go to the pricing FAQs.

Flat rate

Timebutler uses an easy-to-understand flat rate: You get Timebutler on a flat-rate plan and all features are unlocked without restrictions. You pay no additional costs to unlock specific features, no setup fees, and no other charges. The flat rate covers all services and gives you full cost predictability.

Go to the pricing model.

Go to the frequently asked questions about the pricing model.

Usage period

When you sign up for Timebutler, we activate a 6 weeks free trial period. To continue using Timebutler after that, simply order a usage extension online.

You can view the end of your current usage period at any time by signing in to Timebutler as an admin and clicking “Account balance > Account balance” at the bottom left. Timebutler notifies admins well before the end of the usage period so they can order an extension.

You can order an extension at any time, regardless of how much time remains in your current usage period. The new usage period always starts on the day after the current usage period ends, so you always keep the time remaining on your current usage period.

Notes:

  • If you have enabled SEPA direct debit, the system extends the usage period automatically. You then see the current billing period.
  • If you chose a different payment method, you purchased a specific number of months, and you see the end of the current usage period.

Ordering

You can conveniently order an extension of your usage period online at any time.

If you activate SEPA direct debit, Timebutler automatically extends your usage period and automatically debits the amounts due. You then work with Timebutler without interruption.

If you choose another payment method, you purchase a certain number of months by which your usage period will be extended. In this case, you must always order an extension before the current usage period expires.

To order an extension of your usage period, proceed as follows:

1)
Sign in to Timebutler as an admin, click at the bottom left on “Account balance > Account balance” and then on the page click the “Order an extension now” button (only admins have permission to place orders).

2)
The next step shows your current billing address (if already on file) and lets you confirm it or change/enter it.

3)
The next step offers you various payment methods to choose from. Select the payment method that suits you.

4)
Follow the instructions on the website to complete the order.

Payment methods

When ordering a subscription extension for Timebutler, you can choose from various payment methods:

Automatic payment via SEPA direct debit

You only need to activate SEPA direct debit once. After that, the amounts are collected automatically and the invoice is made available to you (to download or sent automatically by email).

Advantages of SEPA direct debit: You can use Timebutler without interruption and you don’t need to place a new order after each usage period ends. You can choose the number of months for the billing period yourself and change it at any time later.

Read here when the direct debits take place.

Payment by invoice, PayPal, credit card and others

When you choose the payment methods invoice, PayPal, credit card and others, you purchase a specific number of months for the subscription extension. The usage period is then extended by the number of months ordered. After these months expire, you need to order a subscription extension again.

Direct debit schedule

If you choose SEPA direct debit as the payment method when ordering the subscription extension, the usage period renews automatically, we automatically debit the amounts from your bank account, and we automatically provide the invoice (to download or sent automatically by email).

Direct debit date

When you select SEPA direct debit, you can also choose how many debits take place per year. You can choose between 12 debits (monthly), 4 debits (every 3 months), 2 debits (every 6 months), or 1 debit (12 months). We always perform the direct debit in the first month of your payment interval on the 26th of the month. On weekends/holidays, we move the date to the next banking day.

If you choose monthly payment, we debit the amount by direct debit on the 26th of each month.

If you set 6 months, we debit on the 26th of the first month in the 6-month period. Example: If the current debit period runs from March to August, we debit the amount for this 6-month period on March 26.

First direct debit differs

If you activate direct debit and your usage period does not happen to end on the last day of the month (that will usually be the case), we will not debit the configured number of months with the first direct debit, but will first only debit the partial amount for the remainder of the current month. Only from the next month will we debit the configured number of months. This way, starting with the second direct debit, we can always settle whole calendar months.

Example:
Your usage period ends on 19/6. On 6/6 you activate SEPA direct debit with the selection of 2 debits per year, every 6 months. The first direct debit therefore takes place on 26/6. We will then not debit 6 months, but only the remaining period for June, i.e., the 10 days from 20/6 to 30/6. Only with the next direct debit in July, on 26/7, will we then debit 6 months.

VAT for orders from outside Germany

If your billing address is outside Germany, in most cases we can show VAT (=value-added tax) as 0% on your invoice.

For the invoice to show VAT at 0%, you need to provide your VAT ID when placing the order.

For orders from outside Germany, our partner MyCommerce handles the order for accounting reasons. MyCommerce is an international payment service provider that processes thousands of payments worldwide every day. We then redirect you to the MyCommerce order form during the ordering process. On the order form, enter your VAT ID by clicking the following options:

1)
First, select your country under “Country” (see image below, arrow 1)

2)
Click the link “Show more input fields” (see image below, arrow 2)

3)
Click the link “Enter VAT ID “ (see image below, arrow 3)

Contract Documents

You do not sign a written contract to use Timebutler. Instead, you can access the overview of the contracts as follows:

Contract - Overview

Sign in to your Timebutler user account, then on any page click the “Contract” link at the very bottom in the footer.

Alternatively, you can also access the different contracts via the following links:

Terms of Use, General Terms and Conditions, and Privacy Policy

Our Terms of Use, General Terms and Conditions, and Privacy Policy apply, and the company agrees to them when signing up for Timebutler.

SEPA Direct Debit Mandate

If you already use Timebutler and have SEPA Direct Debit enabled and now want to retrieve the information about the SEPA Direct Debit mandate: sign in to Timebutler with an admin user, click “Account balance” at the bottom left, then click the small “Account balance” below it. On the page, in the “Your bank details” box, click the “Show SEPA mandate” button (only available if SEPA Direct Debit is enabled).

Data Processing Agreement

Read here how to access the Data Processing Agreement or the technical and organizational measures.

Invoice

Have invoices sent automatically

You can set it up so that new invoices are automatically sent by email to the email address of your choice.

You can enter this email address during the ordering process.

To view the existing email address, add it later, or change it, proceed as follows:

  1. Sign in to Timebutler as an admin — only admins are allowed to make this change. If you do not have admin rights, ask an admin to do it.

  2. Click Account balance > Account balance at the bottom left.

  3. On the page, in the Your billing address box at the top right, you will also see the email address to which new invoices are sent. To change the email address, click the Edit button.

  4. Under Invoice delivery preferences, you can choose whether to receive the invoice directly by email, receive a download link by email, or not receive any email when an invoice is created.

Download invoice

All invoices we issue are available for download in your Timebutler user account at any time. This also applies to invoices from previous years.

To download an invoice, proceed as follows:

  1. Sign in to Timebutler as an admin — only admins are allowed to view and download invoices online. If you do not have an admin account in Timebutler, ask an admin to do so.

  2. Click Account balance > Invoices at the bottom left.

  3. You will see a list of invoices from the current year. To access invoices from previous years, click one of the blue buttons at the top left of the page to switch to another year.

If no invoices are shown here or you are missing an invoice, read here how to find a missing invoice.

Invoice missing

All invoices we issue are available for download in your Timebutler user account at any time. Read here how to download invoices.

If an invoice is missing on the invoice download page, this can have the following reasons.

Previous year
The invoice download page initially shows invoices for the current year. If you are looking for an invoice from an earlier year, click the blue button with the year to switch to that year.

Available only on the day of the direct debit
If you have activated SEPA direct debit as your payment method, we provide the invoice at the earliest on the day the direct debit is collected. The invoice is not available before that.

No order placed yet
You may not have placed an order yet, so no invoice has been issued.

Request invoice again

If you are missing an invoice, you can easily download the invoice online. Read here how to find a missing invoice and how to download the invoice.

An admin can also specify an email address to which new invoices will automatically be sent by email in the future. Read here how to set that new invoices are sent by email.

Request invoice from MyCommerce

If you chose to pay by credit card when ordering or placed the order from outside Germany, then MyCommerce / Shareit is your contracting partner that issues your invoice. In this case, we can’t issue an invoice, so you won’t find an invoice for the order to download in the Timebutler user account.

Instead, MyCommerce automatically sent the invoice by email immediately after receipt of payment to the email address provided during the order. Please check your inbox—and also the email spam folder—for an email from MyCommerce or Shareit dated the day of the order. This email includes the invoice as a PDF attachment.

If you can’t find the invoice or email and want to request the invoice from MyCommerce again, please proceed as follows:

  1. Open the following page:
    https://www.mycommerce.com/shopper-support/

  2. If you have a user account with MyCommerce, click the “CUSTOMER SELF-SERVICE LOGIN” button on the page. Sign in to your user account with your username and password.

If you don’t have a user account with MyCommerce, click the “FIND MY ORDER” button on the page. Sign in using the email address you provided during the order and the last 4 digits of the credit card you used for the order.

  1. After you successfully sign in to your MyCommerce user account, you’ll find an area to view past orders (usually top right under “My Account”). You can open the order, and there is also a link there that lets you download the invoice for the order.

If you don’t have login credentials for the MyCommerce user account or can’t sign in, you can alternatively send an email with your request to MyCommerce customer support. MyCommerce customer service will then be happy to resend the invoice to you by email. Send an email to MyCommerce customer service at: “MyCommerceClientSupportEMEA@digitalriver.com”

Change of billing address and company renaming

This article describes how to change the billing address for future invoices, including changing the email address used for invoice delivery. If you want to know how to change the address on an existing invoice, read the next article to see how to have an invoice corrected.

Change billing address or company name for future invoices

If your company has a new company name or the billing address has changed, proceed as follows:

  1. Sign in to Timebutler as an admin. Only admins are allowed to make this change. If you do not have an admin account in Timebutler, ask an admin to do it.

  2. Click Account balance > Account balance at the bottom left.

  3. On the page, you will see your current billing address in the Your billing address box at the top right. Click the Edit details button. You will be redirected to our payment service provider, Stripe. Under Billing information, click Update information. In this section, you can update your email address and/or billing address.

  4. If you have activated SEPA direct debit and your bank details have also changed, update your bank details as well.

  5. From now on, we will only use the new billing address for future invoices.

Request an invoice correction

Change billing address for an existing invoice

This article explains how to correct the billing address on an existing invoice. The previous chapter explains how to change the billing address for future invoices.

If you receive an invoice with an incorrect billing address, or with the VAT rate shown incorrectly due to an international sale, please send us a short message via our contact form. Please include the corrected, complete billing address and the invoice number you would like us to update.

Changing bank details

If your company has new bank details and you want to change the bank details for the SEPA direct debit, or select a completely new payment method, proceed as follows:

  1. Sign in to Timebutler as an admin. Only admins are allowed to make this change. If you do not have an admin account in Timebutler, ask an admin to do it.

  2. Click Account balance > Account balance at the bottom left.

  3. On the page, in the Your billing address box, click the Edit details button.

  4. You will be redirected to our payment service provider, Stripe, where you can change the payment method details and save the changes. To change the SEPA bank details or select a new payment method, first save the new bank details / payment method, set it as Default, and then remove the old bank details / payment method.

  5. If we need a written SEPA direct debit mandate from you, Timebutler will notify you automatically and in good time.

  6. If your address or company name has also changed, update your billing address details as well.

Please note
Make sure that the correct bank details are entered in good time, at the latest one week before the next usage period is renewed. Changes to the bank details made too late can only be taken into account in the following month.

If you want to change the payment method, for example from SEPA direct debit to bank transfer (payment by invoice), please contact our support team with this request. We will make the change for you.

Support

Support and contact options

How to reach us:

Support and general questions

If you have questions or need support with setting up or using Timebutler, you can always reach our friendly support team quickly via our online contact form. We respond promptly during office hours with an answer to your question.

If a question is better discussed by phone, we are happy to call you back.

Support is included in the flat rate. This means you always receive professional help from us at no additional cost.

Consultation

If you have just discovered Timebutler and would like a consultation, you can schedule a consultation with us.

Support needs

We have offered Timebutler for over 22 years and know from experience that companies only have occasional questions at the beginning, when setting up Timebutler. Many companies even set up Timebutler on their own thanks to its ease of use, and do not need any support.

Once Timebutler is set up and all employees use Timebutler, hardly any questions come up. Despite more than 300,000 users of Timebutler, we receive very few support requests. So you may have only a few questions during setup, and almost none later in regular operation. In any case, our friendly support team is always happy to help.

Cancellation

Cancellation periods

Depending on the selected payment method, the following cancellation periods apply:

Cancellation period for direct debit

If you set up direct debit, you can choose the number of months for the billing period (1, 3, 6, or 12 months). You can then cancel at any time at the end of the current billing period without giving a reason. After that, we will not collect any further direct debits.

Example 1:
You have set up a direct debit with a 1-month billing period. You can now cancel at any time at the end of the month. We will still process the direct debit for the current month. After that, we will not collect any further direct debits.

Example 2:
You have set up a direct debit with a 6-month billing period. In the first month, we collect the direct debit for the 6 months. In the fifth month, you cancel the direct debit. You can then continue to use Timebutler for the remaining two months of the billing period, and we will not collect any further direct debits.

You can cancel at any time online in your user account with just a few clicks. Read here how to cancel the direct debit.

Cancellation for other payment methods

If you choose a payment method other than direct debit, such as invoice, PayPal, or credit card, you purchase a fixed period for using the software, for example 3, 6, or 12 months.

This is a one-time extension and not a subscription. If you do not purchase another extension after this usage period ends, you will not incur any further costs.

In this case, you do not need to cancel, and you cannot cancel. However, note that we cannot refund partially unused periods. For example, if you purchase a 6-month extension and stop using the software after 5 months, we will not refund the one unused month.

Read here what happens to the data after cancellation.

Canceling

If you no longer want to use Timebutler, we would appreciate a message explaining why you no longer want to use Timebutler. Companies often overlook a feature in Timebutler, and we can help you.

You can cancel the usage period, and thus the contract, at any time to the end of the current usage period. Depending on the payment method you last chose, proceed as follows:

Cancellation during the trial period after your first sign-up

A cancellation is not necessary and not possible in this case. With your first sign-up, you received a multi-week free trial period. Unless you actively order an extension of use, the trial period ends automatically and you incur no costs.

Cancellation when SEPA direct debit is enabled

Sign in to Timebutler as an admin and click Account balance > Account balance at the bottom left. On the page, click the Cancel direct debit mandate button and then follow the instructions on the website.

If you don’t have access to your Timebutler user account or if your account doesn’t have admin rights, you can simply send us the cancellation informally via our contact form.

If you want to undo the cancellation, sign in to Timebutler as an admin, click Account balance > Account balance at the bottom left, and click the Reactivate subscription button.

Cancellation for all other payment methods

If you chose a payment method other than direct debit, such as paying by invoice, PayPal, or credit card, you purchase a fixed period for using the software, for example 3, 6, or 12 months.

This is a one-time extension and not a subscription. If you don’t order another extension after this usage period ends, you won’t incur any further costs and the usage period ends automatically.

In this case, you don’t need to and cannot cancel, because the usage period ends automatically.

How to find which payment method you have enabled:
Sign in to Timebutler as an admin and click Account balance > Account balance at the bottom left. If the page displays information about SEPA direct debit, then you have SEPA direct debit enabled. If SEPA direct debit doesn’t appear, you are either in the trial period or you placed your last order using another payment method.

Learn all details about the cancellation notice periods.

Learn what happens to your data after cancellation.

Access after cancellation

In the following cases, the Timebutler usage period may expire:

1. Order placed or bank transfer made too late
Timebutler notifies you in advance about the end of the current usage period. However, you may have placed the order too late, or for invoice payments the bank transfer may arrive too late.

2. No order placed or canceled
If you decide not to continue using Timebutler, you can cancel the SEPA direct debit or simply not extend a usage period.

If the usage period has expired -intentionally or unintentionally- the following applies:

Still possible:
Every user can continue to sign in to their Timebutler user account and view, download, print, and export all data.

No longer possible:
You can no longer enter new records, approve or reject requests, change or delete existing records, or make changes to user accounts or settings. In other words, you can no longer enter, change, or delete data.

To regain full access to Timebutler, you can also order an extension at any time after the usage period has expired.

Read here what happens to your data and when we delete your data if you permanently stop using Timebutler.

Automatic deletion of data

If your usage period has expired and you have not used Timebutler for several weeks, we will automatically delete the user accounts and all data after prior notice.

Find out here when we automatically delete data and how you can prevent that.

Data processing agreement

See the Data Protection chapter

Here you can find information about the Data Processing Agreement and information on data protection.

Data Protection

Privacy and security

Data protection overview

The protection and security of your data are a top priority for us. We process your data in accordance with the General Data Protection Regulation (GDPR).

This is a dedicated section where you can find comprehensive information about data protection at Timebutler.

GDPR, General Data Protection Regulation

We process your data in accordance with the General Data Protection Regulation (GDPR).

Timebutler servers are operated in a secure data center near Frankfurt am Main (Germany). Your data remains within the EU in compliance with the GDPR and is not processed in third countries.

Data Processing Agreement

As an employer, you are required to conclude a Data Processing Agreement with the processor when handling personal data of your employees.

You can find detailed information here: Data Processing Agreement

Location of the Timbutler Server

Timebutler servers are operated in a secure data center near Frankfurt am Main, Germany, under appropriate security measures.

Your data is processed exclusively within the EU and is not transferred to third countries. This ensures compliance with the requirements of the General Data Protection Regulation (GDPR) regarding data processing within the EU.

Secure Connection (SSL / HTTPS)

Communication between your web browser and the Timebutler servers takes place exclusively via a secure connection (SSL / HTTPS).

  • Unencrypted connection attempts are automatically rejected.
  • The system redirects to the secure HTTPS connection.
  • No personal data is transmitted over an unsecured connection.

Exclusion of third countries / USA

Timebutler servers are operated in a secure data center near Frankfurt am Main (Germany) by a leading hosting provider.

In accordance with the General Data Protection Regulation (GDPR), data is processed exclusively within the EU. A transfer of data to third countries outside the EU takes place only in limited exceptional cases.

Transfers to Third Countries

Data is transferred to third countries only in specific situations and only with your explicit action or consent.

1. Single Sign-On (SSO)

Users can link their Timebutler account with a:

  • Google account
  • Microsoft account
  • Slack account

See: Single Sign-On (SSO) with Microsoft, Google, Slack, OAuth and Azure

If you choose to link your account, technical data is transmitted to these providers in the USA.

Important:

  • Linking requires your explicit consent.
  • Only technical authentication data is transmitted.
  • No content data such as absence entries or working time balances is shared.

You must already have an account with the selected provider to use this function.

2. Payment Processing

When an Admin orders a subscription extension, various payment methods are available.

If you choose:

  • PayPal
  • Credit card

You are redirected to the payment page of the respective payment service provider, which may be based in the USA.

In this case:

  • You actively select the payment method.
  • You are redirected to the external provider’s website.
  • No absence data, working time data, or similar content information is transmitted.

Data backup

Automatic Data Backup

To protect your data as effectively as possible, we use an automated and monitored backup system.

Daily Backups

Every night, a fully automated backup of all Timebutler data is created.

  • Backups are stored on separate servers designed specifically for backup storage.
  • The data is protected using a secure encryption algorithm.
  • Without the encryption file and password, the backup data cannot be decrypted.

In the unlikely event that unauthorized third parties gain access to a backup copy, the data remains unusable without the required decryption credentials.

Retention and Deletion

Backup copies are retained only for a limited period in accordance with the General Data Protection Regulation (GDPR).

After this period, backups are automatically deleted.

Further information is available in the Deletion policy and recovery plan.

Monitoring

Backups and the automatic deletion process are continuously monitored.

In case of an error, system administration is notified automatically and immediately.

Download data and backup

Your data is securely stored in Timebutler.
Our automatic and monitored data backup ensures protection against data loss.

Download Data via the Download Center

You can download all data at any time and store your own copy within your organization.

  1. Log in to Timebutler as an Admin.
  2. Go to Reports > Download Center.
  3. Select the required data and download it.

Automated Download via API

You can also use the API to download data automatically.

Screenshot

Data processing agreement

Data Processing Agreement

Under the General Data Protection Regulation (GDPR), the Data Processing Agreement (DPA) can be concluded online. It is no longer necessary to send a signed agreement by post.

Conclude the DPA Online

If you already have a Timebutler user account, you can review and conclude the agreement online here.

View the DPA as a PDF

If you do not yet have a user account or would like to review or forward the agreement in advance, you can access the PDF version here: www.timebutler.de/avv-print

Technical and Organizational Measures (TOMs)

The DPA references the Technical and Organizational Measures (TOMs).

You can access the TOMs here.

Subprocessors

The DPA also lists all subprocessors.

An overview of the subprocessors is available here.

Technical and organizational measures

The Data Processing Agreement includes the Technical and Organizational Measures (TOMs).

You can access the TOMs directly here.

Subprocessors in Data Processing

Under the General Data Protection Regulation (GDPR), you can conclude a Data Processing Agreement with us.

The agreement includes a list of all subprocessors involved in data processing.

An overview of the subprocessors is available here.

Interface (API)

API settings

Enable the API

Timebutler provides an interface (API V1) with many features, including:

  • Retrieve employee data
  • Retrieve employees’ absence entries, working times, vacation entitlements, and working days
  • Control the time clock for time tracking or import time entries
  • Connect third-party hardware time recording terminals
  • Download and change projects and categories for time tracking
  • Query personnel file data and salary data
  • and more

This lets you automatically read out data from Timebutler and, for example, import it into third-party software such as Datev, SAP, or your ERP, generate emails, send notifications to employees, and so on. To query the interface, you need a program that calls the interface. An experienced developer can create a program within a few minutes that queries the standardized Timebutler interface.

An admin can enable or disable the Timebutler interface. You can enable or disable the interface for querying personnel file and salary data separately, and independently enable the interface for all other data. Access requires an individual API token. An admin user can generate the API token. There is one API token for querying personnel file and salary data, and one API token for the remaining API endpoints. This lets you manage access to the two data types separately and grant access separately.

Enable or disable the interface

To enable or disable the interface, log in to Timebutler as an admin and click Settings > My Account > API Tokens on the left. There, under Legacy token (API v1), you can enable or disable the two interfaces; the two API tokens are also displayed there.

Your developer needs these two API tokens to query the interface. Your developer also needs the technical documentation for the API.

An admin can generate a new API token at any time. This invalidates the old API token, so the old API token no longer grants access to the interface and data.

Screenshot: Enable the API

API V2

Timebutler’s API V2 is a modern interface that fully replaces the previous version. Use it to connect Timebutler with the tools your organisation already relies on: payroll providers, ERP systems, HR software, or internal workflow automation.

The API V2 supports the following, among other things:

  • Retrieve employee data and records from the Digital Personnel File
  • Retrieve absence entries, working time records, and vacation balances
  • Control the virtual time clock, import working time, or integrate third-party hardware terminals
  • Query and synchronise projects, activities, and Shift Planning data
  • Export preliminary salary data

Your developer will need a client application and the API’s technical documentation to get started. The API follows the OpenAPI standard, which means integration is straightforward and most developers can get up and running within minutes. The API technical documentation covers all available endpoints and authentication details.

Activate the API and manage tokens

Administrators can activate or deactivate the API V2 at any time from the account settings. Access to sensitive areas — such as salary data or the Digital Personnel File — can be permitted or restricted independently of the general API activation.

Unlike the previous version, API V2 uses personal API tokens (Personal Tokens) tied to individual user accounts rather than a single global password. This gives you finer control over who can access the API and makes it easy to revoke access for a specific user without affecting others.

To activate the API and create a token:

  1. Log in as an administrator.
  2. Go to Settings > My account > API tokens > API tokens.
  3. Give the token a clear, descriptive name — for example, “ERP integration”.
  4. Copy the token immediately and store it in a secure location. It will not be shown in plain text again after you leave the page.

Every API request is logged in an audit-proof manner (access logging). As an administrator, you have a full record of which data was accessed and when. You or the user can revoke an API token at any time. Revocation takes effect immediately — any further requests using that token will be blocked.

Technical documentation

Technical documentation for the API

With the Timebutler API, you can exchange data with Timebutler automatically. A developer writes a program that reads the data and processes it further. For development, you need the technical documentation for the API.

Here you can find the technical documentation for the Timebutler API (V1).

Here you can find the technical documentation for the Timebutler API (V2).

Tips & Tricks

Usage tips

Print calendar

You can print any page. To print a page, use your browser’s print function or click the printer icon at the top of every page in Timebutler.

The smart print feature automatically prints only the relevant areas of the page. For example, it does not print the left or top navigation bars, nor many of the displayed navigation elements or buttons.

When you print a calendar view, the colored markers for absences usually do not appear at first. The reason is that the color highlighting is a background property, and printers typically do not include backgrounds when printing.

To print the colors as well, enable background color printing in your browser options. Depending on your browser, do the following:

Chrome browser
Open the print function for the page. A print preview appears, where you can, for example, choose the printer. In the lower-left area, enable the Print background colors option before printing.

Firefox
Click the menu icon at the top right, then click Print…. The print preview appears, with the printing options in the right sidebar. If you see a More settings heading, click it to show the additional settings. Then enable Settings > Print background.

Firefox (older versions)
Open the File > Page setup menu and the Format & Options tab. Enable the Print background (colors and images) option.

Internet Explorer
Open the File > Print preview… menu. In the print preview window, click the gear icon in the top menu bar. A small Page setup window opens. Enable the Print background colors and images option.

Edge browser
Unfortunately, the Edge browser does not support printing background colors. Please use another browser to print.

Other browsers
Every browser offers an option in its settings or print menu to also print background colors. Find and enable this option before printing.

Single Sign-On (SSO) with Microsoft, Google, Slack, OAuth and Azure

You can link your Timebutler account with a third-party service. This lets you sign in automatically, without a username and password.

Read here how to enable automatic sign-in via your Google, Microsoft, or Slack account.

Timbutler app in the App Store or Play Store

There is intentionally no Timebutler app in the Google Play Store or Apple App Store - for many different reasons. Nevertheless, you can of course use Timebutler with any device, PC or laptop, tablet or smartphone, and all Timebutler features are available on all devices.

You do not need an app to use Timebutler on a smartphone or tablet, because:

Any user can simply open a browser on a smartphone or tablet and go to timebutler.de. Timebutler is optimized for all devices. When signing in, you can enable the “Stay signed in” option; then, on future visits, you will go straight to your Timebutler user account without entering a username and password.

You can also add the page as an icon on your smartphone. Then you will have an icon on your smartphone, tap it and you will go straight to your Timebutler user account - just like an app. When you tap the icon, you will immediately enter your Timebutler user account, you are signed in, and you can use all features without restriction.

Save Timebutler to Android home screen

Timebutler can be used on any device, including a PC, laptop, tablet, or smartphone.

On a smartphone, you can simply open the website www.timebutler.de in your browser, where all features are available. You can also save the page to your Android home screen as a web app (PWA). The Timebutler logo will then appear on your home screen alongside your other apps, and tapping it takes you directly to your Timebutler account — giving you the convenience of an app.

A native Timebutler app is also available in the Google Play Store, but it is still in an early stage of development, so not all features are available yet. For the full range of functions, use the web app described here or open Timebutler in your browser.

Setup instructions

To save the Timebutler page to your home screen:

  1. Open your internet browser on your phone, for example Google Chrome or Firefox.

  2. Go to www.timebutler.de.

  3. Tap the three-dot menu icon (usually at the top right or bottom left).

  4. Depending on your browser, select Add to Home screen or Install app.

  5. Change the suggested name for the app or leave it as “Timebutler”.

  6. Tap Add or Save.

  7. You’re done. Timebutler is saved with its logo in an available spot on your home screen. From now on, simply tap the icon to go directly to your Timebutler account.

For iPhone users

Do you have an iPhone instead of an Android phone? You can also add Timebutler to the iPhone home screen.

Save Timebutler to iOS/iPhone home screen

Timebutler can be used on any device, including a PC, laptop, tablet, or smartphone.

On an iPhone, you can simply open the website www.timebutler.de in your browser, where all features are available. You can also save the page to your iPhone home screen as a web app (PWA). The Timebutler logo will then appear on your home screen alongside your other apps, and tapping it takes you directly to your Timebutler account — giving you the convenience of an app.

A native Timebutler app is also available in the Apple App Store, but it is still in an early stage of development, so not all features are available yet. For the full range of functions, use the web app described here or open Timebutler in your browser.

You can set up the Timebutler page on your iPhone as follows:

  1. Open a browser on your iPhone, for example Safari or Firefox.

  2. Go to www.timebutler.de.

  3. Tap the share button (the square with an upward arrow) and expand the displayed menu.

  4. Select Add to Home Screen. Note: if the Add to Home Screen option is not visible, scroll down in the menu until it appears.

  5. Change the suggested name for the app or leave it as “Timebutler”.

  6. Tap Add or Save.

  7. You’re done. Timebutler is saved with its logo in an available spot on your home screen. From now on, simply tap the icon to go directly to your Timebutler account.

Android phone

Do you have an Android phone instead of an iPhone? You can also add Timebutler to the Android home screen.

Subscribe to the Timebutler calendar

You can subscribe to the Timebutler calendar in a third-party calendar such as Outlook, Google Calendar, and others. Vacation requests and absence entries from Timebutler then appear in your calendar and update automatically.

Read here how to subscribe to the Timebutler calendar in another calendar.

Exporting data

You can easily export all data from Timebutler as an Excel file or a CSV file. The CSV format is used to transfer data to other software, since most third-party providers can import CSV data, for example DATEV, LODAS, SAP, or others.

You have three options:

1) Download via the Download Center

Sign in to Timebutler as an admin and click Reports > Download Center on the left to download all data.

2) Download the data

In any list view (Absences, Vacation balances, Sick reports, Time entries, Working time accounts, User list, etc.), you’ll find a Download button at the top. Use it to download the data as an Excel file or a CSV file with a single click.

3) Retrieval via the API

Timebutler offers an API. Via the API, you can use a small program to automatically query and read your data. Here you can find more information about the API.

Settings tips

Part-time employees

With Timebutler, you can also manage the absences and vacation of employees who work part-time.

There is little to consider, because a part-time employee generally has the same vacation entitlement as a full-time employee. To calculate a pro-rated vacation entitlement, only the number of working days per week matters. Do not take the daily working hours per weekday into account, even if they are irregular.

Learn more about the vacation entitlement for part-time employees, including an online calculator for vacation entitlement.

Import users with different working time models

If you want to create a large number of user accounts in Timebutler, the bulk import of user accounts via Excel file upload is a good option, so you don’t have to enter each account individually.

Employees often have different working time models, for example “Monday to Friday 8h”, “Monday to Thursday 8.5h, Friday 6h”, or “Monday, Wednesday, and Thursday 6h”. To import user accounts with different working time models, proceed as follows:

1) Set the working time model

When you bulk import user accounts via the Excel file upload, Timebutler uses the working time model defined in the default settings for new users. So first set the desired working time model in the default settings.

2) Import employees with the set working time model

Now perform the bulk import of the user accounts for which the working time model you set in step 1) applies.

3) Repeat for other working time models

Repeat steps 1) and 2) for employees with a different working time model.

Undo actions

An admin can undo certain actions in Timebutler with a single click:

Sign in to Timebutler as an admin, click Settings > More… at the bottom left, then click Undo actions on the right.

Note:

  • You can only undo actions performed up to 14 days ago. After that period, you can only delete entries individually. This also applies to the individual items within a recurring series.
  • Each admin can only undo their own actions, not actions by others.
  • Managers and employee users can undo these actions only in a deliberately limited way: they can undo an action only immediately after performing it, for example if an employee user accidentally set an incorrect period for a recurring entry.

Notification for sickness

If an employee reports sick — that is, creates an illness entry in Timebutler — or if an existing illness entry is deleted, Timebutler can automatically inform the managers, the HR department, and other people by email.

To activate the notification for sickness, proceed as follows:

  1. Sign in to Timebutler as an admin.

  2. At the bottom left, click Settings > More…, then click Global settings on the right.

  3. Check or change the Notify managers and copy recipients about illness entries option and save the change.

  4. You can now notify additional email addresses, for example those of employees in the HR department. To do this, add an entry under Copies of information emails.

That’s it: when an employee creates or deletes an illness entry, the manager(s) and the recipients of the email copies are notified.

Important:
If you add the recipients of the Copies of information emails in step 4, you can also select the absence types for which an email is sent. It is important to select all absence types here, or at least the sickness absence types.

FAQ

Calendar

FAQ: Sync with calendar

You can subscribe to the Timebutler calendar in a third-party calendar such as Outlook, Google Calendar, and others. Vacation requests and absence entries from Timebutler then appear in your calendar and update automatically.

How to subscribe to the Timebutler calendar

  1. Open the third-party calendar (Outlook, Google Calendar, etc.), switch to the calendar view, and open the function to subscribe to an internet calendar. The exact click path depends on the calendar and software version, so we cannot provide a detailed guide here.

  2. The calendar software will ask for the subscription URL (also called the iCal URL, WebCal URL, or ICS URL). Sign in to your Timebutler user account and, below Your account, click Integration. Click the Sync with calendar button. On the following page, you can configure various settings for the calendar subscription. Choose the desired options and then click Show subscription link. Copy the subscription link that appears.

  3. Switch back to the calendar software and paste the copied subscription link there.

  4. The Timebutler calendar is now subscribed, and entries will synchronize automatically.

The third-party calendar (Outlook, Google Calendar, etc.) decides on its own when and how often it synchronizes with Timebutler. Third-party calendars usually do not offer a way to view or change this interval. It can therefore take from a few minutes up to several hours until changes in the Timebutler calendar also appear in your own calendar. You can always access the up-to-the-second view directly in Timebutler. Save the link to the Timebutler calendar view as a favorite in your browser to open it with a single click.

If the automatic update does not work, or if entries in the Timebutler calendar are not transferred to the third-party calendar, see solutions to problems with calendar synchronization.

If you use a newer version of Outlook and warning messages appear when Outlook updates the calendar, see information about warning messages during calendar synchronization with Outlook.

FAQ: Sync with calendar - causes of errors

If you have subscribed to the Timebutler calendar in your own calendar (for example, Outlook, Google Calendar, etc.), absences from Timebutler will automatically synchronize to your own calendar. If there are entries in Timebutler that are not displayed in your own calendar — i.e. the calendar is not updated, or not fully updated — this can have the following causes:

1) Incorrect absence status

The missing entry is not in the status Processing completed or Approved. Only entries with these two status values are synchronized. For example, if the missing entry has the status Requested, it is intentionally not synchronized.

2) Not synchronized yet

The missing entry may have been created or approved in Timebutler only recently. The third-party calendar (Outlook, Google Calendar, etc.) decides on its own when and how often it synchronizes with Timebutler. You cannot change or view this interval. It can therefore take from a few minutes up to several hours until changes in the Timebutler calendar become visible in your own calendar. Wait a few hours and then check whether the entry has been synchronized.

3) Employee not selected

The missing entry may belong to an employee whose entries you did not subscribe to. For example, an admin can subscribe to the entries of all employees, the entries of their own team, or only their own entries. If the admin subscribes only to their team’s entries, entries from other employees are not synchronized. So if the missing entry comes from a user who is not in that team, the entry is not synchronized.

To make sure you chose the right settings, delete the calendar in your third-party calendar (Outlook, Google Calendar, etc.) and subscribe to the Timebutler calendar again.

4) Absence not selected

When subscribing to the Timebutler calendar, you have several options, including selecting the absence types to subscribe to. If the missing entry has an absence type that you did not subscribe to, it is intentionally not synchronized.

For example, if you enabled synchronization only for vacation, training, and business trip, a home office entry will never be synchronized.

To make sure you chose the right settings, delete the calendar in your third-party calendar (Outlook, Google Calendar, etc.) and subscribe to the Timebutler calendar again.

5) Synchronization stopped

In rare cases, your own calendar may have stopped or disabled updates. Occasionally this happens even after synchronization has worked without issues for months or years.

Unfortunately, with most calendar providers there is no way to check if or when updates took place, so you cannot determine whether the update was stopped. The only option is to delete the subscribed calendar and subscribe again.

FAQ: Sync with calendar - Outlook error message

If you have subscribed to the Timebutler calendar in a newer Outlook calendar, the automatic synchronization in Outlook can trigger warning messages.

We are aware of these warnings, and they are not a problem.

For technical reasons, we designed the calendar sync transfer so that calendars other than Outlook can also process it. Unfortunately, not all calendars adhere to the synchronization standard, and some expect a format that is actually invalid. Timebutler therefore provides the synchronization in a format that deviates slightly from the standard so that these other calendars can synchronize as well. This format triggers warning messages in Outlook. However, these are only warnings — Outlook still synchronizes and imports the absence entries correctly.

Synchronization in Outlook works without issues, and you can simply ignore these messages.

If you still experience synchronization problems contrary to expectations, read more here about causes of errors in calendar synchronization.

FAQ: Sync with calendar - restriction for employee users

You can subscribe to the Timebutler calendar in a third-party calendar such as Outlook, Google Calendar, and others. The available options depend on the user role:

Admins
Admins can choose whether to subscribe to the entries of all users, only their own employees, or only their own entries.

Managers
Managers can choose whether to subscribe to the entries of their own employees (with or without extended view permissions) or only their own entries.

Employee users
Employee users can subscribe only to their own entries, not to other users’ entries. This also applies when employee users have view permissions for other users in Timebutler.

Sharing for employee users in the third-party calendar
If you want employee users to also see other users’ absences, you have the following option:
Many calendars, such as Outlook, let you share a calendar with colleagues. An admin can subscribe in Outlook to the Timebutler calendar that includes all entries for all users. The admin then shares this calendar in Outlook with colleagues (availability depends on the Outlook version). The colleagues open Outlook and add the shared calendar.

FAQ: Download calendar view for Excel

In Timebutler, you can download almost all list views and reports as an Excel file with a single click on the Download button (or as a CSV file, the common data exchange format). However, you cannot download the calendar view as an Excel file, for the following reasons:

Excel is used to process data, for example by inserting formulas to calculate sums or averages. A calendar view in Excel is uncommon and does not display well. You also cannot perform calculations on a calendar view.

Transfer the calendar manually

If you still want to transfer the calendar view to Excel, you can do so with some know-how. This requires advanced skills: open the calendar view in Timebutler. Select the text in the calendar and copy it using the keyboard shortcut Ctrl + C.

Open Excel and click any cell (do not double-click; just single-click). Then paste the copied text using the keyboard shortcut Ctrl + V.

Excel fits the calendar text neatly into the different columns and rows, so you can now see the calendar view in Excel.

Alternative
You can print the calendar view to a PDF file.

Vacation and absences

FAQ: Alternating weekly workdays

You can set weekly workdays individually in Timebutler. However, you cannot configure irregular or alternating weekly workdays, for example “alternating by week Mon–Fri and Mon–Thu” or “Mon–Fri plus every 1st, 3rd, and 5th Saturday of the month”.

There are two reasons for this:

  • If we offered this, we would have to support an enormous number of special cases, for example “Mon–Thu and every 3rd and 5th Saturday, except when Thursday is a public holiday, then also Friday, but not if colleague X works on a Friday”. That quickly becomes complicated and confusing.
  • In practice, the schedule often differs from the plan anyway — for example when someone swaps their Friday shift with a colleague or wants to change the weekly Mon–Thu / Mon–Fri rhythm. The settings would have to be constantly updated, which is cumbersome.

Depending on whether you have time tracking activated, you have the following options.

Alternating weekly workdays with time tracking

Activate all workdays on which the employee could potentially work. To do this, sign in to Timebutler as an admin, click Settings > Working days at the bottom left, and then click the blue Edit button for the relevant employee.

Now create a new absence type called “Non-working”. Sign in to Timebutler as an admin and click Settings > More… > Absence types. Click the Create new absence type button. Enter “Non-working” in the name field and set it so that only admins may enter this absence by disabling the two options Managers may enter this absence and Employees may enter this absence. Enable the option Reduces target working time and then click the blue Save button at the bottom.

Then create a recurring entry with the “Non-working” absence for the relevant employee on the weekdays they do not work (for example for the entire current year). Read here how to create a recurring entry.

That’s it. Although all weekdays count as workdays for this employee, the “Non-working” entries mark the relevant days as days off, and the system does not count them as workdays for vacation deduction or in the working time account.

Example
An employee alternates weekly between Monday to Friday and Tuesday to Friday, so they have every second Monday off. Activate the weekly workdays Monday to Friday and create a “Non-working” recurring entry for every second Monday from January to December.

This makes Monday a day off every other week, so the employee works Monday to Friday one week and then Tuesday to Friday the next, as desired.

Alternating weekly workdays without time tracking

Activate all workdays on which the employee could potentially work. To do this, sign in to Timebutler as an admin, click Settings > Workdays at the bottom left, and then click the blue Edit button for the relevant employee.

The employee then only needs to make sure that they enter vacation only on the days they would actually have to work; otherwise, too many vacation days will be deducted.

Example
An employee alternates weekly between Monday to Friday and Monday to Thursday, so they have every second Friday off. Activate the weekly workdays Monday to Friday.

If the employee wants to take two weeks of vacation, they must not submit a single vacation request covering both weeks, because that would deduct 2 × 5 = 10 vacation days.

Instead, they submit one vacation request from Monday to Friday (= 5 vacation days) and a second one from Monday to Thursday (= 4 days), so 9 vacation days are correctly deducted.

Screenshot: Setting “Absence reduces target working time”

FAQ: Hourly vacation balances - record vacation in hours

In Timebutler, you can enter vacation requests in half days, full days, or multiple days, but not by the hour. The reason is that very few companies plan vacation by the hour. In addition, recording vacation by the hour would greatly complicate Timebutler in many areas and features.

You can still set up hour-based vacation planning in Timebutler by repurposing the overtime feature. When you enable the overtime feature, Timebutler keeps an overtime account for each employee. You can set an overtime balance as of January 1 for each employee and enter the vacation in hours there. For example, if an employee has 25 days of vacation at 8 hours each, enter 200 (25 x 8 = 200).

Employees can then request overtime reduction — this corresponds to a vacation request. The Manager approves the overtime reduction, and the hours are deducted from the overtime account. The overtime account therefore always shows the current vacation balance in hours.

This alternative has the following disadvantages:

  • The links and buttons for vacation requests and vacation balances remain active, but employees should no longer use them.
  • Some features in Timebutler apply specifically to vacation — for example, vacation blackouts and warnings, or the option to allow overdrawing the vacation balance. These cannot be used with the overtime feature.
  • You cannot enable the time tracking feature. You can therefore use Timebutler only for absence and vacation planning, not for time tracking.

If you still want to enable the overtime feature for hour-based vacation planning, proceed as follows.

1. Enable the overtime feature

Log in to Timebutler as an Admin. In the bottom left, click Settings, then More… below it, and then Overtime feature on the right. Click Enable overtime feature. On this page you will find various options for managing overtime, which you can configure as you wish. Then click Enable overtime feature again to confirm.

2. Require approval for overtime

In the bottom left, click Settings > More…, then click Absence types on the right. For Overtime, click the green button with the pencil. Remove all checkmarks under Editing permissions and all under Delete own entries. Under Approval, enable the option The manager must approve the request. This way, if an employee (accidentally) records overtime — which would otherwise increase the vacation balance — the Manager can simply reject the request.

3. Transfer vacation credit to the overtime account

In the bottom left, click Settings > Vacation entitlement. In the Overtime credit from previous year column, you can now enter the starting overtime credit (i.e., the vacation quota).

4. Set up a vacation blackout

In the bottom left, click Settings > Vacation blackout. Create a new vacation blackout for the entire current year from January 1 to December 31 (and ideally another one for the following year) so that no employee can submit vacation requests.

5. Inform employees

Let employees and Managers know that vacation is no longer managed via vacation requests but via overtime-reduction requests. The current vacation balance can now be found in the overtime account with hourly (to-the-minute) precision.

FAQ: Enter unpaid leave

To enter unpaid leave, do the following.

1. Create the absence type Unpaid leave

Log in to Timebutler as an Admin. In the bottom left, click Settings > More…, then click Absence types on the right. Check whether the absence type Unpaid leave already exists. If not, click Create new absence type.

Now create the absence type Unpaid leave. It’s best to set it so that only Admins can enter it, or that the absence type requires approval. Set the option Reduces planned working time to Reduces the planned working time in the working time account to 0 h [...]. This ensures that employees do not have to work on those days (only relevant if you have time tracking enabled or plan to enable it in the future).

2. Enter the absence entry Unpaid leave

Once the absence type is created, you can enter unpaid leave for employees the same way you enter any other absence. For example, in the top left, click Employees > Absences > Enter absence, or click the start and end date in the calendar to create a new absence entry.

FAQ: Record maternity protection, parental leave, educational leave, and other absences

In Timebutler, you can create any absence types and employees can then enter the absences. This way, you can enable employees to record parental leave, maternity protection, employment prohibition during pregnancy, educational leave, unpaid leave, and any other absence.

The following steps use parental leave as an example.

1. Create absence type

Log in to Timebutler as an admin and click Settings > More… in the bottom left, then click Absence types on the right. Check whether an absence type called Parental leave already exists. If not, click Create new absence type.

Create the absence type Parental leave. It is recommended to configure it so that only admins may enter it, or to set it as approval-required. Set the Reduces planned working time option to Reduces the planned working time in the working time account to 0 h [...]. This ensures that employees are not required to log any working time on those days. This setting is only relevant if you have time tracking enabled or plan to enable it in the future.

Screenshot: “Absence reduces planned working time” setting

2. Enter absence

Once the absence type has been created, you can enter parental leave for employees in the same way as any other absence. Click Employees > Absences > Enter absence in the top left, or click the start and end date in the calendar to create a new absence entry.

Annual limit option In some cases it makes sense to restrict the maximum number of days per year that an employee may enter. For educational leave, for example, a limit is often appropriate. The Annual limit field for this is available in the edit form for the absence type.

Note: Parental leave, maternity protection, employment prohibition during pregnancy, and educational leave are concepts defined under German law. The availability and legal requirements for equivalent absence types may differ in other countries. Check the applicable regulations before configuring these absence types for non-German employees.

FAQ: Record absences by the hour

We intentionally don’t allow you to specify a start/end time or a duration in hours/minutes for absence entries. There are several reasons for this:

  • The calendar view would quickly become cluttered, since there could theoretically be dozens of entries per day.
  • Checking for conflicts with existing absences would become significantly more complicated.
  • Vacation balances would have to handle minute-precise vacation requests, and giving employees that level of precision is uncommon in practice.

For example, for a doctor’s appointment you may want to specify a number of hours or a time. The simple solution: you record a half-day doctor’s appointment (morning or afternoon) and add a note in the Remarks field — for example, “I’ll be in the office a bit later.”

Your colleagues will quickly learn that a half-day doctor’s appointment doesn’t mean you’ll actually be absent for half the day; it means you’ll arrive a bit later in the morning or leave a bit earlier in the afternoon.

Extra fields for entering times

If you still want start and end times to be specified for certain absence types, you can do this with extra fields for absence types. For the absence type (for example, doctor’s appointment), define the following extra fields:

  • Start time
  • End time

When an employee then enters the absence, the two input fields for start and end times also appear, and they can fill in the times. The extra fields are shown in the calendar and in the absence detail view, so colleagues can see the time window during which the employee will be absent.

You can learn more about extra fields, find out how to create or edit extra fields, and see how extra fields are displayed in the calendar.

Record business errands

If you have activated time tracking, you can also record business errands.

FAQ: Special leave

We intentionally deduct special leave from the vacation balance.

Learn how to handle special leave.

FAQ: Expiration of remaining vacation

Find out here how to record the expiration of remaining vacation.

FAQ: Yearly calendar across multiple employees

Timebutler offers the following calendar views:

  • Annual view of your own entries
  • Annual view of a specific colleague’s entries (for managers and admins)
  • Monthly view across multiple employees

A yearly view across multiple employees is intentionally not available, because a calendar of that scope cannot be displayed usefully on a web page. With 50 employees, for example, it would require a table with 50 rows and 365 columns (or the reverse). That does not fit on a web page without horizontal scrolling, which makes it hard to get a clear overview of the whole year. Horizontal scrolling on web pages is avoided entirely in Timebutler because it is very difficult to use — which is why almost no websites require it.

You can, however, open the monthly view across multiple employees. You can also configure it to show a custom date range instead of the current calendar month — for example, from the 18th of one month to the 18th of the following month. This gives you a clear view of the absence situation around month transitions as well.

The calendar view includes navigation buttons above the calendar to move one month forward or back. This lets you move through calendars quickly. If you have a long list of employees and have scrolled down so that the buttons above the calendar are no longer visible, two links automatically appear in the top left to navigate one month forward or back. Clicking them takes you to the next month, starting at the same row and employee you were viewing before.

Alternative: subscribe via calendar software

If you use calendar software such as Outlook, Google Calendar, or Apple iCal, you can subscribe to the Timebutler calendar directly in that application. To do so, click the tear-off calendar icon at the top of the logged-in area of timebutler.de — it is located between the globe icon and the envelope icon. Timebutler then synchronizes all entries to the calendar automatically and keeps them up to date. Third-party calendars such as Outlook offer a yearly view, which can also be printed. However, a yearly view contains a large amount of information and can become difficult to read quickly.

FAQ: Transfer remaining vacation and overtime to the following year

Timebutler does not automatically transfer the overtime balance and remaining vacation to the next year. You can do this with a few clicks, without any manual calculation.

Log in to Timebutler as an admin, click Settings in the bottom left, then More… below it. Click Vacation contingent and overtime balance transfer on the right.

You can run the transfer as many times as needed. For example, you can transfer remaining vacation in November or December, and again at the start of the year once vacation planning for the previous year is complete. At the beginning of the year, you should transfer both remaining vacation and the overtime balance from the previous year into the current year.

Timebutler will automatically remind you of the transfers at the start of the year.

Screenshot: Selection for transferring remaining vacation

Transfer history

You can check at any time when the transfer of remaining vacation and overtime was last run. Log in as an admin, click Settings in the bottom left, then More… below it. Click Vacation contingent and overtime balance transfer on the right, then click Show transfer history in the top right of the page.

Screenshot: Transfer history

Edit history

Timebutler also logs changes to vacation entitlement data and time balances (overtime, starting balance of the overtime credit) in the Change history of entitlement data.

FAQ: Notify employees about remaining vacation

Find out here how to automatically notify employees about remaining vacation.

FAQ: Electronic certificate of incapacity for work (eAU)

After several postponements, an electronic query has replaced paper certificates of incapacity for work (sick notes / “yellow slips”) issued by doctors in Germany since January 2023. This is the so-called electronic certificate of incapacity for work — eAU or eAttest for short.

We followed the development closely for months and continuously evaluated how to integrate the eAttest query into Timebutler. After an in-depth review of the options and requirements set by the legislator, and intensive exchange with the responsible bodies, we decided not to offer eAttest retrieval in Timebutler for the time being. The many reasons for this — which also serve the interests of Timebutler users — are explained further down this page.

How can you retrieve the eAttest?

As explained above, Timebutler does not support eAttest retrieval. Instead, you have the following options.

1) Not necessary in many cases

The responsible bodies have stated that in most cases, retrieving the eAttest is not necessary. If your company trusts the employee’s sick report, or if the document is not relevant for payment, you do not need to retrieve the eAttest.

2) Payroll program

Since 2022, all certified payroll programs are legally required to offer a way to query eAttests. Your company or your tax advisor uses a payroll program where eAttests can be retrieved. Speak to your payroll department or tax advisor about this.

3) sv.net form assistant

At www.itsg.de/produkte/sv-net/, ITSG GmbH (the service centre of the statutory health insurers) offers a way to retrieve eAttests online. However, this is only practical for small companies without a payroll program: you have to re-enter all employee data with every query, so the form assistant offers little convenience for recurring requests.

How can you record in Timebutler that the certificate is on file?

In Timebutler, you can set for each sick report whether the certificate has been received by the company. This has always been possible and does not change with the introduction of the eAttest — especially since many employees will not have an eAttest, and the previous procedure using paper certificates remains in place.

As soon as the doctor’s certificate reaches the company in paper form or as an eAttest, you can mark the sick report in Timebutler as having a certificate on file. Read here how to change the certificate status of a sick report.

Read here how to record additional sick leave information — for example, whether a doctor issued an eAttest for a sick report.

Why we don’t offer eAttest retrieval

In short:

  • The official procedure does not allow convenient, real-time retrieval of the data.
  • Requirements for data provision force companies to enter the same data multiple times and to use cumbersome transmission channels.
  • Many employees are excluded from eAttest retrieval, so paper certificates still have to be processed.
  • Improper queries are unlawful — we want to protect our customers from this.
  • Offering the query would require a complex, labour-intensive identification process for companies within Timebutler.

The detailed reasons follow below.

Not convenient

Several restrictions in the retrieval procedure make the eAttest query inconvenient.

No real-time availability

When an employee has seen a doctor and a certificate has been issued, they inform the company. Today’s electronic transmission methods create the expectation that the eAttest is available for retrieval immediately or within a few minutes. In practice, when the company queries the eAttest, the reporting office will often respond that no eAttest is available. In most cases, an eAttest is not retrievable until days after the doctor’s visit — frequently only 4–6 days after the sick report.

Duplicate data entry and laborious reconciliation

The procedure requires personnel data (employee name, health insurer, and others) to be transferred from a certified payroll system to the target system. Timebutler already holds this information, but you explicitly may not use it. Instead, you would have to export the data from certified payroll software and import it into Timebutler. Because payroll products have no common specification for data exchange, companies would have to painstakingly convert or rework the exported data before importing it — a task that typically only experienced IT staff can do.

This manual export and import would have to be repeated before every eAttest retrieval to ensure the procedure meets legal requirements. That is not reasonable to expect from users.

The exact same data is already present in Timebutler, but you may not use it. Transferring the data from a payroll system is mandatory regardless of what is already in place.

In addition, the company must ensure that the data comes from a so-called system-tested payroll program and is imported unchanged. You must continuously verify the data and keep it up to date.

You may only retrieve an eAttest if an employee has reported sick beforehand and the company has been informed. This has the following consequences.

Access may be blocked

If companies knowingly or accidentally perform eAttest queries in Timebutler without a prior sick report, the reporting office could block Timebutler’s access to eAttest retrieval for all users due to too many unjustified requests. Software cannot guarantee with absolute certainty whether an employee may have already reported sick by phone or email before the company triggers the query.

This means there is a real risk that access to eAttest retrieval could be revoked. Under these conditions, we cannot ensure that eAttest retrieval remains permanently available.

No automatic provision possible

Our preferred scenario would have been for Timebutler to provide companies with their eAttests automatically. For this, Timebutler would need to query all open eAttests for the companies, so that the list of retrievable eAttests could be presented to users as soon as they log in.

However, this is not permitted. Only targeted queries for individual employees on specific dates are allowed, and only on the condition that the employee has reported the illness beforehand.

Not comprehensive — paper certificates continue to exist

The switch to the eAttest does not apply to all employee groups. For example, no eAttests will be issued for the large group of privately insured employees — instead, eAttests and the familiar paper certificates will run in parallel.

In individual cases, doctors’ practices will not issue an eAttest even for eligible employees — for example, in the event of a technical malfunction, a missing digital signature, or one that has not been renewed. In this case, the employee receives a paper certificate that must be sent to the health insurer. If the employee fails to do so, no eAttest is created for that illness and it will never be retrievable.

Risk of violating data protection

To prevent unauthorised parties from querying sensitive personal health data, the querying system must provide written assurance that its users “have identified themselves to the reporting office or its contractors.” Meeting this requirement involves extensive specifications from the German Federal Office for Information Security (BSI).

To meet these requirements, companies would need to undergo an extensive, time-consuming identification process, including verification of their authorisation to access certain data. This identification must also be confirmed and repeated regularly. At the time of the eAttest’s introduction, the BSI document describing the identification requirements was 60 pages long.

While it would be possible to set up such an identification process, it would involve considerable effort for companies. Even then, Timebutler would still have no complete assurance that, in individual cases, unauthorised health data of employees from third-party companies would not be queried — or that the Timebutler query would not be misused for this purpose. Such violations could have legal consequences for both Timebutler and the companies involved. We want to protect our customers and Timebutler from this.

Technical complexity and interface changes

At the time of the eAttest’s introduction, around 30 endpoints (health insurers) on the receiving end use partly different encryption methods. In some cases, the interface specifications also differ, and experience from other companies shows that eAttest queries sometimes require manual rework.

Implementing eAttest retrieval involves several audits and the fulfilment of an extensive specification — at the time of the eAttest’s introduction, this comprised 100 criteria, with further criteria to be added. In addition to the system audit, an initial system examination must demonstrate the correctness and practicality of the retrieval through pilot tests at at least two different employers within nine months of the system audit being completed. The prescribed certification process therefore takes at least 9 months, and realistically additional lead time has to be planned.

There are also legal requirements regarding versioning. When changes to the eAttest retrieval requirements are defined, querying systems have only a very limited timeframe to adapt the system, and to have the changes tested and certified. If these timeframes are missed, the certification can be revoked, suddenly making eAttest retrieval impossible.

Under these conditions, we cannot ensure that eAttest retrieval remains permanently available.

No real-time query

As described above, eAttests are typically only ready for retrieval 4–6 days after the sick report. In addition, queries are only permitted if the company has submitted a report beforehand. Automatic provision by Timebutler, as we would have liked, is therefore not allowed and not possible.

The eAttest query interface may also only be called a maximum of 4 times per hour. Companies therefore cannot retrieve the eAttest immediately and may have to observe a waiting time of up to 15 minutes.

Note: The electronic certificate of incapacity for work (eAU/eAttest) is a German-specific procedure under German social insurance law and applies only to companies operating in Germany. Comparable electronic sick-note systems exist in some other countries, but the legal classification, retrieval procedure, and certification requirements described here are specific to the German system.

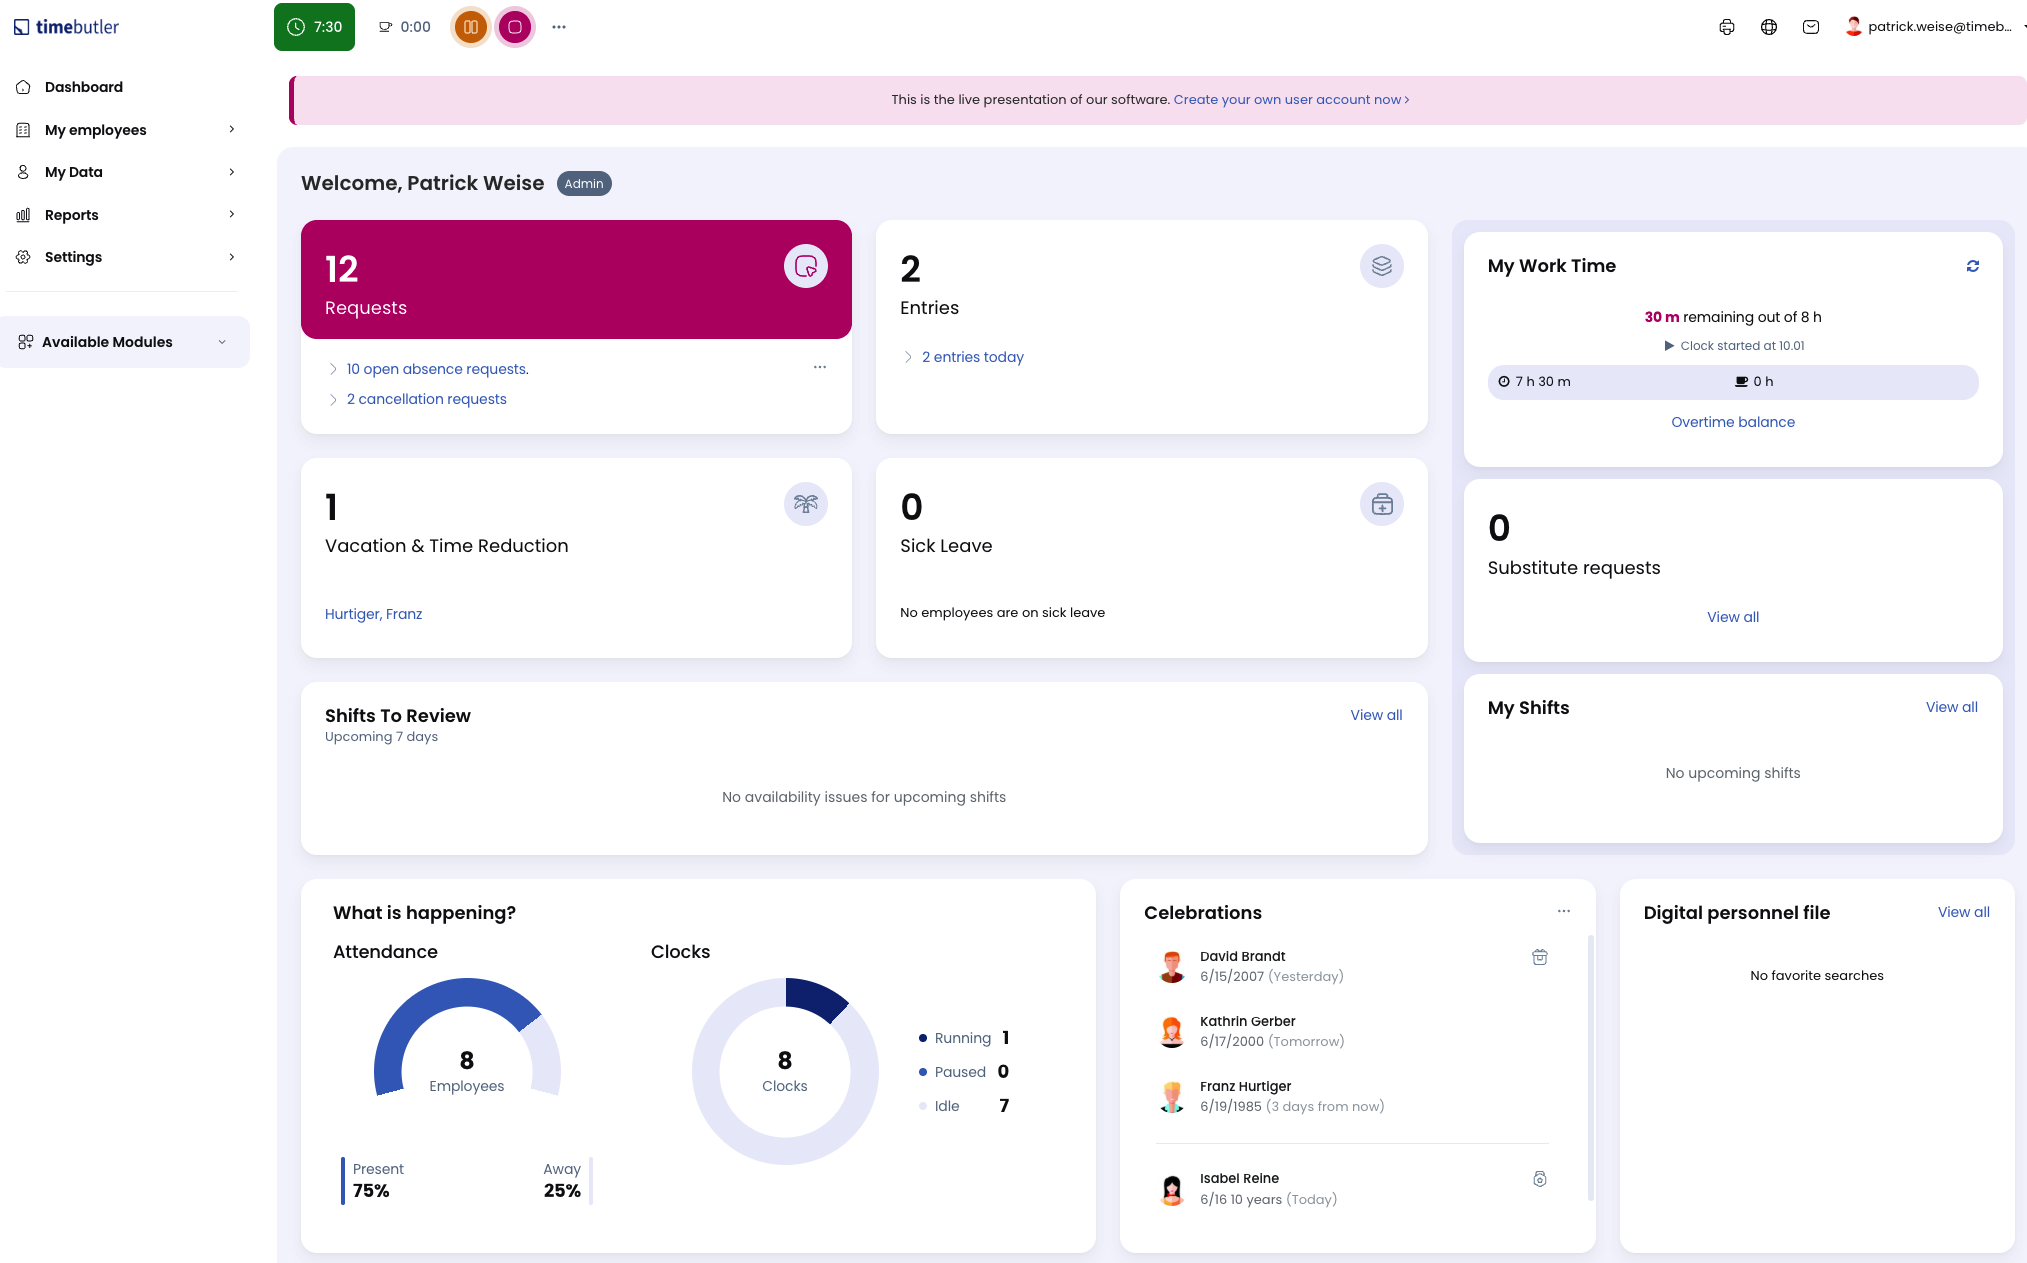
FAQ: Additional information for the eAU

You can retrieve the electronic certificate of incapacity for work (eAU, also called eAttest) via your payroll program, for example. Keep two things in mind when retrieving it:

  1. As an employer, you are legally required to retrieve the eAttest only if an employee has informed you that the doctor’s office has issued an eAU.

  2. Several days may pass between your retrieval of the eAU from the health insurer and the eAU actually arriving at the employer.

For this reason, it makes sense to let employees indicate on sickness entries whether the doctor’s office has issued an eAttest. HR should be able to record whether the eAttest has already been requested. And finally, you should record that the employer has received the eAttest.

The information about whether the eAttest has been received by the employer is already stored automatically for all sickness entries. Read here how to change the certificate status for a sickness entry.

You can add the other two pieces of information using the extra fields feature in Timebutler. You can define any extra fields for each absence type. For the Sickness absence type, create one or more extra fields, for example:

  • “eAttest issued by the doctor’s office”, Type: yes/no selection, entered by the employee
  • “eAttest requested from the health insurer”, Type: yes/no selection, entered by the admin/HR

Read here how to set up extra fields.

Read here how to retrieve the electronic certificate of incapacity for work.

Note
The electronic certificate of incapacity for work (eAU / eAttest) is specific to Germany and is part of the German statutory health insurance system (gesetzliche Krankenkassen). The general approach described above — letting employees flag that a certificate has been issued, tracking the request status, and recording when the certificate is received — can be adapted to similar sick-leave certification processes in other countries by using the extra fields feature accordingly.

Time tracking

FAQ: Project favorites

An admin can configure any number of projects for time tracking in Timebutler. Employees can then book working time to those projects, both via the entry form and when recording time via the virtual time clock or the time tracking terminal.

Timebutler intentionally does not restrict projects to specific employees or departments or assign them to anyone. Instead, each employee selects their own project favorites. When an employee books a time entry to a project, Timebutler offers to save it as a favorite. For future time entries, project favorites appear at the top of the selection.

For example, an employee sees 4 project favorites offered prominently, with the remaining projects listed separately below. This gives each employee a quick, clear way to select their most-used projects.

Project favorites also bring additional benefits: HR or resource planning no longer needs to handle the time-consuming and error-prone task of assigning projects to dozens or hundreds of employees. And if an employee occasionally needs to book time to a project they do not use regularly, they can do so without delay.

You only need to configure the projects.

Employees can view and edit their project favorites at any time by signing in to their user account and clicking Settings > Project favorites in the bottom left.

Screenshot: Set up project favorites

FAQ: Default Project and Category

If an admin has set up projects or categories for time tracking, you can assign time entries to those projects or categories.

You can set personal project favorites and also select a default project or default category. When a default is set, Timebutler automatically preselects the chosen project or category when you create a new time entry or record time via the virtual time clock.

This speeds up time recording when you frequently work on the same project or category.

Set the default project and default category

Log in to your Timebutler user account, click Settings in the bottom left, then click Project favorites below it.

Screenshot: Set default project and default category

FAQ: Enable time tracking for employees or departments

You can enable time tracking for all employees in the company, only for specific departments, or for individual employees only.

Read here how to enable time tracking for employees or departments.

FAQ: Partial-day sickness

In the special case where an employee goes home sick after working a few hours, the working time must be adjusted. Sick leave entries can only be recorded as half or full days, and Timebutler reduces the planned working time accordingly. It is therefore not possible to subtract, for example, 5.5 h of sick leave from the planned working time directly.

The following examples assume a planned working time of 8 hours. Proceed as follows depending on how many hours the employee worked:

1. Worked less than half a day, sick for the rest (in this example: 1 minute to 3 hours 59 minutes)

Enter a time entry for the hours worked, for example 3.5 h.

Also enter half a day of sick leave (not a full day). Timebutler converts the half day into a 4 h reduction of planned working time. This gives: 8 h planned working time minus 3.5 h worked minus 4 h sick leave = 0.5 h deducted from the working time account. To correct this 0.5 h discrepancy, you have two options:

Enter a time entry of 0.5 h and add a comment such as “Sick leave”.

Alternatively, create a Sick leave correction category (log in to Timebutler as an admin, click Settings > More… in the bottom left, then Time tracking on the right, then the Categories tab) and book the time entry to the Sick leave correction category.

In both cases, you can evaluate at the end of the month how much recorded time was a sick leave correction rather than actual working time.

2. Worked exactly half a day, sick for the rest (4 hours in this example)

Enter a time entry for the hours worked, i.e. 4 h. Also enter half a day of sick leave. Timebutler converts the half day into a 4 h reduction of planned working time.

This correctly balances the working time account: 8 h planned, 4 h worked, and 4 h deducted for sick leave.

3. Worked more than half a day, sick for the rest (in this example: 4 hours 1 minute to 7 hours 59 minutes)

Enter a time entry for the hours worked, for example 6.5 h.

Do not enter any sick leave for that day.

This gives: 8 h planned working time minus 6.5 h worked = 1.5 h deducted from the working time account. To correct this 1.5 h discrepancy, proceed as described in section 1 above: enter a time entry of 1.5 h with the comment “Sick leave”, or book it to the Sick leave correction category.


These boundaries are not rigid. If an employee goes home after 3 h 50 m, for example, you would typically enter half a day of sick leave and 4 h of working time for simplicity.

FAQ: Time Clock Stop at Midnight - Night Shifts

Time entries always belong to a specific calendar day and cannot span past midnight. When entering a time entry, selecting two dates is not possible. Even if you start the virtual time clock and later forget to stop it, Timebutler automatically stops it at midnight.

This day-based separation is required for the working time account and all other reports to be accurate per day, and therefore per week and per month.

If your employees work night shifts, you can work around this as follows:

When entering time entries

The employee should enter two separate time entries for any working time that runs past midnight. For example, for a shift from 22:00 to 06:00 the following day, the employee enters one time entry from 22:00 to 00:00 and another from 00:00 to 06:00.

When recording via the virtual time clock

An admin can configure Timebutler for night shift work. Timebutler will still stop the virtual time clock at midnight, but will automatically restart it in the same second.

To configure this, log in to Timebutler as an admin, click Settings > More… in the bottom left, then click Time tracking on the right. Set the Stop time clock at midnight option and save the change by clicking Save at the bottom of the page.

FAQ: Time tracking terminal PIN only with email address

Only the user themselves can view and change their PIN for the time tracking terminal in their own Timebutler user account. No one can view or change another user’s PIN — not even managers or admins.

The reason is that authentication would be compromised if a user could view someone else’s PIN. Timebutler logs the edit history for time entries, among other things. If another person could use someone’s PIN, the log would show that the authenticated employee started the virtual time clock — but it could no longer be guaranteed that the logged user was actually the one who performed the action. The edit history would no longer be reliable and the integrity of the audit trail would be at risk.

Employees without an email address cannot log in to their Timebutler user account and therefore cannot view their PIN. As a result, these employees cannot use the time tracking terminal.

Add an email address

To allow these employees to use the time tracking terminal, enter an email address for them. Your IT department may be able to create a work email address for them.

Alternative: add a private email address

Alternatively, after discussing it with the employees concerned, you can enter their private email address. Email addresses are not shared with third parties and are used exclusively in connection with Timebutler — for example, to send login credentials or notifications about approved vacation requests.

You can also protect employees’ private email addresses by enabling the option that prevents employee users from seeing other employees’ email addresses. Especially when asking for a private email address, many employees prefer that it not be visible to colleagues. This option is available in Global settings: Hide other people's email addresses for employees.

FAQ: Holiday and weekend premiums

Premiums for working hours (holidays, weekends, night shifts) cannot be configured in Timebutler yet.

There are two ways to record them:

1. Have employees record additional hours

If you grant a 50% weekend premium, employees can book 50% more time than actually worked. If an employee works 4 h on a Sunday, they enter 6 h instead of 4 h. In the comment, they can note that the recorded time includes a 50% premium.

2. Use categories for premiums

You can define any number of categories for time tracking that employees can book time to. For example, create a category Weekend premium and a category Holiday premium. Employees then record their actual working hours as usual and, for weekend or holiday work, book the time to one of the two categories.

At the end of the month, you can review the entries and calculate the corresponding premium for all entries in the Holiday premium or Weekend premium category. The easiest way to do this is to export the data to Excel — nearly all views in Timebutler include a Download button to download the list view as an Excel file.

To create categories, log in to Timebutler as an admin, click Settings > More… in the bottom left, then click Time tracking on the right. Click the Categories tab.

FAQ: Shift planning and duty roster

Timebutler does not offer a full-featured shift planning function or duty scheduling for workforce planning. Some companies do, however, use Timebutler as a shift or duty planner:

You can create any absence types you like. For example, create Early shift and Late shift and then enter the shifts in employees’ calendars.

To create the absence types, log in to Timebutler as an admin, click Settings > More… in the bottom left, then click Absence types on the right. Click Create new absence type and create the absence type, for example Early shift. You can also define who may enter these absences — all employees, or only admins or managers — using the New entries option.

You can also enter the absences (i.e. shift entries) directly in the calendar view. Click Employees > Absences > Calendar view in the top left. In the row of the desired employee, click the cell for the start of the new absence, then the cell for the end. A small pop-up window appears. Click Other absence to open the entry form for the shift entry.

You can also create multiple shift entries using recurring entries. For example, if you want to enter a late shift for an employee every Monday and Thursday in a month — 8 entries in total — you can use the recurrence function to create all 8 entries with just a few clicks instead of entering them individually. Read here how to create recurring entries.

FAQ: Monthly target working time and mini-jobbers

Timebutler does not currently support monthly or weekly working hours — only a daily planned working time per weekday (Monday to Sunday). The following workaround uses an employee in marginal employment with a fixed monthly number of hours as an example.

Log in to Timebutler as an admin and click Settings > Working days in the bottom left. In the row for the affected employee, click the blue Edit button.

Enable the working days on which the employee will (potentially) work, for example Monday to Friday. A planned working time must be entered for each enabled day. Because weekly or monthly working hours cannot be entered, you cannot enter the correct value here — but 0 h is not possible either, as the day would then not count as a working day. Instead, enter 1 m (1 minute).

On the same page, set the Number of hours not to transfer to the next month option to Do not transfer any overtime hours or negative overtime to the next month (the overtime balance will always be 0 h). Save the change.

That’s it.

In the working time account, the employee will technically accumulate overtime during the month, since their planned working time is only 1 minute per day. Timebutler resets the overtime balance to 0 at the end of each month, so this number can be ignored.

What matters instead is the number of hours the employee actually worked in that month. To find this, go to Employees > Time tracking > Working time accounts in the top left. Click Working time in period, then Month / Year, and select the desired month. The second-to-last column, Hours worked, shows the total hours the employee worked in that month.

Hourly wage earners If your company employs hourly wage earners for whom hours worked, vacation, sick leave, and public holidays are all paid, read here how to determine working time details for hourly employees.

Note: Marginal employment (mini-job) is a German-specific employment classification defined under German social security law. The configuration described here is intended for this employment type. Similar part-time or low-hour employment arrangements exist in other countries, but the legal framework and payroll requirements differ. Check the applicable regulations before applying this setup outside of Germany.

FAQ: Absences reduce target working time

Vacation and sick leave are automatically deducted in the working time account. For all other absence types, you have two options:

1. Not deducted in the working time account

By default, absence types other than vacation and sick leave have no effect on the working time account. The absence is recorded, but Timebutler does not treat it as worked time.

This means employees must still enter a time entry for any day they work — even if they have also entered an absence such as training, vocational school, or home office.

Example: An employee has 8 h of planned working time on Monday and enters a training absence for that day. Because training does not reduce planned working time under this option, Timebutler still expects 8 h of actual working time. If the employee enters no time entry for that day, the working time account shows 8 h planned and 0 h actual — a deficit of 8 h.

To avoid this, the employee must enter both the training absence and a time entry for the hours worked.

2. Define absence types that reduce planned working time

As an admin, you can configure each absence type individually to reduce planned working time.

If you activate this for training, the calculation works as follows: an employee has 8 h of planned working time on Monday and has entered a full day of training. Timebutler automatically reduces the planned working time for that day. Even without a time entry, the employee has a balance of 0 h on that day. Entering the training absence is sufficient — no additional time entry is required.

With option 1, the rule is simple: employees must always record all working time performed, regardless of whether it was in the office, in training, at vocational school, or elsewhere. Entering only a training absence without a time entry is not sufficient. The advantage is that working time can be recorded to the minute for each day.

With option 2, employees only need to enter the absence (e.g., training) — no time entry is required. The trade-off is that working time cannot be specified to the minute: Timebutler deducts the daily planned working time regardless of the hours actually worked.

To check or change which absence types reduce planned working time, log in to Timebutler as an admin, click Settings > More… in the bottom left, then click Absence types on the right. The Reduces planned working time column shows which absence types have this option active. To change the setting, click the green Edit button (pencil icon) on the left in the row of the relevant absence type. Check Reduces planned working time and click Save.

Screenshot: “Absence reduces planned working time” setting

FAQ: Activate the time tracking terminal

Once you activate the time tracking terminal on a tablet, it stays activated on that tablet permanently and does not need to be activated again.

Learn how to activate the time tracking terminal.

FAQ: Geofencing, limit the time clock to an IP address

When you enable the virtual time clock for time tracking, employees can record their working time via the virtual time clock in their user account in Timebutler. Because Timebutler also runs on smartphones, employees could start the virtual time clock from home or on the way to work.

This creates a desire to restrict clocking in to certain locations or IP addresses — known as geofencing.

Restrict access to IP addresses

An admin can restrict access to specific IP addresses. This can help ensure that employees can only use the virtual time clock when they are on the corporate network.

Note that this completely blocks access to Timebutler from outside the corporate network. Employees would then be unable to, for example, request vacation from home or check colleagues’ absence status for the following day.

There are further ways to restrict access specifically to the virtual time clock:

Geofencing via location data

Geofencing based on employees’ location data is technically and legally problematic: for data protection reasons, employers may not monitor or collect employees’ location data without further justification.

There are also several technical drawbacks. Some employees may not have a smartphone or a device with GPS, or may have disabled or blocked GPS. GPS location is also easy to manipulate — employees can download free fake GPS apps from Google Play or the Apple App Store to set any location they choose.

Timebutler intentionally does not offer geofencing via location data, to protect companies from legal consequences and because it does not provide reliable security. The following alternatives are available instead:

Alternatives

Spot checks When you sign in to Timebutler as an admin, the top of the home page shows virtual time clock information — which time clocks are running, idle, or paused. Click it to open the time clock status view, where you can see each employee’s start time for the currently running time clock. Running spot checks here to identify employees who have already started the clock but are not yet in the office lets you address those individuals directly. Often a single conversation is enough to resolve the issue permanently.

Time tracking terminal You can enable the Timebutler time tracking terminal on a tablet and place the tablet at the office entrance, then configure it so that the virtual time clock can only be started (or stopped) at the time tracking terminal. This ensures employees are in the office when they start recording time.

For field staff or employees working from home, you can still allow clocking via the virtual time clock in their user account.

Read here how to allow only the time tracking terminal for specific employees.

Restriction to IP addresses An admin can restrict access to specific IP addresses. Note that this restricts all Timebutler functions to that IP range, not just the virtual time clock.

FAQ: Paid-Out Overtime (Time Tracking)

Learn how to enter paid-out overtime.

FAQ: Switching from the overtime feature to time tracking

Timebutler offers full-featured time tracking, including a virtual time clock, extensive settings, viewing and editing permissions, booking time to projects and categories, working time accounts, statutory and custom break rules, reporting with Excel download, and more. All employees can record their time via the virtual time clock or enter it directly. You can also use the time tracking terminal: open the Timebutler time tracking terminal view on a standard tablet and place it at the office or company entrance. Employees can then clock in and out and record their breaks on the tablet with just a few clicks.

If you currently use the overtime feature and activate the time tracking feature, Timebutler automatically deactivates the overtime feature. With the overtime feature, employees enter their overtime and undertime manually. With the time tracking feature, Timebutler calculates overtime and undertime based on planned working time and the entered or recorded working times.

Proceed as follows:

1. Test time tracking

Go to www.timebutler.com, sign out if you are signed in automatically, and click Live Demo in the top right. Sign in as a fictitious admin user and try out time tracking. On the left, click Employees > Time tracking > Enter working time or Employees > Time tracking > Working time accounts. Click the 00:00 button at the top to try the virtual time clock. Or click Settings > More… in the bottom left, then Time tracking on the right, to explore the available settings.

2. Prepare settings for time tracking

You can configure time tracking settings before the date on which time tracking is set to start. This lets you prepare everything in advance — for example, configure the time tracking settings or define the planned working time for employees.

Activating the time tracking feature automatically deactivates the overtime feature. However, you need to activate the time tracking feature in order to configure its settings. Proceed as follows:

Inform all employees that the overtime feature will be temporarily switched off during a specific time window — for example, on a Friday between 3:00 PM and 5:00 PM.

On that Friday at 3:00 PM, activate time tracking — Timebutler automatically deactivates the overtime feature. Enable time tracking only for a small group of users, for example only for HR staff or a specific admin (read here how to restrict time tracking to specific users). Time tracking will then be active, but only for those users. All other employees will not see time tracking.

You can now configure all time tracking settings at your own pace. Afterwards, you can reactivate the overtime feature.

3. Switch to time tracking

Once you have decided to use time tracking, set a cutover date on which to activate it. The first day of a month works well. On the cutover date, sign in to Timebutler as an admin and click Employees > Overtime accounts in the top left. Download the view as an Excel file — you will need the values in the Balance column later.

Click Settings > More… in the bottom left, then Time tracking on the right. Activate time tracking, set the cutover date under Start of time tracking, and configure the remaining settings. Then click Settings > Working time balance in the bottom left and enter the values from the Balance column of the overtime accounts into the Working time balance at the start of time tracking column.

From this point on, employees can enter working time in Timebutler or record it via the virtual time clock or the time tracking terminal, and you can use all time tracking features.

FAQ: Only the overtime feature or the time tracking feature

Timebutler includes the time tracking feature and the overtime feature. Both features cannot be enabled at the same time.

Read here why the time tracking feature and the overtime feature cannot be enabled simultaneously.

FAQ: Bulk import of time entries

When switching to Timebutler, you may want to import previously recorded time entries into Timebutler.

Timebutler intentionally does not offer a bulk import for time entries, because importing old time entries is not necessary. Here is why:

When you enable time tracking in Timebutler, you set the date from which time tracking starts. You can also set an initial overtime balance for each employee as of that date. Employees then start on the configured date with their entered starting balance. Time entries recorded before that start date are not relevant in Timebutler and do not need to be entered or imported.

Read here how to set the start date for time tracking and the initial overtime balance for employees.

FAQ: Overtime time off, no deduction in the working time account

When the time tracking feature is enabled and an employee records overtime time off, Timebutler does not deduct those hours directly from the working time account.

Read here why the working time account shows no deduction when taking overtime time off.

FAQ: Carry over remaining leave and overtime

Timebutler intentionally does not transfer the overtime balance and remaining vacation fully automatically from one year to the next — among other reasons, to allow companies to continue editing these values. You can, however, carry over the overtime balance and remaining vacation with just a few clicks.

Read here how to carry over remaining vacation and overtime to the next year.

FAQ: Short-time work

You can record short-time work in Timebutler and configure the working time account to be reduced automatically. Proceed as follows depending on your short-time work model:

Short-time work model 1: Employees on 50% or 100% short-time work (no fractions)

Create absence type “Short-time work”

Log in to Timebutler as an admin, click Settings > More… in the bottom left, then click Absence types on the right. Create a new absence type Short-time work (or Released due to short-time work). Enable the Reduces planned working time option. Set whether all employees may enter this absence type or only admins (and, if applicable, managers), then save the change.

Enter short-time work

You can now enter short-time work for individual employees the same way you would enter any other absence such as sick leave, training, or home office — either by clicking directly in the calendar or via Employees > Absences > Enter absence in the top left.

You can also create recurring entries, as with other absences — for example: “Every Monday and Friday from 1 April to 1 July.” In the absence entry form, enable the Create recurring entry option.

You can also create bulk entries for multiple employees at once. Click Employees > Absences > Enter absence in the top left, then click the Bulk entry link next to the employee selection box.

Short-time work and working time account

For days on which short-time work is entered, Timebutler reduces the planned working time to 0 h, since employees are not required to work on those days. For half-day short-time work entries, the planned working time is halved. This ensures the working time account is calculated correctly.

Short-time work model 2: Flexible or varying working hours, or percentages other than 50% or 100%

Option 1: Reduce planned working time

You can configure a reduced planned working time for a specific period — for example, 20% less than usual.

Employees continue to record their working time as normal and will naturally enter approximately 20% fewer hours, since they know they are working less. Short-time work is not recorded separately in Timebutler; it simply appears as though the employee works 20% less.

You only need to inform payroll once which employees are on 20% short-time work — payroll can then calculate automatically how many short-time work hours accrued in the month.

To configure this, log in to Timebutler as an admin and click Settings > Working days in the bottom left. Click the blue Edit button for the relevant employee, then click Add new period. You can now set different planned working times and weekly working days for the period before the short-time work phase and from the start of the short-time work phase.

Once the short-time work phase ends, add another period for the time after and increase the planned working time again.

Option 2: Leave planned working time unchanged, employees record short-time work separately

Alternatively, leave the planned working time unchanged and have each employee record their short-time work as a separate time entry.

For example, if an employee normally works Mon–Fri 8 h and from the following month works Mon–Fri 6 h with 2 h of short-time work, the employee records their actual working time as usual (approximately 6 h per day) and additionally records a separate time entry of 2 h each day, booked to the Short-time work category. At the end of the month, you can then evaluate how many hours of short-time work and how many hours of actual work each employee performed.

To do this, create the Short-time work category first. Log in to Timebutler as an admin, click Settings > More… in the bottom left, then click Time tracking on the right, then the Categories tab.

Note: Timebutler cannot and does not provide legal or tax advice. The information in this article is provided without warranty.

Note: Short-time work (Kurzarbeit) as described here refers to the German government-subsidized reduced working hours program. Similar schemes exist in other countries — such as partial unemployment (chômage partiel) in France, Cassa Integrazione in Italy, and furlough arrangements in the UK — but the legal frameworks, eligibility criteria, and administrative requirements differ by country. Check the applicable regulations before applying this configuration outside of Germany.

FAQ: Hours for hourly employees

For hourly employees — that is, employees who are not on a monthly salary but are paid by the hour — you need additional information about the hours worked.

Read here how to display working time details for hourly employees.

FAQ: Vocational school and working time

In Timebutler, you can create any absence types and have employees record them — including vocational school.

If time tracking is enabled, there are two options for how vocational school affects the working time account. Depending on how your company handles working time on vocational school days, configure the Vocational school absence type as follows:

Option 1: Vocational school days count as full working days

In most companies, vocational school students are not required to come to the workplace on days with vocational school. Alternatively, the rule may be that the daily planned working time is considered fulfilled on vocational school days, regardless of whether the student actually worked the full planned hours.

If all vocational school days should be treated as though the planned working time has been met — regardless of whether the student worked their full planned hours (e.g., 8 h) — enable the Reduces planned working time option for the Vocational school absence type.

When this option is enabled, the student only needs to enter a vocational school absence entry on vocational school days. No working time needs to be recorded for those days: the days are already considered fully completed.

On days without vocational school, working time must still be recorded as usual.

Advantage: On vocational school days, the student only needs to enter a vocational school entry — no working time entry is required.

Disadvantage: This option is not suitable if working time should also be recorded on vocational school days and overtime or deficit hours need to be tracked.

Option 2: Record and evaluate working time on vocational school days

If your company requires that the student comes to the workplace after class on vocational school days and working time should be recorded, disable the Reduces planned working time option for the Vocational school absence type.

When this option is disabled, vocational school has no effect on the working time account. The student must record their full working time on vocational school days, including the time spent at vocational school. If no working time is recorded, Timebutler calculates 0 h of actual working time, resulting in deficit hours equal to the planned working time — for example, −8 h for a day with 8 h planned.

Advantage: Working time is credited to the minute in the working time account, even on vocational school days.

Disadvantage: On vocational school days, the student must enter both a vocational school absence entry and a working time entry.

Option 1 and Option 2

In some cases, vocational school needs to be handled differently depending on the day of the week. For example, on Tuesdays with vocational school the student does not need to come to the workplace, but on Thursdays they must come in after class and record their working time.

This would call for Option 1 on Tuesdays and Option 2 on Thursdays. However, only one option can be active at a time. In this scenario, Option 2 must be activated, and the student must record working time on both Thursdays and Tuesdays.

Enter multiple vocational school entries via recurring entry Instead of entering vocational school entries individually, you can create many entries at once using a recurring entry.

Screenshot: “Absence reduces planned working time” setting

Note: Vocational school (Berufsschule) as described here refers to the German dual vocational training system. The configuration options above apply to any absence type where working time treatment needs to be defined. Companies outside Germany with similar apprenticeship or part-time education arrangements can apply the same logic, but the specific legal and contractual requirements differ by country.
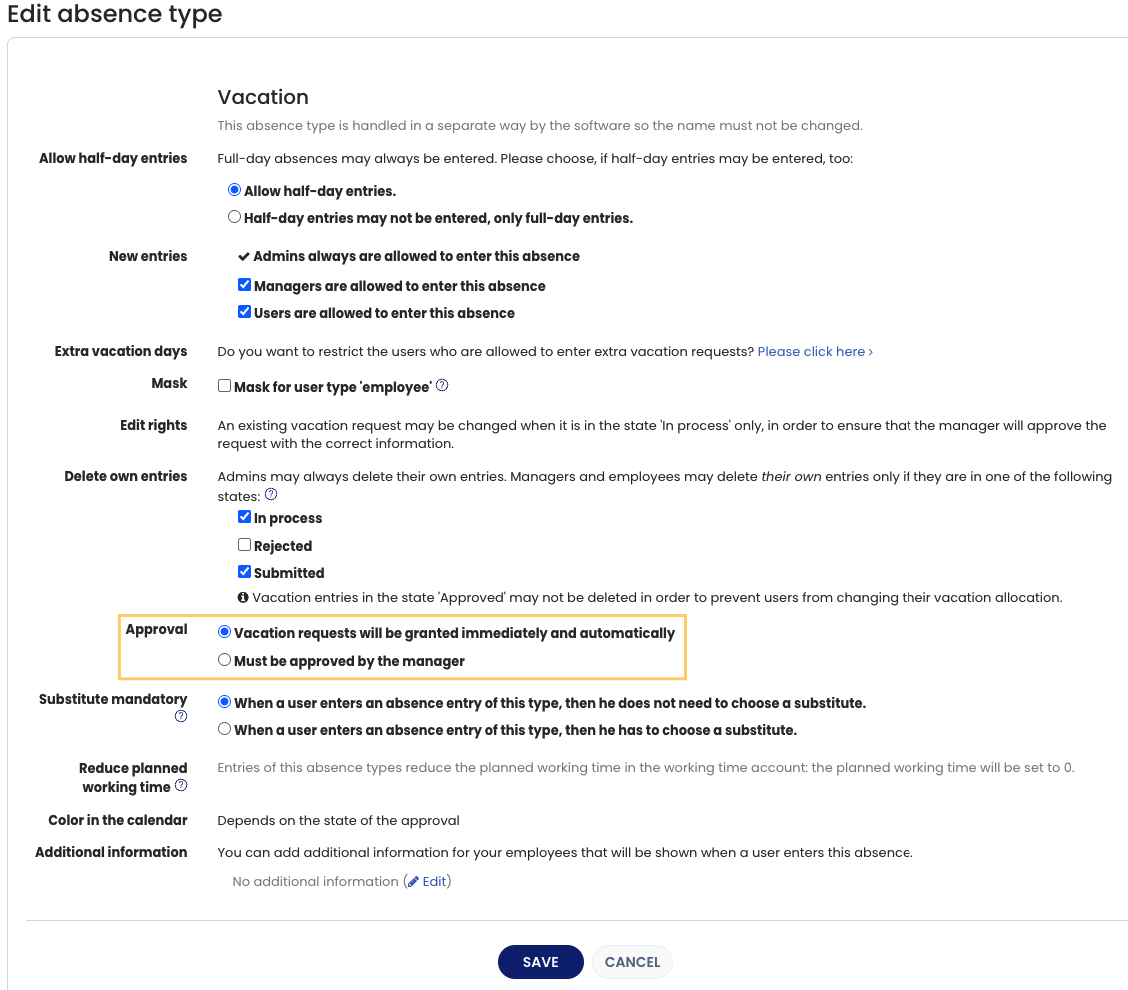
FAQ: Enter vocational school - recurring entry

For vocational school students, the days of vocational school are usually known at the start of the year. Instead of creating numerous individual entries manually, you can use recurring entries to generate multiple absence entries at once. The feature also allows you to exclude school holidays.

For example, you can create vocational school entries for every Tuesday and Thursday from January to June, while automatically accounting for school holidays in a specific federal state.

Detailed instructions for creating a recurring entry can be found in the documentation on absence entries — recurring entries.

Screenshot: Enter vocational school as a recurring entry

Note: Vocational school (Berufsschule) as described here refers to the German dual vocational training system. The school holiday exclusion feature references school holiday calendars by German federal state (Bundesland). Equivalent workflows may apply in other countries with similar vocational training systems.
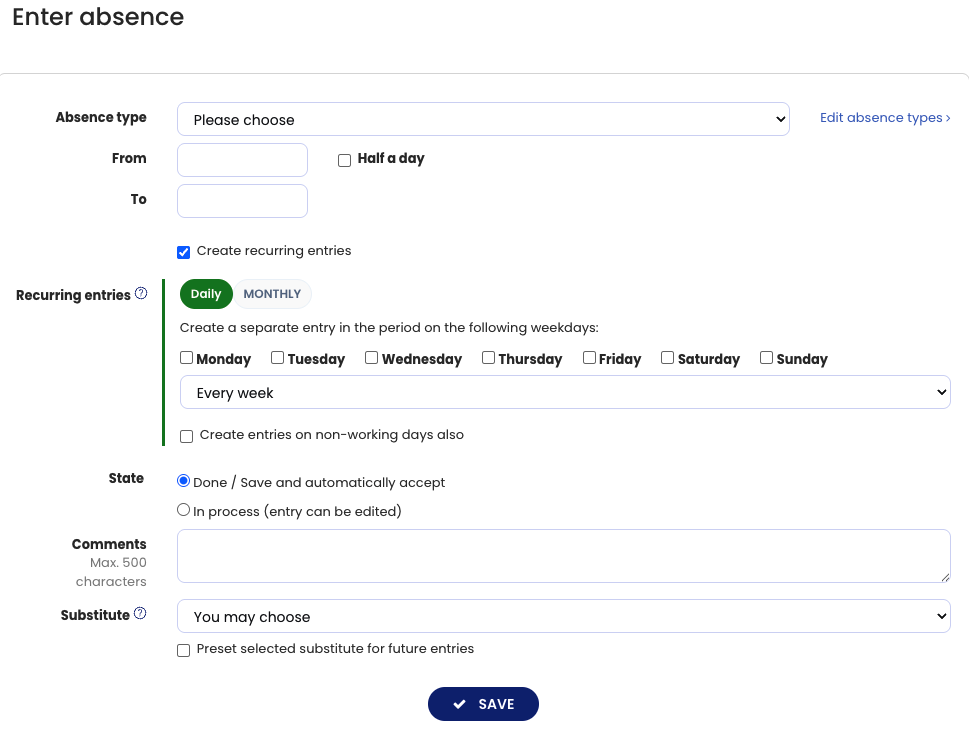
FAQ: Break rules for night shifts

When an employee records their working time with the virtual time clock and does not stop it at the end of their shift, it is automatically stopped at midnight. For night shifts, you can adjust the Stop time clock at midnight option in the time tracking settings.

Break rules are not applied

Break rules are only applied to calendar days. They do not work for shifts that extend past midnight, because break rules cannot be unambiguously assigned to working time spanning multiple calendar days.

Warning: For night shifts, break rules cannot be applied automatically, and no breaks are added automatically. Employees working night shifts should always clock their own breaks.

Overtime

FAQ: Either time tracking or the overtime feature

Timebutler offers a time tracking feature and an overtime feature. You cannot activate both features at the same time.

Read here why you cannot activate the time tracking feature and the overtime feature at the same time.

Sign in and sign out

FAQ: Problems logging in

Problems signing in

If you get an error message when signing in to your Timebutler account with your username and password, the following reasons could be the cause.

Correct password, wrong username

People often enter the correct password but the wrong username. Make sure you enter both the correct email address and your current password when signing in.

Wrong email address

Do you have multiple email addresses? You may have entered the wrong email address in the username field. Enter the email address associated with your Timebutler account.

Show password

When you enter your password on the sign-in page, your input is hidden and replaced with asterisks. To check for typos, click the eye icon directly above the password field — this will show the password as you type it.

Forgot password

You entered your username and password correctly but still see an error saying the sign-in details are incorrect? Or you have forgotten your password? Read here how to reset your password.

Password reset email doesn’t arrive

Timebutler sends the password reset email to the address you specified. Please wait a few minutes for it to arrive and also check your spam and promotions folders. If the email still does not arrive, please contact our support.

Problems signing in with Two-Factor Authentication (2FA)

If you have enabled Two-Factor Authentication (2FA), after signing in with your username and password you will also be asked for the 2FA access code. Read here how to resolve sign-in issues with 2FA.

FAQ: Forgot your password

If you have forgotten your password and can no longer sign in to Timebutler, follow these steps:

  1. Go to www.timebutler.de and click Login in the top right.

  2. Below the password field, click the Forgot password link.

  3. You will be taken to the page where you can request a password reset email. Enter the email address you use to sign in to Timebutler in the Email field and click Submit.

  4. Timebutler will send an email to the address you entered. Please wait a few minutes and also check your spam and promotions folders. If the email still does not arrive, find out how to resolve sign-in issues.

  5. Open the email and click the Change password button.

  6. You will be taken to a page where you can enter your new password.

  7. Your password has now been changed. You can sign in to Timebutler with your username (= email address) and the new password.

Problems signing in with Two-Factor Authentication (2FA)

If you have enabled Two-Factor Authentication (2FA), Timebutler will also ask you for the 2FA access code after you sign in with your username and password. Read here how to resolve sign-in issues with 2FA.

FAQ: Change password

Change password

If you want to change your password, sign in to your Timebutler user account and click Settings on the left, then Security beneath it. Now click the Change password button.

Forgot your password?

If you have forgotten your password and can no longer sign in to your user account, learn how to proceed if you have forgotten your password.

FAQ: Two-Factor Authentication (2FA)

Two-Factor Authentication (2FA)

With Two-Factor Authentication (2FA), you can increase the security of your user account. When 2FA is enabled, after signing in with your username and password you will also be asked for a personal 2FA access code to complete the sign-in. This means that even if an attacker obtains your password, they cannot access your user account.

You can enable Two-Factor Authentication (2FA) in the following ways.

Set up 2FA in Timebutler

You can enable Two-Factor Authentication (2FA) in Timebutler.

2FA via third-party providers

Every user can link their Timebutler account with a Google, Microsoft, or Slack account. This enables automatic sign-in to your Timebutler user account without entering a username and password. All three providers support Two-Factor Authentication, which lets you sign in to Timebutler with an additional layer of security.

Learn how to enable automatic sign-in via a Google, Microsoft, or Slack account.

FAQ: Enable Two-Factor Authentication (2FA)

Enable Two-Factor Authentication (2FA)

To enable Two-Factor Authentication (2FA), sign in to your Timebutler user account and click Settings in the bottom left, then Security beneath it. Now click the Set up 2FA button.

Prerequisite: Authenticator app on your smartphone

When you enable 2FA, you will need to enter a 2FA verification code in addition to your username and password each time you sign in. The 2FA verification code is personal, remains valid for 30 seconds, and is then regenerated. To view the code, you need to install an authenticator app (also called a 2FA app) on your smartphone. You can use any authenticator app from any provider — Timebutler’s 2FA follows the industry standard and supports all common authenticator apps.

If you have not yet installed an authenticator app on your smartphone, you will receive suggestions for suitable apps during the 2FA setup process.

Important: Once you have enabled 2FA in Timebutler and paired it with the authenticator app on your smartphone, you can only sign in to your Timebutler user account if you have access to that authenticator app. Make sure you do not lose access to it.

FAQ: Disable Two-Factor Authentication (2FA)

Disable Two-Factor Authentication (2FA)

To disable Two-Factor Authentication (2FA), sign in to your Timebutler user account and click Settings in the bottom left, then Security beneath it. Now click the Disable 2FA button (this button only appears if 2FA has previously been enabled).

For security purposes, you will be asked to enter the 2FA access code from the authenticator app you used to set up 2FA.

No access to the authenticator app?

If you no longer have access to the authenticator app, you cannot disable 2FA using the method described above. Instead, proceed as follows:

The next time you sign in to your Timebutler user account, you will be prompted for the 2FA access code. On that page, there is a button to send a request to disable 2FA. Click this button so that one of your admins or your manager can disable 2FA on your behalf.

FAQ: Enable 2FA for all employees

FAQ: Enable 2FA for all employees

Every user can enable Two-Factor Authentication (2FA) in their own user account.

Admins and managers cannot enable 2FA on behalf of other users: to enable 2FA, the employee must set up an authenticator app on their own smartphone, which only they can do themselves. Likewise, it is not possible to require employees to enable 2FA after their next login, as some employees do not have a smartphone, cannot enable 2FA, and would therefore be permanently locked out.

Instead, as an admin you can view the list of users who do not have 2FA enabled and send them an email asking them to enable it.

Send a request to enable 2FA

Sign in to Timebutler as an admin and click Settings in the bottom left, then Security beneath it. Under the Users without 2FA heading, you can display all employees who do not have 2FA enabled. Below that, there is a button to send the request to enable 2FA to these users.

FAQ: Problems signing in with 2FA

Problems signing in with 2FA

If you have enabled Two-Factor Authentication (2FA), when signing in to your Timebutler user account you will be asked for the 2FA access code after entering your username and password. The 2FA access code is personal, remains valid for 30 seconds, and is then regenerated.

You can read the 2FA access code from the authenticator app you set up on your smartphone when you enabled 2FA in Timebutler.

2FA access code not accepted

If you correctly read the 2FA access code from the authenticator app and entered it in Timebutler, but still receive a message saying the code is incorrect, the following may be the cause:

  1. You accidentally entered the code incorrectly. Please try entering it again.

  2. For security reasons, each 2FA access code can only be used once and then becomes invalid. Did you recently use the code for a sign-in, or to enable or disable 2FA? Wait 30 seconds until the authenticator app displays a new code, then use the new code to sign in.

  3. If you have set up multiple 2FA codes in your authenticator app, you may have entered the code for a different application or a different Timebutler user account. Make sure you are using the 2FA access code for the correct application and the correct user account.

  4. Check whether the date and time on your smartphone are set correctly, and correct them if necessary. Then wait 30 seconds and sign in again using the newly generated code.

No access to the authenticator app

If you no longer have access to your smartphone or the authenticator app, you cannot enter the 2FA access code and will therefore be unable to sign in to your Timebutler user account. To regain access, have 2FA disabled by following these steps:

Go to the Timebutler sign-in page and sign in with your username and password. In the second step, you will be asked for the 2FA access code. On this page there is a Disable Two-Factor Authentication link. Click the link. Timebutler will then send an email to your manager asking whether your 2FA should be disabled.

Your manager opens the email and clicks the button to confirm that 2FA should be disabled. You will then receive a confirmation email informing you that 2FA has been disabled.

You can now sign in to your Timebutler user account using only your username and password, without being asked for the 2FA access code.

Let your manager know: Inform your manager that they will receive an email from Timebutler and should confirm the deactivation of 2FA. This ensures they do not mistake the request for an unwanted email or accidentally decline the deactivation.

FAQ: Single Sign-On (SSO) with Microsoft, Google, Slack, OAuth and Azure

Single Sign-On (SSO) with Microsoft, Google, Slack, OAuth and Azure

Every user can link their Timebutler account to a Google, Microsoft, or Slack account. This means you no longer need to sign in with a username and password. Instead, on the Timebutler sign-in page you can click the sign-in button for Google, Microsoft, or Slack and you will be signed in automatically (Single Sign-On).

All three providers also support Two-Factor Authentication, giving you an additional way to sign in to Timebutler with an extra layer of security.

To enable automatic sign-in via a Google, Microsoft, or Slack account, sign in to Timebutler and click Settings > Integration in the bottom left.

If you do not see the option for automatic sign-in, an admin has disabled this feature. Admins can enable it by signing in to Timebutler, clicking Settings > More… in the bottom left, then Global settings, and enabling the SSO (Single Sign-On) via Google / Microsoft / Slack options.

Note: For data protection reasons (Schrems II ruling of the ECJ, July 2020), it is intentionally not possible to enable SSO and link all employee user accounts via a central company account — for example in Microsoft Azure. The ECJ ruling invalidated the so-called Safe Harbor agreement, meaning that each employee must individually give their consent to exchange data with US companies. Therefore, each employee must set up the SSO integration themselves rather than having it activated centrally via a company account.

FAQ: Enable SSO for all employees

Every user can enable Single Sign-On (SSO) in their own user account. For data protection reasons, admins and managers cannot enable SSO on behalf of other users (see the note at the bottom of this page).

Instead, as an admin you can view the list of users who have not yet enabled SSO and send them an email asking them to enable it.

Send the activation request

Sign in to Timebutler as an admin and click Settings in the bottom left, then Security beneath it. Under the Users without SSO heading, you can display all employees who have not yet enabled SSO. Below that, there is a button to send the activation request to these users.

Note: For data protection reasons (Schrems II ruling of the ECJ, July 2020), it is intentionally not possible to enable SSO and link all employee user accounts via a central company account — for example in Microsoft Azure. The ECJ ruling invalidated the so-called Safe Harbor agreement, meaning that each employee must individually give their consent to exchange data with US companies. Therefore, each employee must set up the SSO integration themselves rather than having it activated centrally via a company account.Sonnet 4.6

FAQ: Automatic session sign-out

When a user is signed in to their Timebutler account, they are automatically signed out after a period of inactivity. This automatic session expiry is intentional and serves security purposes: it reduces the risk of third parties accessing the account while the employee is away from their desk, and greatly reduces the attack surface for external threats.

To avoid having to enter a username and password every time after a sign-out, the following options are available:

1) “Stay signed in” option

When signing in to Timebutler, you can enable the Stay signed in option. The system will then sign you in automatically in future without requiring your username and password.

Note: This automatic sign-in requires cookies to be allowed in your browser, at least for timebutler.de. Cookies must not be deleted automatically when the browser is closed.

2) Single Sign-On via third-party providers

Sign in to Timebutler and click Settings > Integration at the bottom left. Here you can link your user account with a third-party account. No personal data is transmitted to the third-party provider — only a technical link is established. Once activated, you can sign in to Timebutler with a single click, without entering a username and password.

Read here how to activate automatic sign-in.

3) Longer usage period for the virtual time clock

If time tracking and the virtual time clock are enabled in Timebutler, the virtual time clock can still be used even after the user account session has expired. No additional configuration is required: the virtual time clock has an inactivity timeout that spans an entire working day. An employee can sign in to Timebutler in the morning, start the virtual time clock, leave the browser open, and operate the virtual time clock at any point during the day without needing to sign in again.

FAQ: Send welcome email

Send welcome email

Timebutler automatically sends a welcome email to new employees to prompt them to sign in to their user account. You have the following options for sending the welcome email.

When creating the user account

When you create a user account, you can use the Send welcome email with login credentials option to decide whether Timebutler should send a welcome email immediately.

If you enable the option, Timebutler automatically sends a welcome email with the login credentials to the employee and prompts them to sign in to Timebutler.

If you disable the option, Timebutler will not send a welcome email — and will not send any follow-up email to that user either, so you can finish setting everything up first. Timebutler will only send emails to the user once you decide to send the welcome email at a later point and the user signs in to Timebutler for the first time.

Send the welcome email later

If an employee has never signed in to Timebutler — for example because they did not receive the welcome email or deleted it by mistake — an admin can send the welcome email again.

To do this, sign in to Timebutler as an admin and click Employees in the top left, then Overview beneath the Employees subheading. For the relevant user account, click the Send welcome email button.

If the Send welcome email button does not appear, there are two possible reasons:

  • The user has already signed in to Timebutler at least once.
  • You already sent a welcome email to that user during your current session. In this case, sign out (click on your email address in the top right), sign back in, and repeat the steps above.

Sending the welcome email to many users at once: If you want to send the welcome email to a large number of users, you do not need to click the button for each user individually. Instead, you will find a Send all welcome emails button above the employee overview.

Resend login credentials for existing users

If an employee has already signed in to their Timebutler user account at least once, it is no longer possible to send a welcome email. If the user can no longer sign in, they should use the Forgot password function instead.

FAQ: Access restriction by IP address

An admin can restrict access to Timebutler to specific IP addresses. For example, by allowing access only from company network IP addresses, you can ensure that employees can sign in to Timebutler only from within the company network. The restriction can also be applied to specific users only, while all other users retain unrestricted access.

Restrict access to specific IP addresses

Sign in to Timebutler as an admin and click Settings at the bottom left, then Security below it. Here you will find the Restrict to IP addresses section, which shows the current setting and allows you to change or remove it.

Restrict access by IP address for specific users only

In the IP address restriction settings (see above), there is also an Apply to users option. Here you can select which users the restriction applies to and which users are exempt.

Remove restriction

To remove the IP address restriction, sign in to Timebutler as an admin and click Settings at the bottom left, then Security below it. In the Restrict to IP addresses section, click the Remove restriction button.

Note: With an IP address restriction in place, employees cannot access Timebutler unless they are within the company network. If your only goal is to prevent employees from starting time tracking on the punch clock from home or via smartphone, there is an alternative: the Restrict to the time tracking terminal option ensures that employees can only clock in at the office or workplace where the time tracking terminal on a tablet is available.

Warning: If you enter an incorrect IP address, or if the IP address changes later, your users will no longer be able to sign in to Timebutler. If the restriction is applied to all users, this can lock everyone out of Timebutler.

IP address restriction

User groups

FAQ: Multiple locations, multiple workspaces

If your company is divided into several legal entities or locations, you have two options for setting up the employees of all entities or locations in Timebutler.

1) Multiple locations in one user group

You can create all employees from all locations in a single user group. You can easily grant users from location A visibility permissions for (specific) users from location A only, and not for other locations. You can also grant users from location A visibility permissions for users from location B if needed. One exception applies: users with admin rights always see all users, including users across all locations.

2) One user group per location (i.e., multiple user groups)

Create a separate user group for the employees of each location. The employees of a location are then in their own, completely separate user group. In this setup, no user from location A can see any user from another location — not even admins.

Deciding between option 1 and option 2

Choose between the two options as follows:

  • If you need admin users who may only see employees from their own location and not from another location, you must choose option 2.
  • If the general settings can be exactly the same across all locations (absence type settings, all global settings, corporate design, time tracking settings), you can use option 1. If you need different settings per location, you must use option 2, because these general settings always apply to all users within a user group.

Once you have decided on option 1 or option 2, proceed as follows.

If you choose “1) One user group for all locations”:
Sign in to Timebutler with an admin account and simply create all user accounts for all employees across all locations. When creating the user accounts, fill in the Location field accordingly so that you can later filter by location, for example.

If you choose “2) One user group per location”:
For each user group, one person registers a new company in Timebutler, which creates a new user group. To do this, go to www.timebutler.de (if you are signed in automatically, please sign out) and click Register in the top right.

Note
If you choose multiple user groups but still want a specific person to have visibility across all users in all locations, this is possible: in each of the different user groups, an admin creates a new user account of type Admin for that person (different email addresses must be used, because Timebutler does not allow two user accounts with the same email address).

The person can then sign in with one of the user accounts to the respective user group of that location and view the different locations. To switch to another user group, they sign out and sign back in using the credentials of the other location.

FAQ: Merge multiple locations or companies

If your company is divided into multiple entities or locations, you may have created the employees of the different entities or locations in separate user groups in Timebutler. If you want to merge two or more user groups so that the employees of the different user groups end up in a shared user group, you have the following option:

Recreate the user accounts that should move from the “old” user group into the “new” (target) user group inside the target user group. From a cutoff date that you define, these users will only use the new user group, not the old one. The old entries up to that cutoff date remain stored in the old user group and can still be retrieved there.

Because email addresses cannot be used in more than one user account, you have two options:

  1. Create the new user accounts now without entering an email address. Later, remove the email addresses from the old user accounts and then lock those accounts. The email addresses are now free again and can be entered in the new user accounts.

  2. Create the new user accounts only at the cutoff date for the merge. At that point, remove the email addresses from the old user accounts, lock those accounts, and create the new user accounts in the target user group with the freed email addresses.

FAQ: Split companies or locations

If your company already uses Timebutler and a part of the company is sold or split into multiple entities, it is often necessary to separate the employee data. The employees of the existing company remain in the current user group, while the employees of the departing entity are moved into a new, separate user group.

Create new user accounts in the target user group for the employees who are leaving the “old” user group. From a cutoff date that you define, those employees will work exclusively in the new user group. Their previous data remains in the old user group and can still be viewed there.

Because email addresses cannot be assigned to more than one user account, you have two options:

  1. Create the new user accounts in advance and leave the email addresses blank for now. Later, remove the email addresses from the old user accounts and lock those accounts. The email addresses are then free again and can be entered in the new user accounts.

  2. Create the new user accounts only at the chosen cutoff date. To do this, remove the email addresses from the old user accounts at that point, lock those accounts, and then create the new user accounts in the target user group with the freed email addresses.

User accounts

FAQ: Former employees

When an employee leaves the company, you can lock their user account.

Locking prevents the employee from signing in to Timebutler. It also immediately disables all of the employee’s calendar subscriptions. This ensures the employee no longer has access to colleagues’ data.

The data is preserved, so you can access it later. Locked user accounts are also hidden from most views.

To lock a user account, sign in to Timebutler as an admin and click Employees in the top left, then Overview below the small Employees label. You will now see the list of your user accounts. For the relevant user account, click the padlock icon to lock the account.

Temporarily show locked user accounts

As described above, locked user accounts are hidden from most views. If you want to access the data of a locked user account at a later time, do the following: sign in to Timebutler as an admin and click Settings > More… > Global settings. Review or change the Show locked user accounts option.

FAQ: Create or change a department or location

Timebutler intentionally does not offer a central place to manage all departments or locations. Instead, Timebutler automatically derives the list of departments and locations from the values in the Department and Location fields in user accounts.

If you want to create a new department or location, simply enter it in the Department or Location field of an existing user account — or create a new user account. As soon as the value is saved in a user account, Timebutler automatically adds it to the list of departments or locations. The new department or location will then immediately appear in the filter options of the calendar view, for example.

You have the following options for entering a department or location in a user account.

1) Enter a department or location in an existing user account

Sign in to Timebutler as an admin and click Employees in the top left, then Overview below the small Employees label. For the desired employee, click the green pencil button (= Edit). Enter the new department in the Department field (or the new location in the Location field). Click the Save button at the bottom of the page.

2) Enter a department or location in a new user account

Sign in to Timebutler as an admin and click Employees in the top left, then Create user account below the small Employees label. Create the new user account and enter the new department in the Department field (or the new location in the Location field).

3) Change the department or location for many user accounts

If you want to change the department or location for many user accounts, editing each one individually would be very cumbersome. Instead, you can use the bulk edit option.

Sign in to Timebutler as an admin and click Settings > More… > Bulk change of user accounts.

Notes on adding departments

  • In Advanced viewing rights, you can grant individual users visibility permissions for, among other things, departments. You may want to grant visibility permissions for the new department to some users. To do this, sign in to Timebutler as an admin and click Settings > Viewing rights at the bottom left to grant the permissions if needed.
  • If you use the time tracking feature, you may have configured it to be enabled only for specific departments. In that case, you may want to enable time tracking for the new department as well. To do this, sign in to Timebutler as an admin and click Settings > More… > Time tracking. At the top, under Activate time tracking, you can see which departments time tracking is enabled for and add the new department.

Delete a department or location
Read here how to delete a department or a location.

FAQ: Delete department or location

Timebutler automatically derives the list of departments and locations from the values entered in the Department and Location fields in user accounts. There is no central place to manage the list of departments and locations.

To delete a department or location, remove it from the Department and Location fields in all user accounts where it is entered. Proceed as follows.

1) Identify user accounts with the department or location to delete

Sign in to Timebutler as an admin and click Employees in the top left, then Overview below the small Employees label. You will see the list of all user accounts. Click the green Show filters button in the top right.

In the filter, select the department or location you want to delete and click the Apply filter button.

You now see the list of user accounts where the department or location to be deleted is entered. You need to edit these user accounts and remove the entry.

2) Remove the department or location entries

There are two ways to change the values in the Department and Location fields:

Change or remove department or location for a single user account
In the user account, click the green pencil button (= Edit). Then change or remove the value in the Department or Location field.

Repeat this until the department or location to be deleted is no longer entered in any user account.

Change department or location for many user accounts
If you want to change the department or location for many user accounts, editing each one individually would be very cumbersome. Instead, you can use the bulk edit option.

Sign in to Timebutler as an admin and click Settings > More… > Bulk change of user accounts.

FAQ: Delegate feature

Timebutler has a substitute feature so that a substitute can approve requests while a manager is absent. Your managers probably already use this feature intuitively, as follows:

When a manager (or admin) enters vacation or sickness for themselves, they can also select a substitute. If, during the manager’s absence, one of their employees submits a vacation request (or another request that requires approval), Timebutler detects that the manager is absent and that a substitute was selected. The substitute then additionally receives an email with the request information and two buttons to approve or reject it as a substitute.

The substitute does not get full visibility permissions on the manager’s employees during the manager’s absence. Instead, they receive email notifications and can approve or reject individual requests directly from the email. The manager still receives the email with the employee’s request, even during their vacation or sickness.

You can find more information about the substitute feature by opening the input form for a new request and clicking the question mark icon next to the word Substitute.

Disable the substitute feature

Your company may have the substitute feature disabled. An admin can configure whether the substitute feature described above is active or not. Sign in to Timebutler as an admin and click Settings > More… > Global settings. Review or change the option Substitute selection.

Substitute selection required depending on absence type

You can configure individually for each absence type whether a substitute must be selected or not.

Useful notes about the substitute feature

  • The substitute selection also has a convenience option. In many teams, there is one person who often takes over as substitute. When entering an absence, you can activate an option in the substitute selection so that the chosen substitute is automatically preselected for future entries. This removes the need to select a substitute every time and ensures the substitute is preset.
  • If you want to see who approved a request, open the request’s detail view. The Processing history box shows, among other things, who approved the request, with a timestamp.
  • If a manager will be absent for an extended period — for example due to foreseeable long-term sickness or parental leave — you should temporarily assign their employees to a different manager. In that case, sign in to Timebutler as an admin, click Settings > Managers at the bottom left, and assign the employees of the absent manager to another manager. After the manager returns, you can assign the employees back.

Activate substitute selection
The substitute selection may be completely disabled. If that is the case, no substitute can be selected, and the substitute feature is therefore not available.

Check whether substitute selection is enabled. To do this, sign in to Timebutler with an admin user and click Settings > More… > Global settings. There you will find the option Offer substitute selection.

Screenshot: Offer substitute selection

FAQ: Assign multiple supervisors

You can assign one or multiple managers to each user. This lets you require two or more managers to approve a request, so a multi-level approval workflow is easily possible.

You can also configure whether, in the case of a multiple assignment, only one of the managers must approve the request or all managers must approve it. If all managers must approve, you can also specify whether the approvals should happen in a specific order.

How to set this up

Sign in to Timebutler as an admin and click Settings > Managers at the bottom left. At the top, in the blue box reading “You can assign one manager to each user. This is the simplest setting and helps all users to understand the software. You may activate the feature to assign more than one manager to each user: Activate now “, click the link Activate now.

You can now assign multiple managers to users on the page. To set the order of the managers, click the Employee list tab on the page.

As soon as at least one employee has two or more managers assigned, click Settings > More… > Global settings and review or change the following two options:

  • Several managers - approval
  • Several managers - approval order

Not for working time entries
If time tracking is activated and the time tracking settings require managers or admins to approve entries or changes, the following applies:

Any one of the assigned managers can process a request to change a working time entry. Approval from only one manager is sufficient, even if multiple managers are assigned to the employee. The multi-level approval workflow therefore intentionally applies only to approval-required absence entries (vacation, training, etc.) and not to change requests for working time entries.

Screenshot: Assign multiple managers

FAQ: Multiple substitutes

When you enter an absence, you can also select a substitute. You cannot select multiple substitutes here; you can only choose one.

There are two reasons for this. First, very few companies need to select multiple substitutes. Second, allowing multiple substitutes would make Timebutler much more complex: there are many settings related to substitutes, for example confirmation by the substitute, manager approval only after the substitute has confirmed, and others. With multiple substitutes, approval workflows would become more complicated, and individual substitutes could intentionally or unintentionally delay or block approval, thereby gaining indirect decision-making authority.

Another issue would be the display in various views. For example, the list view also shows the substitute and the status of the substitute’s confirmation. With multiple substitutes, the list views would become cluttered and fragmented.

You have the following option instead:

When you enter an absence, select the primary substitute in the designated field. Then simply add any additional substitutes as a note in the Notes field. When colleagues check the absence, they can see who else is acting as a substitute.

In addition, the Limits feature often helps:
You can configure that a certain number of employees must always be present in specific departments or user groups (or company-wide). Timebutler then ensures that not too many employees take vacation at the same time. For example, you can define that at least two employees from the “Sales” department must always be present.

You can set up limits by signing in to Timebutler as an admin and clicking Settings > Limitations at the bottom left.

FAQ: Multiple departments or locations for one employee

You can only assign one location and one department to each employee, not multiple.

As a rule, when people ask for multiple locations or departments, they don’t actually want to assign multiple locations or departments to a single employee — they have a different goal. Depending on that goal, you can achieve it as follows.

1) When filtering by location or department, an employee should appear under more than one selection

You can solve this by creating user groups. Sign in to Timebutler and click Settings > User groups at the bottom left, then create a new user group, for example named “Location Munich”, and add the users. (Note: if you select the Shared user group option, other users will also have access to this group.) Now create another user group, for example “Location Dortmund”, and add the employees.

You can add an employee to multiple groups. For example, you can add an employee to both “Location Munich” and “Location Dortmund”.

As soon as you have created the groups, Timebutler automatically shows an option to filter by user group in most views (green Show filter button at the top right).

2) Users should get visibility permissions for employees assigned to two or more departments or locations

For this case, first create the user groups as described in 1). Then sign in to Timebutler as an admin and click Settings > Viewing rights at the bottom left. You can now grant visibility permissions for the user groups.

3) Multiple managers should approve the requests of one or more employees

You do not need to assign multiple departments or locations to an employee for this.

You can assign one or more managers to each user account. Read here how to assign multiple managers to employees.

FAQ: Automatic deletion of unused user accounts

For data protection reasons, we automatically delete user accounts when the usage period has expired and no one from your company has signed in to Timebutler for 8 weeks.

Timebutler first sends a warning email, then another one a few weeks later. If no user signs in after either email, we will permanently delete all user accounts and the associated data. This also serves the interests of companies, so that data is not kept in Timebutler longer than necessary.

If you cancel Timebutler or do not extend the usage period, the 8-week period until the first warning email starts.

Prevent automatic deletion of user accounts and data

You cannot deactivate the deletion countdown or the related warning emails.

You can easily prevent data deletion and the warning emails in your company by signing in to your Timebutler user account regularly. The simplest approach is to set a reminder every 4 weeks to sign in to Timebutler.

A single sign-in is enough: it resets the deletion-warning countdown for all users in your company.

Please note
The General Data Protection Regulation states that data must not be collected and stored unnecessarily. If you do not use Timebutler, you should delete all data in Timebutler within a reasonable time.

FAQ: Employee rejoining the company

If an employee has a user account in Timebutler, leaves the company, and returns after some time, proceed as follows.

1) Lock the old user account
Lock the existing user account, if you have not already done so. To do this, sign in to Timebutler as an admin, click Employees in the top left, then Overview below the small Employees label. For the relevant user account, click the padlock icon and lock the account.

2) Remove the email address
Now remove the email address from the user account. As an admin, click Employees in the top left, then Overview below the small Employees label. For the relevant user account, click the magnifying glass icon (= detail view). On the page you will see, among other things, the user’s email address, with a remove link next to it. Click the link and follow the instructions on the page to remove the email address. The user account and all of its data remain intact.

3) Create a new user account
Then create a new user account for the returning employee using the same email address. There will then be two user accounts for the same employee: one user account without an email address, where all of the old absence entries and data remain stored and retrievable, and a new user account that the employee can sign in to.

FAQ: Delete user account

To delete a user account, do the following:

Sign in to Timebutler as an admin and click Employees in the top left, then Overview below the small Employees label. For the relevant user account, click the red trash can icon. On the next page, confirm the deletion.

Permanent deletion
For data protection reasons, Timebutler deletes the data irreversibly. This includes the user account and all of the user’s records, such as absence entries, overtime and working time entries, vacation entitlement data, edit history, user settings, and so on.

If you still need the data, download it via the Download Center before deleting. Instead of deleting the data, you can also suspend the user account.

If you deleted a user account by mistake, in exceptional cases and within a limited period after deletion we can restore a deleted user account.

Screenshot: Delete user account

FAQ: Restore a deleted user account

For data protection reasons, when you delete a user account, we remove it completely and irreversibly. However, we create backups of all data every 24 hours and keep these backups for a few days. The deleted user’s data may therefore still be present in the backups and can be restored from there.

To do this, we need to extract the data from the backup and import it into Timebutler. We also have to ensure that the data integrates without conflict with the existing customer’s data and is correctly linked and assigned. We charge for the effort involved in the restoration. You will receive a non-binding quote on request.

To check whether a restoration is still possible, we need the following information:

  1. The email address of the user account that was deleted and should be restored.
  2. The approximate date of deletion (ideally the exact date — we send an email to the admins when an account is deleted).

Send us a request via our contact form with these two pieces of information. We will then check free of charge whether the user account can be restored from the backups and let you know the cost of the restoration.

FAQ: Error message Email address already exists

If, when creating a user account or changing an email address, you see the error message that a user account with the specified email address already exists, you cannot create the user account.

If you do not find a user account for that email address in the employee overview, it means the person previously created their own user account. This user account is completely separate from your user group, so you do not see it.

To create a new user account with the desired email address, the existing user account must first be deleted. The owner of the user account proceeds as follows:

  1. Go to Timebutler and sign in (if not signed in automatically). If you no longer know the password, click the Forgot password link on the sign-in page.

  2. Click Settings > My profile at the bottom left.

  3. On the next page, click the Delete user account button and follow the instructions on the page to delete the user account. Note: this permanently deletes the user account and all associated data.

Once the user account has been deleted, you can sign in to Timebutler and create a new user account with the desired email address.

FAQ: Change email address

You can change the email address on an existing user account in the following ways.

Employees change their own email address

To change your email address, sign in to your Timebutler user account and click Settings > My Profile. The page shows your email address with a Change link next to it. Click the link to open the form for changing the email address.

For security reasons, you must enter your current password to change the email address. If you no longer know your password, you can set a new password.

Bulk change for many or all employees

Sometimes the email address changes for many or all employees, for example when the company name changes. The email addresses then change, for example, from firstname.lastname@companyname.com to firstname.lastname@new-companyname.com.

You can change many email addresses with just a few clicks: sign in to Timebutler as an admin and click Settings > More…. Click the Bulk change of user accounts heading on the right. Click one of the links in the Email box and follow the instructions on the page.

Admin or manager changes the email address

As an admin or manager, you can initiate a change of the email address for a user account. The affected user then receives an email with a link to confirm the change. Timebutler only applies the change to the user account after the recipient has clicked the confirmation link in the email.

To initiate the change, sign in to Timebutler as an admin or manager. Click Employees in the top left, then Overview below the small Employees label. For the relevant user account, click the blue magnifying glass icon (= detail view). Next to the email address, you will now find a Change link. Click the link to open the form for entering the new email address.

User has no access to their emails?
If the user no longer has access to the email inbox, they cannot open the confirmation email and therefore cannot confirm the change. In this case you have two options:

  1. The user changes the email address themselves in their own user account; see the top of this page.
  2. Send us the old and new email address by email or use our contact form. After a brief review, we will make the change for you.

FAQ: Add profile picture

For each user account, Timebutler automatically assigns a profile picture with a person icon in a random color. Once assigned, the color does not change for a user account — unless the user selects a different color.

The color has no special meaning. The unique color assignment makes it easier to recognize user accounts over time, since the same color is always displayed for a given account.

Upload a profile picture

Every user can change the color of their person icon or upload an image to replace the profile picture.

To do this, the user signs in to their Timebutler account and clicks “Settings” at the bottom left, then clicks “Your account” below. Next to their name, the current profile picture is displayed. Clicking the profile picture takes the user to the editing form for the image.

Allow display of profile pictures

An admin can configure whether profile pictures should be displayed or not. To do this, sign in to Timebutler as an admin, click “Settings” at the bottom left, then click “More..” below. Now click “Global settings” at the top right. Here you will find the “Show profile pictures” option.

Only upload your own profile picture

Every user can only upload and edit their own profile picture. It is not possible to upload or change the profile picture for other users — even admins do not have this option.

Email delivery

FAQ: Emails are not delivered

If a user does not receive any emails from Timebutler, or only some emails, there can be various reasons.

General causes

Email delivery disabled
The affected user may have disabled email delivery. Check whether email delivery is enabled or disabled for the user.

Email address incorrect or no longer valid
An incorrect email address may have been entered in Timebutler, or the email address may no longer be valid. Check whether the email address is entered correctly and whether the mailbox still exists and can receive emails. If the email address is incorrect, you can change the email address.

Spam folder
Emails may be classified as spam and delivered to the user’s spam folder. The affected user should check whether the emails are in the spam mailbox.

Notification emails about absence entries

No email for self-entered requests
If a manager enters a request for one of their employees, Timebutler intentionally does not send the notification email about the new request, because the manager entered the request themselves. In the edit history you can check whether the manager entered the request themselves.

Vacation request not yet submitted
If an employee creates a vacation request or another approval-required absence but does not set it to the status Requested and instead leaves it in In progress, the request remains with the employee and has not yet been submitted to the manager. In this case Timebutler does not send an email, because the manager cannot approve the request yet. Check whether the request is in the status Requested or has not yet been submitted.

No emails to managers when they have no approval rights
In Settings > More… > Global settings (sign in as an admin) there is an option Managers may not accept absence requests. If you disable this option, Timebutler does not send emails to managers for new approval-required requests (but it still sends them to admins), because managers have no approval rights.

Emails are sent only after the substitute confirms
Timebutler does not necessarily send the notification email to the manager immediately after a request is submitted. If the option Send approval email after substitute accepted is enabled in Settings > More… > Global settings (sign in as an admin), Timebutler does not send the email immediately after submission, but only after the selected substitute has accepted the substitution.

Send approval email after substitute accepted
A manager is on vacation and has selected a substitute. If one of the manager’s employees submits an approval-required absence, Timebutler sends an email to both the manager and the substitute. However, Timebutler only sends the email to the substitute if all of the following conditions are met:

  1. The substitute must be an admin or a manager. If the substitute is an employee user, they do not receive an email (among other reasons because employees have no authority to give instructions and generally may not approve requests).
  2. The option Approval for substitute, option 2, must be enabled in Settings > More… > Global settings (sign in as an admin).
  3. The requester must have exactly one manager assigned. If the requester has multiple managers assigned, Timebutler does not send an email to the substitute.

Technical issues with email delivery

Mail server refuses delivery
In some cases the mail server refuses to accept emails from Timebutler and does not deliver any of them. Please contact your IT or mail server admin and have them check whether emails from Timebutler (timebutler.de and timebutler.com) are being blocked or filtered out.
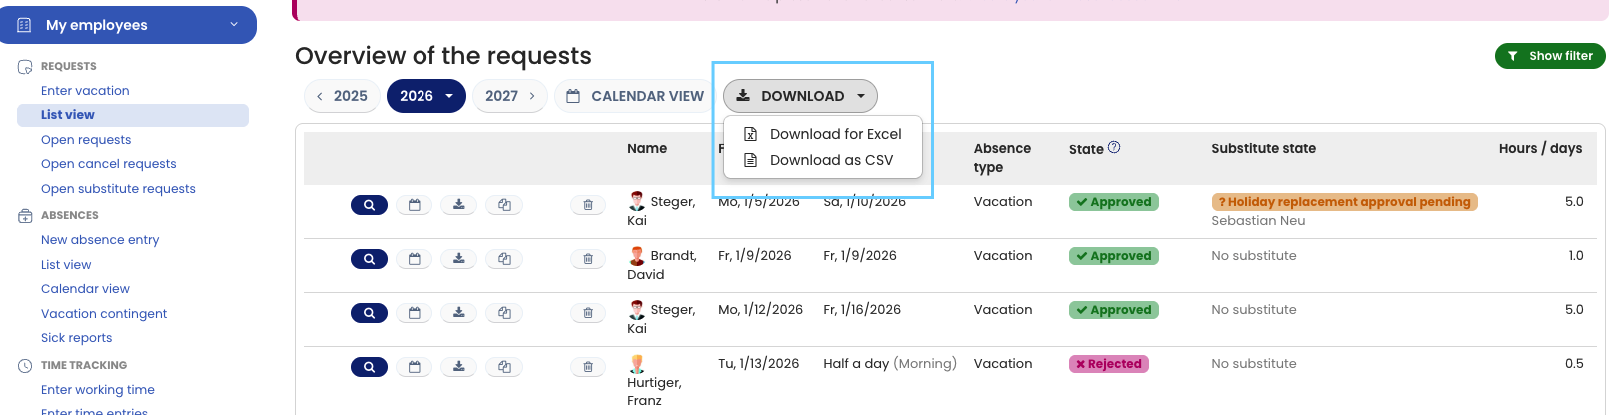
Sender blocked / blacklist
If the recipient has configured their email program to block or delete emails from our sender addresses user@timebutler.de / user@timebutler.com and access@timebutler.de / access@timebutler.com, the emails will not be delivered either. The user should therefore check their email program for such a block. The settings vary depending on the email program, so we cannot provide a specific click path here.

Other causes

In over 22 years, one of the reasons listed above has been the cause in almost every case where emails were not delivered. If you still need further help, please contact our Support and include the email address for which the problem occurs. If this is your own email address, please also provide your phone number, because our email reply may also fail to reach you.

FAQ: Email delivery status

Timebutler sends email notifications to users for various events, for example:

  • Information for the manager about a new vacation request that needs to be approved
  • Request to cancel a vacation request
  • Notification about a change to the email address

Each user decides whether to enable email delivery or disable email delivery.

Check your own delivery status

To check whether your own email delivery is enabled or disabled, sign in to your Timebutler user account and click Settings > My profile. The email delivery status is shown on that page.

Check another user’s delivery status

If, as an admin or manager, you want to check whether another user has enabled or disabled email delivery, sign in to your Timebutler user account and click Employees in the top left, then Overview below the small Employees label. For the relevant user account, click the blue magnifying glass icon to open the user account detail view. The current email delivery status is shown on this page.

FAQ: Disable email delivery

Disable email delivery

Timebutler sends email notifications to users for various events. Emails are kept to a minimum and are only sent when a notification is important or when the user needs to take action.

Disable email delivery

You can disable email delivery in two ways:

1) Link in the email In every Timebutler email, you will find a Disable email delivery link in the footer. Click the link. A page in Timebutler will open. If you are not already signed in to your Timebutler user account, you will be prompted to do so. Sign in, and you will receive confirmation that email delivery has been disabled.

2) Change in your user account Sign in to your Timebutler user account and click Settings in the bottom left, then Your user account beneath it. On that page you will see the current email delivery status and a button to enable or disable email delivery.

Disable email delivery for another user

Each user decides for themselves whether to receive emails (see above). It is not possible for one user to change email delivery settings for another user — not even for admins. The user must sign in to Timebutler themselves and change their own email delivery setting.

Email delivery disabled, but you still receive emails

If you have disabled email delivery but are still receiving emails, there are two possible reasons:

  • Even with email delivery disabled, Timebutler will continue to send certain essential emails. This includes, for example, the password reset email so you can regain access to your user account.
  • Your email address may still be listed as a recipient of copy information emails. Ask an admin to check whether you appear in the list of recipients of copy information emails.

Do you want to check whether email delivery is enabled or disabled? Read how to check the email delivery status.

FAQ: Enable email delivery

Timebutler sends notifications by email to users for various events. Each user can disable email delivery.

Enable email delivery

If you previously disabled email delivery but now want to receive emails again, sign in to your Timebutler user account and click Settings > My profile. On this page, you can see the email delivery status and a button to enable or disable email delivery.

Enable email delivery for another user

Each user decides whether they want to receive emails or not. It is not possible for one user to change another user’s email delivery — not even for admins. Instead, the user signs in to Timebutler and changes the email delivery setting themselves.

Emails are not delivered
You enabled email delivery but still do not receive emails? Read how to proceed when emails are not delivered.

Enable privacy mode for the email subject

You can decide how much detail is shown in the email subject line.

Sign in to your Timebutler user account and click Settings > More… > Global settings. There you can review or change the option Email subject privacy mode.

Examples

Without privacy mode:

  • Subject: “Your request has been approved (Vacation (12.02.–16.02.)) – Max Mustermann”
  • Subject: “Please approve: 5 x Vacation – Max Mustermann”

With privacy mode enabled:

  • Subject: “Your absence request has been approved”
  • Subject: “Multiple absence requests: 5 for Max Mustermann”

Holidays

FAQ: Public holidays

Companies worldwide use Timebutler for vacation planning and absence management. You need to configure the holidays of the relevant country and region that apply to each employee.

Read here how to assign Holiday calendars to employees.

Read here how to create and assign Holiday sets for any countries and regions.

FAQ: Add Christmas Eve, New Year's Eve, Women's Carnival Day, and more

You can define the applicable holidays for each employee.

You can also assign any additional holidays, for example Christmas Eve, New Year’s Eve, or St. Patrick’s Day. These are not statutory public holidays, so they are not part of the Holiday sets already stored in Timebutler.

Read here how to add additional holidays like Christmas Eve or New Year’s Eve.

FAQ: Public holiday rules for additional countries

Timebutler provides Holiday sets for the German federal states, Austria, Switzerland, the UK, and the USA.

You can, of course, use Timebutler for employees worldwide and also add Holiday sets for other countries. Read here how to set up Holiday sets for additional countries and assign them to employees.

Invoices and accounting

FAQ: Have invoices sent automatically

You can set it up so that new invoices are automatically sent by email to your preferred email address.

Read here how to configure the delivery of new invoices.

FAQ: Download invoice

All invoices we issue are available in your Timebutler user account at any time, and you can download them.
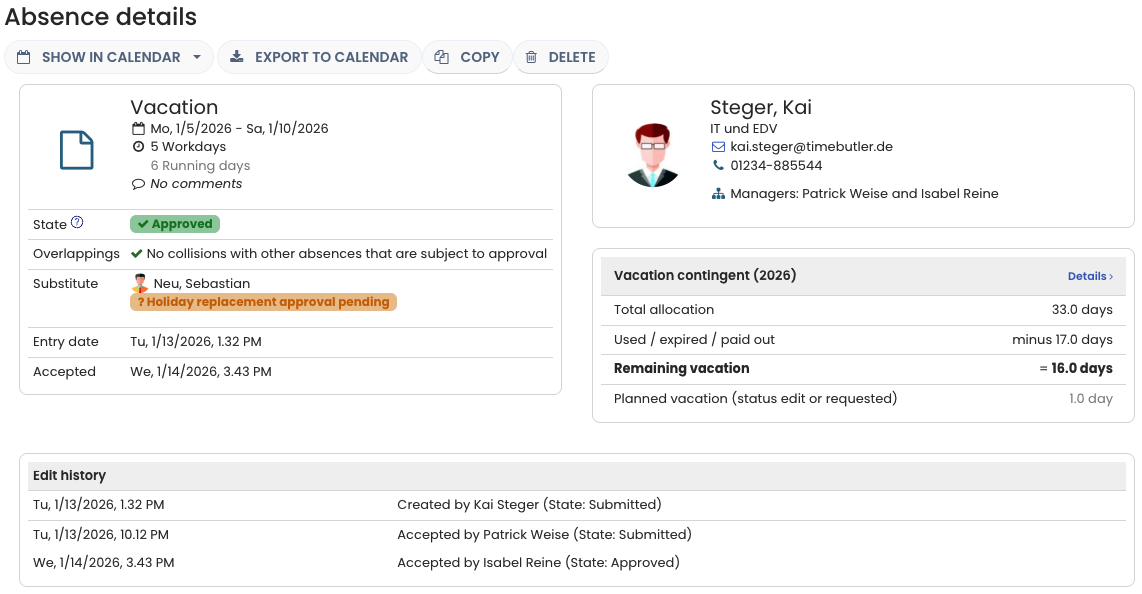
Read here how to download invoices.
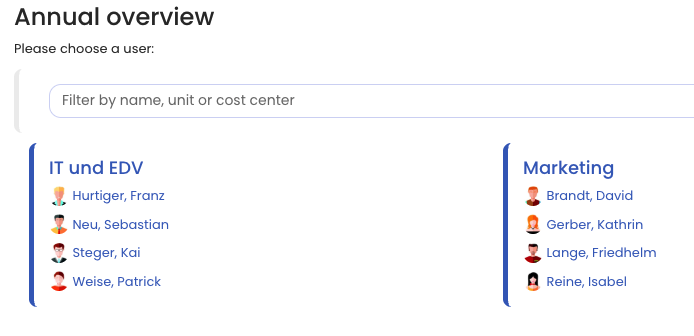
FAQ: Missing invoice

Read here how to proceed when an invoice is missing.
FAQ: Change billing address and company name

Has your company been renamed or do you have a new billing address? You can easily update the address online in Timebutler.

Read here how to change the billing address for future invoices.

Read here how to have an existing invoice corrected.

Support

FAQ: Support and contact options

Here you can find support information.